Tutorials
Weight Maps
Alternative Methods
of using Bones and WMaps
Advanced IK Setups
Set Driven Key Basics
Assigning Motion Capture
Customizing Lightwave
Lightwave Basics

Gallery

Links
Flay
VisualFX Pro
The Lightwave Mailing List
Lightwave Tutorials on the Web
About me
Set Driven Key is an easy way to setup relationships between any number of items (cameras, lights, bones, and objects) to make managing complex motions or objects much easier. Set Driven Key is actually a canned Expression that takes out alot of the work involved in setting up an Expression. This tutorial covers how to setup some fingers. You can see a movie of the setup in action here.
Note: Set Driven Key in 6.0b is a little flaky. First of all, it doesn't update in Real Time. You have to make keyframes first to see the result. This makes getting just the right balance a little tedious. Secondly, once you setup a relationship, moving anything in the scene will cause all the items which have Set Driven Key assigned to them to start rotating wildly. It doesn't cause any harm, but it sure does look weird.
First thing you need to do is make a Null object so we start throwing in some Bones. Make a quick Hand skeleton like the one shown in Figure 1.
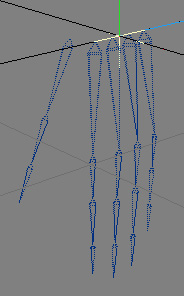 Figure
1
Figure
1
Next, add 4 Null objects (one for each finger) and place them somewhere that is readily accessible. Figure 2 shows the Nulls set off to the side on the X axis and roughly in-line with each finger.
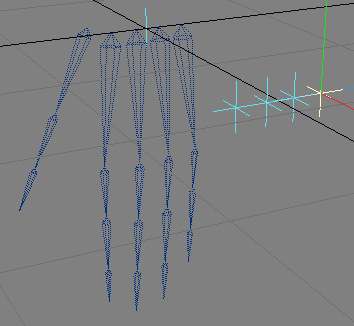 Figure
2
Figure
2
Now we're going to start assigning Set Driven Key to each Digit of each Finger. Select the first Digit of the Index Finger (don't confuse the first digit with the Bone in the Palm!), and open the Graph Editor. Pick the appropriate Rotational Channel (in this case it's Heading). Click on the Modifiers tab, Add Modifier, and choose Set Driven Key.
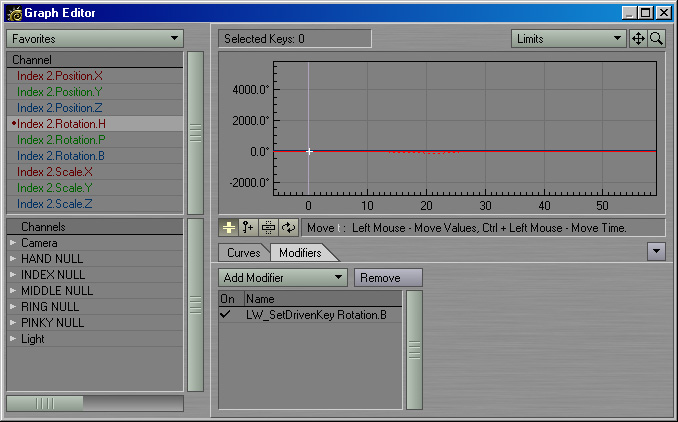 Figure
3
Figure
3
Double-click where it says LW_SetDrivenKey in the Modifier list. This brings up the Set Driven Key interface. It looks pretty straight forward, huh?
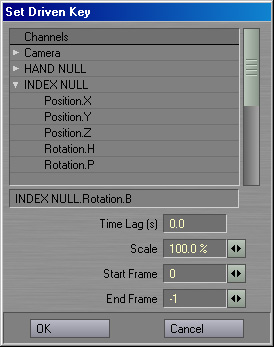 Figure
4
Figure
4
At the top, you can browse through all the elements in your scene and choose the Channel you wish to be the driving force behind your Bone. Expand the Index Null and choose Rotation.B by double clicking on it.
Time Lag does exactly what it sounds like. The effect will lag behind by the amount of Time you enter. Leave it at 0.0.
Scale determines how much the Null will affect the Bone. For example, at 100%, 1 degree of rotation on the Bank will equal 1 degree of Rotation on the Heading. At 50%, 10 degrees will equal 5 degrees.
Note: if you set up movement on an axis to drive rotation, remember that 1m equals 1 degree of rotation at 100%. That means you'd have to move the Null object 45m to get a 45 degree angle! If you boost the scale to 1000%, then would only have to move the Null, uh, 4.5m (math...numbers...brain failing...anyway you get the idea).
Leave the Start and End Frames at 0 and -1. This means that your Bone will always be affected by the Null.
Hit OK, now you will see a checkmark in the Modifier List under the ON column. Also notice that the Heading Channel in the list on the left has a little dot next to it. This indicates the Channel has a Modifier.
Go back to Layout and make some keyframes for the Index Null. Hopefully the first digit of the Index finger is rotating in parallel with the Null. That's all it takes to setup a Set Driven Key. If your finger is bending the wrong way, then go back to the Set Driven Key Options and change the Scale from 100% to -100%.
Now we need to assign the other digits of the Index Finger to Index Null. Follow the same steps to assign the 2nd and 3rd digit's Heading Channels to the Null's Bank. After you get that set up, go back and look at the original keyframes you made. You now see the whole finger bending.
Set up the rest of the Fingers in the same manner, attaching each finger's digits to its respective Null Object.
Taking Set Driven Keys Further
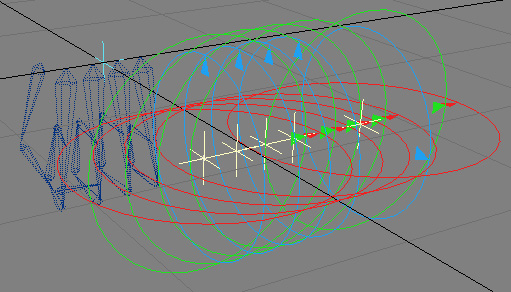
You could add a 5th Null that controls all four fingers if you want to clench the hand into a fist. Just add another Set Driven Key modifier into the list and point to the new Null. Figure 5 shows the 5th null controlling the 4 fingers.
 Figure
5
Figure
5
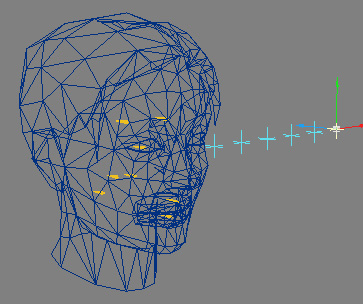
The Facial Animation Test Movie in the Gallery is a series of Set Driven Keys setup to controll the various Bones in the Face. You can setup multiple deformations to take place at once. For example, the first Null on the left drives the Jaw Bone. The Upper and Lower Lip Bones are driven by the same Null's X Scale, and the Null's OWN X scale is driven by it's height on the Y axis. So as the Null moves up, it lowers the Jaw, but also scales itself down on the X axis, thus scaling the lips and making an O out of the mouth. Figure 6 shows the setup.
 Figure
6
Figure
6