Tutorials
Weight Maps
Alternative Methods
of using Bones and WMaps
Advanced IK Setup
Set Driven Key Basics
Assigning Motion Capture
Customizing Lightwave
Lightwave Basics

Gallery

Links
Flay
VisualFX Pro
The Lightwave Mailing List
Lightwave Tutorials on the Web
About me
This tutorial will show you how to apply your character to the Jog.lws file found on your LW6 CD (under Scenes/Character/MotionCapture). You will learn how to work with an existing skeleton, changing the proportions to fit your character without losing the Motion Capture Data.
Before we start, load the Jog.lws scene in Layout and scale your character to fit the general size of the skeleton. Make sure your character is facing down the +Z axis too. After your character closely fits the skeleton, save out the object with the Save Transformed option as a new object file and clear the object from the scene.
You should also download the ActivateAll and DeactivateAll Bones Plugins from www.lightwave6.com.
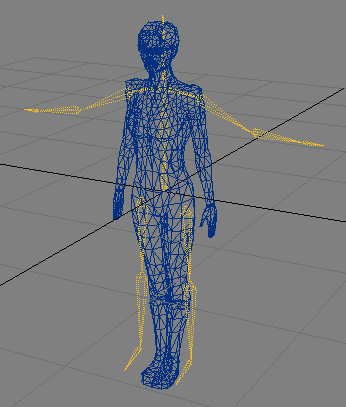
Select the Null Object to which all the Bones are attached to. Replace with Null with your new character model, and deactivate all the Bones. Figure 1 shows the default skeleton and the character we are going to attach it to.
 Figure
1
Figure
1
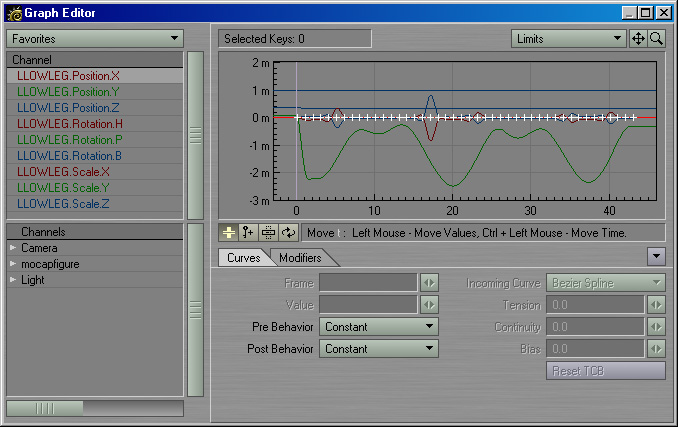
The first thing to notice is that every Channel of every Bone has Keyframes on every Frame. For example, select one of the LowerLeg Bones and open the Graph Editor. You'll see on the X Position Channel that it has a Keyframe on every frame with the same value (Figure 2). Let's say we had to move the Lower Leg bones up a little because the Knee joint is too low. If we move the LowerLeg Bone on Frame 0 and make a new keyframe, Record it's Rest Position and reactivate it, the LowerLeg will snap back to original position when we go to Frame 1 because it has a Keyframe for it's position on every Keyframe.
 Figure
2
Figure
2
So, our first task will be cleaning out redundant Keyframes so we can do whatever we want to the Skeleton on Frame 0 and have our changes carry over through the whole animation. Thankfully, in LW6's Graph Editor this is alot easier than in LW5.6, though not as easy as it should be. What we need to do is load in the X, Y, and Z positional Channels of every bone in the skeleton EXCEPT the Root Bone into the Graph Editor so we delete all the extra Keyframes at once. The reason we don't want to mess with the Root Bone is because that is the Bone which is causing our character to move around.
To load all the Channels into the Graph Editor, first remove any Channels which are being displayed by selecting the Channel at the Top and Shift-clicking on the bottom Channel. You can also use CTRL to individually add or remove Channels from the currently highlighted list. Right click on the highlighted list and choose Remove From List (default keyboard shortcut is "Shift-d").
Now we want to start adding the positional Channels for the Bones to the list. The bottom section shows an expanding tree of everything in your scene. Expand your character object to see all the Bones (you'll need to scroll down a bit). Expand each Bone one at a time and select the X, Y, and Z channels and drag them into the upper list (Remember, all of them EXCEPT the Root Bone, which happens to be called LOWERTORSO). Once you are finished, you should have a long list of X, Y, and Z Channels for all the Bones.
Now, select the entire list and goto where it says Limits at the top right. Select Automatic Limits (this will fit all the motions into the graph view). Now right-click and drag a box over all the keyframes between frame 1 and last keyframe and hit DELETE. Poof! There go all those unecessary keyframes.
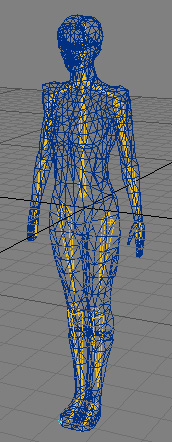
Now that all those Keyframes are gone, we are free to do whatever we want with the skeleton at Frame 0. We can move Bones around, resize them, rotate, whatever we need to do to make our character fit. Just do not under any circustance EVER SCALE A BONE! ALWAYS use Rest Length to change the size of a Bone. Figure 3 shows the skeleton fit to my character.
 Figure
3
Figure
3
Notice that the some of the Bones no longer touch end to end. And that the shoulder Bones are rotated slightly downward. If you look closely at the original Frame 0 you will notice the Shoulder Bones are out straight, but if you look at the animation, you will see the Shoulders rotated slightly downward. If you left the Shoulder Bones straight out and just rotated the Arm Bone down you will notice the Shoulders slump down too far when you attach your model and watch the animation. It's important to watch how the skeleton looks during the animation to determine how a Bone should be positioned at Frame 0. If your character has its arms at it sides, you should find a frame where the arm is at the side to determine how your Frame 0 should look.
The next step is attach Weight Maps (if any)to your Bones. To learn about making and applying Weight Maps, go here. Otherwise its time to turn on all our Bones. Before you start activating the Bones, its a good idea to make a keyframe for them just in case. Starting at the Root Bone, Record each Bone's Rest Position one at a time. It's very important to start at the top of the chain. To Record Rest Position press "r" (Don't confused this with "Ctrl-r" which is a different function).
Goto Frame 1. You should now see your character attached the Bones, posed at Frame 1. Figure 4 shows Frame 1.
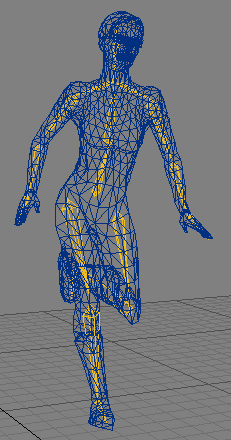 Figure 4
Make a preview and see how well your character looks. It probably doesn't look too good, but it's a start. Potential problems are the Neck (is the head tilted too far back or forward), the Shoulders (are they hunched down or up too much), and the Feet (do the bottoms lie flat on the ground or do they twist?). As you scroll through the Keyframes pay close attention to the Feet when they hit the Ground. Do they slide or do they stay solid? Keeping the Feet solid will the topic of the next tutorial.
To change a Bone, you should DeActivate all your Bones, make the necessary changes, make keyframes to record the changes, and then Rest the Bones ("r") from top to bottom. I'm not too keen on the ActivateAll plugin yet...sometimes your model will freak out if the Bones are not Rested or Activated in the proper order.
Lets say when you look at your character the Head is tilted too far back. You could adjust the Keyframes for the Heads Rotation on every frame, or you could adjust the rotation of the Head Bone at Frame 0. Compare where Head Bone is during the animation in relation to your geometry and figure out where the geometry should be. Then goto Frame 0, and rotate the Head Bone to the appropriate place. When you look at the animation again, your Head should be in the right place. Follow this same procedure to fix stuff like where the knees and elbows bend.
To move around the whole animation, parent your Character Model to a Null object and move the Null object to move the entire animation.
To swap out your character with a new character, just follow the same steps. Replace your character with the new one. Deactivate all the Bones. Move em, Scale em, Rotate em until you're happy, and you're done! Just make sure your new character has the appropriate Weight Maps, etc.
The next tutorial will cover how to make this animation loop in place and make the feet stick.