Home
My Airplanes
Where I used to fly
R/C Sukhoi 26mx
Other People's Sukhois
Download
View Guestbook
Sign Guestbook
Copyright notice
Links page
About Me
Stuck in someones frames? Click here to escape.
Website maintained by Erik Middeldorp
From: "Jarmo Laine"
14.Sept 2001 (resending 7th october 01)
Finally I have had time to write few words about this project, which I find very interested. Thanks to you. I am going to write few words of the blue prints, wood and balsa parts, glass fiber parts, assembly, covering and last but not least the first flight.
Blue Prints
In my opinion blue prints for this project were better than average. I down loaded prints to normal 3,5" disc and I took it to the architect print company. They had large printers and tool needed to open this file and it was good that on the prints you find the scale in mm to get exact right size of the print. Only in few occasion I had to ask help to interpret blue print. I have experience to read blue prints and even without that experience you can read these blue prints. The parts on the prints were well marked which help significantly on assemble process.
Wood and Balsa parts
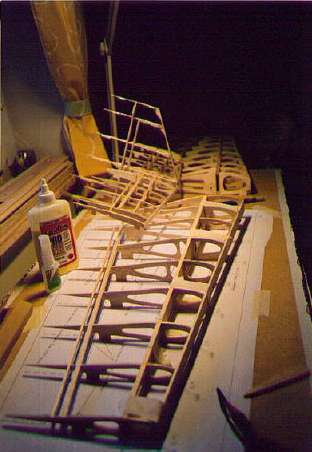
It was slow process to cut all the parts. I draw all the to balsa and plywood by using a ‘copy’ paper between the blue print and balsa or plywood. This was very slow process, but if you do this well and you cut by using extreme precision you will find that in a long run it pays off! I bought an electric Dremmel saw to cut plywood and even some balsa parts. It was worth to invest. If you follow blue print sizes on the parts well you don’t have any problems to fit parts together.
I made some adjustment (reinforcing) to some areas of the tail plane. I add reinforcement to the stabilizer, just 2X2 mm wood parallel to L.E of the stabilizer. This was only because I though to eliminate flutter in possible high speed flying and to add strength on advance maneuvers.
By my own mistake I chose slightly ‘wrong’ type of balsa for covering the wings. I recommend using harder type of 1,5mm balsa to cover the wings. I used soft balsa and It was extremely difficult to get surface of the wing even. For the wing join I used thin plywood on both, fuselage and wing, sides to make it more strong because of attaching and removing wings from the fuselage.
Glass fiber parts
I started with landing gears, I made a plug like on instructions I find on Eriks WEB-site. I had very little experience by working with glass fiber. Everything went well and after several hours of finishing work I had beautiful landing gears. Unfortunate I never used this landing gear on my SU26! I was afraid that it would not hold on landing. I made them probably too thin and they were too flexible. Next time I know how to make it. I managed to get my hands to 3mm dural aluminum (strong aluminum) and I made landing gear out of that.
The ventilation holes on the cowling, I call them cowl flaps in this story, was another eternity project! I had so many different ideas in my head how to make them, and finally I made them out of glass fiber. But how, that’s another story. First I bent out of thin aluminum plate a form of one cowl flap. Then I bought hobby clay. I made a platform on same curvature like the engine cowl was. Then on this platform I made forms of cowl flaps by using this aluminum plate I bent. The longest set of cowl flaps is 8 piece, so I made this form with 8 cowl flaps. This clay was easy to sand and I was able to make final touch to it after it was dry. I varnish this plug and sand it few times. Then I took 2 component silicone, mixed and place it in a small box, slightly bigger than my cowl flap plug. I placed this plug up side down on the silicone and let it harden. Then I removed plug and now I had a ‘female’ plug out of cowl flaps set of 8. In to this plug I mould glass fiber, very thin, in many layers. I reinforced them later with carbon fiber. When my cowl flaps was harden I removed them from the silicone plug and made openings for air ventilation. I made right size of rectangular holes to engine cowl and glued these cowl flaps on its place. There is a picture also of this plug on this email. Before I clued cowl flaps on their respective places I spray putty these and sand them to finishing quality.
I made also a canopy plug out of blue foam. Then I cover that with glass fiber and then I spray putty that too. I sanded the surface to fine quality. I made this canopy form longer on the bottom edges for forming reason the PC plastic on it. I made a wooden frame larger than this canopy plug. I placed PC in this frame and warmed up in an oven and then I pushed this frame over this canopy form. The reason I made this form slightly bigger was that it gave me a possibility to have nice edge to the canopy after cutting it to the right size.
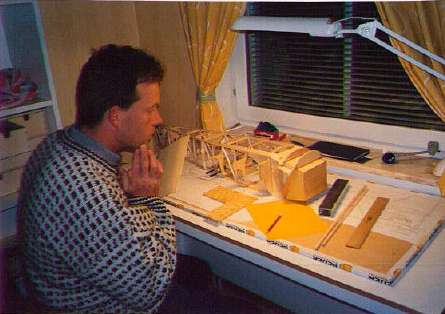
Assembly
Covering
I changed my mind many time during this project what I am going to use for covering. Finally I made up my mind and I covered wings with Monokote and I painted fuselage. As you can understand to cover wings with Monokote is fairly quick. But again fuselage!! I spent so many hours on this project that I didn’t want to fail to cover fuselage. I covered entire fuselage by thinnest glass fiber cloth I find. 25gr. Then I sanded carefully and then I spray putty it too. After about 1 week sanding and adding putty I got the surface of the fuselage good enough. (I can be very picky sometimes)
Then I spray painted with Monokote paint to match wing color. I used the painting schema out of my company airplanes painting! The company I am flying is called ‘Britannia’ I sent this text form to Finland to a business of my friend. Then he scanned the text and color of it and by a special machine he cut the text for me whom I placed on the wings and fuselage of my SU26. A Company logo I draw on the paper and placed it on self-adhesive Monokote and cut it out with hobby knife. You can see all these by looking pictures in this Email.
This project took me several hundreds hours to finish. I don’t even want to count! But, after all it was worth. I had something to do during long winter nights. Sometimes my wife ask me; ‘Did you forget to come and sleep last night?’ I went to sleep on many mornings like 05.00AM.
First flight
This was full of excitement and also a tragedy!! But, I was lucky and I had my plane in one piece after the first evening. I had my friend with me on this evening. He is more experience RC-pilot then I am.
I was nervous of course. I checked everything prior to first flight of course. We measured the C.G and I knew it was on the aft limit or even slightly behind it! I thought, well I think I can handle that, let’s fly. I can tell you already now that I am never ever going to make this mistake again.
I have O.S 91 Surpass II on my Sukhoi with 14-7 3-blade prop. This engine is so reliable and therefor I placed that on my SU26. But, with this propeller I find out later that it’s not that powerful. Well, let’s go flying.
I taxi out and it felt so good. I decided to accelerate plane few times on the runway and then abort take-off, just to have a feeling of it characteristics. On my second acceleration plane lifted about 30 cm, but I bring it back to ground. Taxi back and it was time to take-off. I made some small adjustment by trim to trim it slightly nose down. I didn’t want to get it airborne in too slow speed by him self to avoid possible stall when it leaves the ground effect.
I opened the throttle slowly and I got it airborne. It started to climb, too steep. I called my friend next to me to trim nose down. I was already more than vertical about 15 meters high. As soon as I corrected with elevator airplane became very, very unstable. Now it was inverted. It kept pitching up and now we are nose down towards the ground. I was too concentrated to get scared! I decided to increase speed slightly while nose down (10 meters height). Then I pull back power and slightly controlled up elevator. I got airplane straighten level flight but very unstable. It was riding on the waves!!! I cut the power and kept wings level and let it land on high grass. This high grass saved my SU26. Now my heart started bouncing. I find my plane in one piece and then we had a long discussion with my friend what went wrong.
We came up to a conclusion that C.G point was too far aft. We used all our knowledge of aerodynamics, we are airline pilots both of us, he is flying Boeing 737-800 and I am Boeing 757-200 and 767-300. We find out that it’s very important to respect C.G on model airplanes, especially in advance aerobatics models.
I made following changes to my SU26 prior to next flight. I didn’t want to add any extra weight like led. So I removed rudder servo from the tail section and placed it under the canopy on the place where I had throttle servo. I moved throttle servo as far front I could. Then I placed battery pack on the top of the engine! I have engine up side down and I made a case out of aluminum to place battery in it and then I screw it tight on the engine bed. With these changes I managed to move C.G to slightly front of the aft limit. I wasn’t satisfied, because of the first flight I was still terrified! I placed some 60 grams of led to the nose portion of the engine cowling. Let’s fly again.
Back to the field. I taxi airplane to the end of runway. This time I decided to take it airborne without extra accelerations on the runway. Here we go. Full throttle and we are in airborne. It flies, but it’s still very sensitive. I don’t have to make more than think to turn or it’s already turning, On this first REAL flight I just flew straight & level, turns, climb & descents. Prior to landing I took airplane to slightly higher and performed slow flight characteristics and finally I stalled the airplane. I was surprised how gently it stalled. I could feel adrenaline raising while in landing pattern. I turned final and only thing I kept in my mind was to keep airplanes body attitude about parallel to horizon. This way I cannot stall this plane on short final. I had slightly too high approach speed and therefore I ‘measured’ runway quite long before it settles down. I made it Sukhoi flew nicely. I made some adjustments to control travels and back to the airborne.
Now I have made about 10-12 flights and I am getting used to it and I have to tell; it’s nice airplane to fly, but it requires skills to operate and get everything out of it. It’s not the easiest airplane to bring for landing because of its stability characteristics. There is not much marginal to play with on landing. On my last flight I flipped it over. I have scale size wheels on it and they are quite small for the grass runway like we have. This summer the grass on our field has been very thick. This makes small wheel to brake too fast and the rest you know what happens. Rudder broke but I fixed it with ZAP. I will remove cover of the rudder on the winter and cover it again. If it’s required I will built new rudder!
Conclusion
This is a nice project. Erik made excellent job on blue prints. ARF airplanes are very popular today I still find it exciting to build a model from blue prints. There is completely different feeling to take this airplane to airfield and fly it than ARF plane. I recommend using quality servos on this project. I used Futaba servos on this project, normal servo on throttle and slightly better on control surfaces. Rudder servo was the top of the line servo from Futaba.
Thank you Erik for nice Blue Prints and support during my project.
Jarmo Laine
Airline Pilot, Britannia Airways Ab
PS. I have change the engine for this Sukhoi! I have replaced O.S91SurpassII with YS91. This has more power. O.S gives out 1.6HP according the manufacturer, YS91 gives 2.0HP. I am ready to fly it now, hopefully tomorrow. I bought a digital camera, I took some pictures today, SU26october2001 is the photo taken today with digital camera, you can see the quality differrence in pictures. Maybe I have to build another Sukhoi, just to have better quality pictures along the building process. You told once that you might do a larger blueprints, If you do, make it good size, I will build another one. You are so good with prints that I can make another Sukhoi by Erik!
Update:
I (Erik) asked Jarmo if he had flown the sukhoi with the YS yet. Here is his response:
Yes I did, there is plenty of power, not too much but plenty, much better
than with O.S91 SurpassII. I would succes this Y.S engine for couple of
reasons. 1.It's 100gr heavier than O.S this helps to get C.G to fit better,
then extry lead is not needed. 2. In my opinion this engine runs better
cylinder down than O.S.
I forgot to mention in my building project that I had to make fuselage
shorter in side of engine cowl, I think I moved firewall back ward 2,5-3 cm
because I was using Dubro's soft mount for the engine and this particular
engine mount is quite long with an engine. This is another cause why C.G
point moved more rear.
To: [email protected]
Date: 08 Oct 2001, 03:48:04 AM
Subject: Finally a story of My SU26
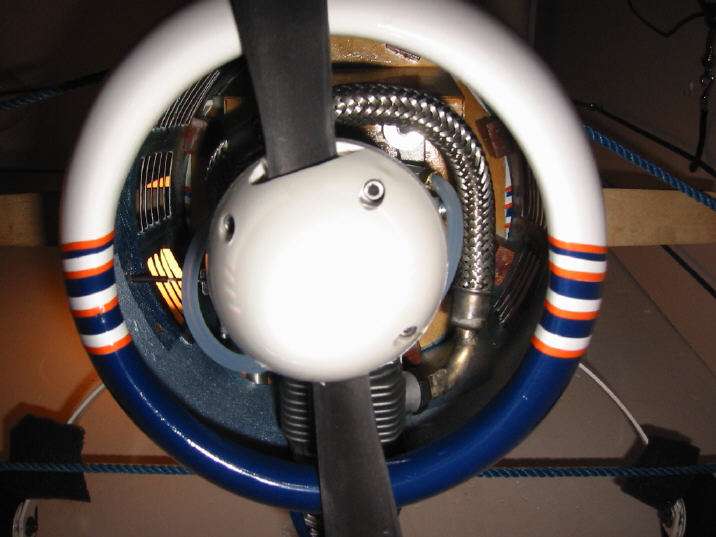
 Then I started with spinner. That was a long process too. I used a lathe to make a scale form of the spinner, this was out of wood. Then I varnish it and sand it many times on lathe. Finally I cut it out by lathe to make ‘spinner’ to spin balanced. I glued this wood on a straight plate by epoxy and then I made a plug on a top of it. Now I had a ‘female’ form of the spinner, in to this made glass fiber spinner by reinforcing it by some carbon fiber. Prior to removing spinner from this plug I sanded spinner to the level of this plate I glue while making this female form, this way I had straight spinner edge against the aluminum plate which I made by lathe too. There is a picture attached to this email, I hope you understand my explanation! I cut holes for the propeller blades (3-blade first and later I made 2-blade spinner too).
 Engine cowl, It was easily than I expected. By using blue foam I formed a cowl and on a lathe I made to front part of the cowl to get it nicely round and formed like real. Prior to placing glass fiber on a top of it I used packing tape to cover my plug. A good tip, a packing tape acting like film when you add low heat to it, in that way you can have nice curvature like in this case on the front part of the cowl. I made Oil cooler part of the cowling a slightly bigger to fit 4-stroke engine valve house in it.
 To glue fuselage and wings on the top of the blue prints was fairly quick. I made a ‘bed’ for the servos under the cockpit. I made 3 servo places in a row next to each other. In the middle I placed rudder servo and 2 elevator servos next to it. I had first rudder servo at the tail section of the fuselage, but due by C.G I had to move it fronts. I placed throttle servo all the way to the firewall for C.G reason too.
 In this assembly project the longest time took to cover fuselage and wings with balsa. To cut ailerons and tail plane parts out was easy. The fuselage covering took longest time. I used 1mm 1.5mm balsa on some places like turtle deck and wing/fuselage joint. I placed balsa in a hot water dried out most and then form it to the place. Difficult, but at the end nice looking. When the Sukhoi was balsa ready I started the long process for covering this project.
 I made just a short flight because the exhaust pipe I made was just a pipe
around the engine cowl without any silencer, (around means= when I have
cylinder down 6 a clock position the exhaust hole on the cylinder block is
down too, from there I direct the exhaust by using flexible pipe 270 degrees
around the engine cowl then straight out from lower part of the cowl) see
attached photo.
I made just a short flight because the exhaust pipe I made was just a pipe
around the engine cowl without any silencer, (around means= when I have
cylinder down 6 a clock position the exhaust hole on the cylinder block is
down too, from there I direct the exhaust by using flexible pipe 270 degrees
around the engine cowl then straight out from lower part of the cowl) see
attached photo.
I have modified now the system that I have a silencer there, because this
engine needs silencer because it produces back pressure in to the engine
which is needed for the smooth operation of this engine.