|
REMOVING THE SEAT COVERS:
Back:
- Pulled the clips out the headrest grommets. This allows the head rest to slide out
- Pried off the release lever 'button' and grommet.
- Straightened the 4 or 5 pointed metal tabs at the bottom.
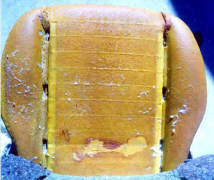
- Pulled up the cover as far as possible. This exposed the tubes which are part the headrest
grommets. (see picture below)
- Pressed in the 4 'barbs' while pulling on the grommets from the top. Once, the grommet/tubes
we're pulled, cover comes off.
Bottom:
- Unwrap wires from back legs.
- Straighten pointed tabs (one per side) on side.
- Pop off (gently ) two plastic "push rivets" from front.
- "Peel" the skirt up (the sides, front & back section).
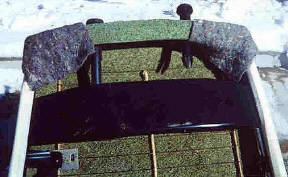
- Cut with wire cutter or open the 4 rings per rod with pliers. (see picture below)
- Remove cover.
|
|
SEAT UPGRADES
|
|
For seats with seperate headrests
|
|
<----------------------You must push in the 4 barbs at the bottom
in order to remove
|
|
1
|
|
2
|
|
6
|
|
4
|
|
5
|
|
3
|
|
The six locations where
the rings need to be removed |
|
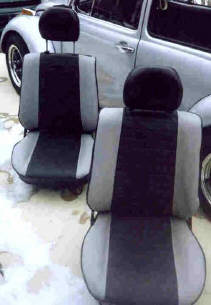
Finished seats
|
|
Once the seats are off you'll see that each section (back and bottom)
have 2 pieces, a back/side piece and the part you make contact when your sitting.
If you have any sewing ability or even access to a sewing machine, you
have an advantage. Otherwise, find someone who can help you sew the stuff. I strongly recommend sewing the pieces by machine, not hand.
You seperate the sections using a seam ripper or a small scissor. Then
you'll see you have a piece which you can use as a pattern for your new part. (email me if you need more details)
Go to a fabric store and pick whatever color vinyl you want. Cut the
pieces using the old as a pattern. You can get fancy by sewing different color pieces together to get a really custom look. Re-use the back or side piece if it's in good condition. Anyway, sew the pieces back together and you'll have a good fitting cover. One caution: The piping will seperate from the back/side part depending on which seam you rip. (you will see what I mean when you do it. |
|
For my seat upgrade, I added
the gray vinyl "wing" sections. The black part is the original basketweave vinyl |

|
Home | GoalsThanx | Paint | Framehead | fh2 | Orig Cond | Door Strip | Panels | Site Index | Engine | Seat Covers |
Tech | paint2 |