Paint Shop Pro Advanced
Week Four Part 6
Making Selections to
Minimize Color Spill
Continued
Method #3
Choking the Mask Using Levels


Green channel after we ran a Gaussian Blur using a
radius = 2.00
Image from Green channel before we feathered it by running a Gaussian Blur
1. Go back to the Green channel image from which you saved Mask1.
2. This is a trick I learned from Photoshop on how to feather, expand, and contract a mask. Undo the step where we did the Gaussian blur to feather our mask.
(See image above)
3. Go to Image - Blur - Gaussian Blur and put in a radius of 2. The image is very blurry. (See image top right)
4. Go to Layers - New Adjustment Layer - Levels.
Note: To contract the white area of the image, you will move the black input slider to the right. To expand the white area of the image you will move the white input slider to the left. In this case I want to contract the white area. At the same time we do this, we will also be feathering the image.
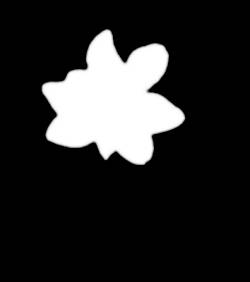
Green channel after the Gaussian Blur and the Levels Adjustment
5. Move the black input slider to the right to where the numbers read 140 - 1.00 - 255. Click OK.
6. Go to Layers - Merge - Merge Visible.
7. Go to Masks - New - From Image, This Window, Source Luminance.
8. Go to Masks - Save to Disk and save Mask2.
9. Activate the image that has the object that you want to select. I activated my original image.

10. Double-click the background layer and name it Magnolia.
11. Create a new layer, fill it with a color sampled from the center of the flower. (Use the eyedropper) Place the layer below the Magnolia layer.
12. Click on the Magnolia layer to make it active.
13. Go to Masks - Load from Disk and load Mask2. Notice that the magnolia has no color spill.
14. With the Move tool, move the Magnolia to a new location.
15. Sample a color in the flower and add text on a curve.