Paint Shop Pro Advanced
Week Four
This week we learned all about channels and masks. I had fun with this one! My favorite thing to teach in Photoshop is advanced selections and masks! I have experimented with PSP to see if I can do some of the same things that I do in Photoshop. This is what I came up with.
GHOST FLOWERS
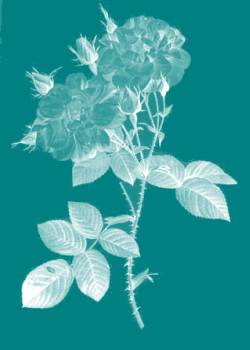
Finished Image
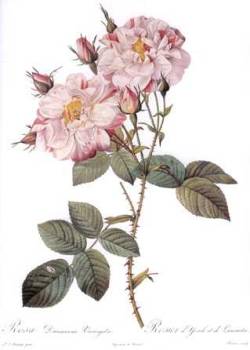
Original Image
1. Open Original Image.
2. Double-click the background layer and click OK. This makes your background layer a floating layer that now can have transparency. Background layers can not have transparency in them.
3. Select the magic wand and set it's tolerance to 20. Click on the white background, and shift-click the white between the stems and leaves. Press the Delete Key. Press CTRL - D to deselect.
4. Go to Colors and click Grayscale.
5. Go to Colors - Adjust - Brightness/Contrast and set the Brightness to -35 and the Contrast to 11.
6. Take the eraser and erase any stray wording or pixels that you don't want in your final image.
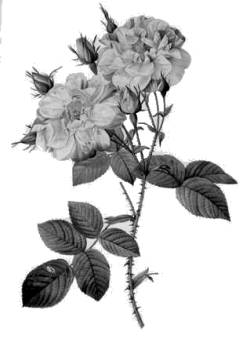
This is what I have so far. Of course my image has a transparent background, but this is a JPEG image and it shows that the background is white.
When I first converted my image to grayscale, the image was much lighter. That is why I made the Brightness/Contrast change to darken the image and bring more contrast to it.
7. Go to Mask - New - From Image. Source Luminance, invert mask data.
8. Go to Mask - Save to Disk. Name the mask and save it to your hard drive.
9. Creating the mask is now complete.
10. New Image. Open a new file with the same dimensions and resolution as the file from which you created your mask. Choose white background and 16.7 million colors.
11. Double-click the background layer and click OK to make it a floating layer with transparency.
12. Go to Mask - Load From Disk and load the mask that you saved. You should see a faint white flower.
13. In the Layers Palette, click on the New Layer icon and then click OK. You now have a layer 2. Move Layer 2 below Layer 1 (flower layer).
14. Choose a pleasing color and fill Layer 2 with it.
15. Click on Layer 1 (flower layer) and experiment with blending modes. I chose Normal for this example.