


The original camera picture included a shadow cast to the right of the camera. When you erased the background in the previous section, you also erased this shadow. In this section, you will create and position a new shadow in the shape of the camera.
There are a couple of ways you could create the shadow. You could trace the outline with the freehand shapes tool. Or you could, as described in this section, use a copy of the cropped camera image.
To create a copy of the cropped camera image:
Because the background is transparent, the rectangular cutout will include only the camera.
If needed, you can use the handles on the outline tool to adjust the rectangle around the camera.
VizPaint2D places the cutout in a canvas called cut_2.
A swatch of the cutout appears in the cut tool.
A blank canvas named temp_1 appears on the VizPaint2D screen.
A list shows the canvases available to paste.
The paste tool shows the cut_2 swatch. A shaded outline tool appears in the canvas.
The cutout is pasted on the blank canvas.
The shapes tool is displayed. You will use the shapes tool to paint the cutout gray. You could also do this with the fill tool.
Tip: Atop mode draws only where there is an existing layer of pixels. Here you will be creating a copy of the camera. |
The block palette tool is displayed.
The shapes fill tool is displayed.
· click on the shapes fill color selector to activate it
The camera is covered by a layer of gray as shown in figure 83. 
Figure 83 Making a drop shadow
The cut tool is displayed. The outline tool is displayed on the canvas in the same position as the last cut operation.
VizPaint2D creates another cutout and puts it in a canvas named cut_3.
A list of available canvases and their corresponding swatches are displayed.
The tutorial canvas has an intact version of the camera. This is where you'll be pasting the camera shadow cutout.
A list shows the canvases available to paste.
The paste tool shows the cut_3 swatch. A shaded outline tool appears on the canvas.
The shadow moves down and to the right of the camera. If you want, use the outline tool handles to fine-tune the shadow's position.
The reduced opacity setting creates a softer, more realistic shadow.
VizPaint2D pastes the shadow beneath the camera. See figure 84 for an example of what the canvas should look like. 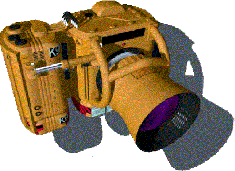
 \
\


