|
|
PowerToon
|
|
|
25
|
PowerToon
|
|
This feature is available in PowerAnimator with Advanced Animation, Studio with Design Animation, and AutoStudio.
PowerToon is an OpenAlias and OpenRender feature that lets you create 2D cartoon style renderings of 3D geometry and scenes.
In This Section:
PowerToon Overview
|
|
|
|
|
PowerToon is an OpenAlias and OpenRender feature that lets you create 2D cartoon style renderings of 3D geometry and scenes.

The 2D lines are generated from outlines, edges and interior foldlines that are determined from the rendering process.These lines are high quality anti-aliased lines that may have sub-pixel widths. You can control the appearance of these lines with global and per shader parameters that determine how to render the 3D geometry for fold angle thresholds, depth thresholds, scale factors, blending, line illumination, and depth controls.
For Studio with Design Animation and AutoStudio customers, PowerToon provides hidden line removal rendering that is useful to engineers and animators.
Alias users will find that PowerToon Shader provides an interface that is familiar, intuitive, and consistent with the rest of the Alias environment.
PowerToon Features
PowerToon provides the following features:
- An adjustable preview render window with global overrides for per shader parameters.
- Vector (or polyline) output of high quality anti-aliased lines that may have sub-pixel widths. Various compositing operations are available, with alpha and color line output provided.
- A standalone line renderer for post process rendering of line file output. The ASCII line files contain line shaders, global parameters, and a list of polylines with per point thickness depth and brightness. They may be edited for post-process compositing or for fast experimentation with various line widths and colors.
-
Line files may be rendered at any resolution. (Render
times are typically a few seconds.)
- A variety of fill methods are possible using existing Alias shader functions. Numerous sample shaders are available to maximize PowerToon effects.
- You can control the appearance of generated lines in a variety of ways:
- With all Alias effects: particles, shading mapping, glows, textures, etc. A line may appear through raytraced glass refractions, as well as in reflections.
- With edges based on shader-shader boundaries, object-object boundaries, folds and depth change.
- By controlling thick-thin effects based on fold and depth-change thresholds.
- By perspective, so that far away lines are smaller.
- By line draw softness and opacity to create blurry/sharp lines.
- Lines may pick up shading from surface they are derived from. They can be lighter along highlights and darker in shadowed regions.
- You have per shader control of color, thickness, shading, and boundary creation tolerances. These PowerToon controls appear in the multilister on the shader and may be animated. Lines may be turned off on a per shader basis.
- Transparent objects with lines turned off can be used to block line creation from certain regions. For example, a sphere could show lines around all around except at the very top, if desired.
- Line width is relative to screen size, so preview tests are more accurate.
How PowerToon Works
PowerToon generates 2D lines from outlines, edges and interior foldlines that are determined from the rendering process. You can control the appearance of these lines with global and per shader parameters that determine how to render the 3D geometry for fold angle thresholds, depth thresholds, scale factors, blending, line illumination, and depth controls.
You must load the PowerToon feature into the Plug-in Manager (see Getting Started on page 534). Once it is installed and loaded, you can use the following items from the Render pulldown:
- PowerToon Editor: An editor window for controlling global parameters and viewing test renders.
- PowerToon Render: Invokes rendering using the PowerToon OpenRender shaders and generates an SDL file with PowerToon-specific information. You must choose this option, rather than Render, to properly render the PowerToon Shaders.
- PowerToon Export SDL. Exports the current PowerToon changes to an SDL file (as with the PowerToon Render option), but does not invoke the render process.
SDL files used by the PowerToon feature differ from standard SDL files because they also contain:
- OpenRender plug-in definitions
- OpenRender shader definitions for line rendering. These shaders are layered on top of other shaders.
- Updated object names that include shader names.
You can configure the PowerToon feature to output several types of pix files, including the original pix file and composited pix files. For more information, see Output Controls on page 550.
In addition, a line file is generated that contains creation thresholds and plots in ASCII format all polylines generated by PowerToon. You can evaluate and update this file with a standalone version of the line rendering component of OpenRender. The line renderer allows quick evaluation of different line colors and widths. (See Line Render on page 556.)
Using PowerToon
|
|
|
|
|
PowerToon Workflow
Keep the following workflow in mind when using PowerToon:
-
1
-
Create the 3D geometry you want to render in 2D. For best results, use basic geometry with straightforward foldlines.
-
2
-
Assign PowerToon shaders to the geometry.
-
For best results, use the PowerToon default shaders and
assign a different shader to each object if you want to
ensure that there are lines between objects. Consider using
shaders rather than fold angles, because shader
boundaries create more stable lines than fold angles.
-
For more information, see PowerToon Shader Parameters on
page 553.
-
3
-
Set the PowerToon Editor parameters and then render the geometry with PowerToon.
-
For more information on using these parameters, see
PowerToon Editor on page 543.
-
For more information on the types of files you can
generate, see Output Controls on page 550.
PowerToon Tips
You can control the appearance of lines from the PowerToon Editor (See PowerToon Editor on page 543) and by the shaders you assign to objects (see PowerToon Shader Parameters on page 553).
The following tips are provided to help to achieve good quality PowerToon renders:
- Load the toon_shader_defaults wire file (see Getting Started on page 534). This file contains a number of shaders that use different PowerToon fill methods. These defaults are easier to work with for PowerToon than the normal shader defaults.
- In Render > Globals (under Global Quality Parameters), make anti-aliasing levels 0,0 and turn jitter off.
- In Render > PowerToon Editor, turn on Oversample.
- Preview and tweek images at their full size. Otherwise, you may not see unwanted details or the effect of settings you have made.
- If you are rendering a large image, you need a lower fold angle minimum to catch curves (as opposed to sharp bends).
- As a rule of thumb, the maximum values should not be greater than 2-3 times the minimum values.
- Use the fold angle minimums and maximums to control how thick or thin the lines appear. (This thick-thin effect is valuable in creating more realistic cartoon renderings.)
- The depth and fold angle minimums should be low enough to get good detail: fold angle minimums of 0.5 or 1.0 are often required, especially if the render resolution is large and oversample is ON.
- For best results, set the depth and fold angle minimums and maximums on a per shader basis, with smaller objects generally getting smaller depth thresholds and larger fold angle thresholds.
- Some lines are best created with texture mapping. For example, eyebrows. Note that these lines will not appear in the line file.
- Set line width to zero on those shaders where you want no lines to appear.
- To erase unwanted lines from an object, model an object in front of that portion of the object containing the lines you want erased. Then assign a transparent shader with 0 line width to this object. (See Using Transparent Surfaces on page 541.)
Getting Started
This section describes how to quickly perform a PowerToon edge render on a very simple scene:
-
1
-
Select Utilities > Plug-in Manager.
-
The Plug-In Manager window appears. Load the
PowerToon feature by selecting the Load Unload column
beside its entry.

-
To configure PowerToon to autoload at start-up, check the
AutoLoad column next to the PowerToon entry.
-
You can customize PowerToon so that it resides in your
shelf area or marking menu. It can also be configured for
hotkey activation.
-
2
-
It is recommended that you start by choosing a favorite shader from the numerous PowerToon default shaders that are available. To access these shaders, select File > Open and find the files in the following path (accessible from your Alias installation):
-
.../ODS/OpenAlias/plugins/files/powerToon/
example/wire/
-
If you cannot find these files, they may not have been
installed. See the Release Notes and Installation for
information on how to perform a custom install of the
PowerToon examples.
-
The wire file toon_shader_defaults has a variety of
useful cartoon shaders and environments that set basic
parameters you require for effective use of the PowerToon
tool (for example, white backgrounds rather than black
and a Y-up environment).
-
Other wire files you can experiment with include:
- pumpkin (a Halloween pumpkin)
- dark_man (a darkened head with banded shadows and rim highlights)
- toon_guy (a funny wrinkled face with expression controls for animation)
- toon_dog_shaded (a dog with simulated airbrush shading)
- toon_dog_flat (a dog with simple flat shading)
-
It is recommended that you set your default shader to one
of these shaders and tweek it for your needs.
-
3
-
Select the wire file toon_shader_defaults, which is used for the rest of the steps in this section.
-
4
-
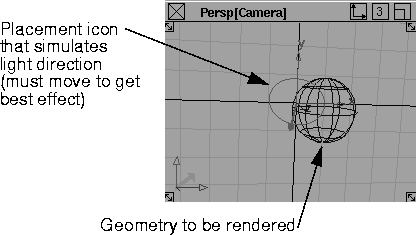
Create some geometry, such as a sphere, in the scene. Ensure that the geometry is viewable from the perspective camera.
-
5
-
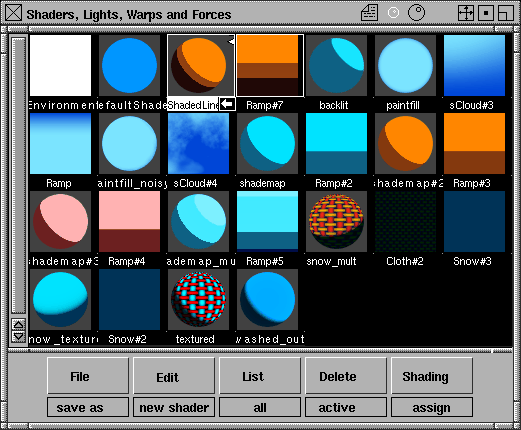
Select Windows > Multi-lister > Shaders. A variety of shaders appear, courtesy of the default wire file. These shaders each provide varying effects for your cartoon shading needs.
-
6
-
Select the Shaded Line shader.
-
This particular shader makes shaded regions darker. Line
illumination is on, with line brightness dependent on the
brightness of the surface under the line. You can tweek
these effects by double-clicking on the Shaded Line shader
to open the shader control panel, and then changing the
effects grouped under PowerToon Shader Edge
parameters and PowerToon Shader Thresholds. You may
also wish to change the colors used in the associated
ramp.
-
7
-
With the geometry selected, click Shading > Assign Shader.
-
8
-
Create a light from the Objects > Lights choices. Alternatively, select Render > Quick render to create some default lighting.
-
9
-
Select Render > PowerToon Editor and set your PowerToon settings (see PowerToon Tips on page 533 and PowerToon Editor on page 543).
-
10
-
Select Test Render from the PowerToon editor window. The prompt line will provide a message that the file is being rendered.
-
A progressively updated rendering of the scene will
appear in the PowerToon Editor test area. Note that the
lines appear only after the render is completed (this
characteristic is per design.)
-
See the following sections for information on the various
global and per shader parameters you can modify to
control the color and edge styles.
-
11
-
You can choose a variety of composited pix files to output (see Output Controls on page 550). In addition, a line file is generated that plots in ASCII format all polylines generated by PowerToon. You can evaluate and update this file with a standalone line renderer (see Line Render on page 556).
Creating Scenes for PowerToon
It is important to design your scene so that it produces the best line quality. Complex sets of lines within an object can, at times, be best handled using textures. Stylized eyes, or carving lines in ornate furniture, may work better as textures.
Optimal line production can be accomplished by modifying your model. Try to model sharp kinks for character lines generated by folds. In an example with a normal cube, the lines on it will be cleaner and more stable than those of a cube with rounded edges. The thickness of a line can be modulated by the fold angle. Where you wish to see a line taper, you need to make the fold angle vary, while maintaining a sharp crease in the surface. For more information on fold angles, see Global Fold Angle, Fold Angle Min Max on page 545.
Thickthin fold lines can be generated from typically smooth curving surfaces by making the fold angle minimum very low. The lines, however, may crawl during an animation, and be affected by the closeness of the object. Remember, a smoothly curving surface becomes flatter in appearance the closer it is, whereas a crease will stay a crease at any distance.
Fill and Shading Methods
Cartoon-style fill and shading can be accomplished with normal PowerAnimator shading controls. There are a variety of useful techniques for creating a wide range of looks. Some of the methods can be seen in the sample files provided. The PowerToon shader defaults file provides a sampling of different methods.
Flat Fill (no shading):
This is the simplest form of fill.
- Set the shader model to Lightsource and select a desired color.
Stepped or banded shading:
Apply a banded ramp texture as a shading map (found under Special Effects in the shader).
- Set ambient shade to 0.5 and light intensity to 1.0. This will give precise control over color based on the angle of the surface normal to the light.
- Set the color of the light and the shader to white.
- Select the lambert shading model. The top of your shading map ramp should now map the surface normals pointing at the light. The bottom should map them pointing directly away from the light.
Stepped shading with shadows and highlights:
- Apply a ramp shading map as in stepped or banded shading. The normal illumination and specular shading models must be used.
- Balance the light intensity, diffusion, and specular components of your shader.
- Set the Ucoverage of the shading map to 2 or more. This avoids a wraparound problem, where highlight might map to the bottom of the ramp.
- Illuminate everything in the model, except the shadow regions, for precise colored shadows. A band at the very bottom of the shading map can then be used for the shadow color, without mapping to darkly shaded areas of the surface as well.
- Make the specular illumination intense, relative to the diffuse illumination. A light band near the top of the ramp will map to specular highlights.
- Add an sCloud texture without noise that has a sharp normal rolloff. This creates highlights along an object's edge and is used in the dark_man wirefile example.
Banded illumination on textured surfaces:
To achieve flat washed-out illumination, try either of these methods:
- Set the shader translucence to 1.0, translucence depth to 0.0, and diffuse to 0.0. As a surface turns away from a light a sharp transition to darkness is created.
- Pick an ambient light. Set the ambient shade to 0.0. Use this for the fill on the back side.
- Make the main light amber and the ambient light blue. This modifies the direct and ambient colors to provide blue shadows.
OR
- Set the shading model to lightsource.
- Apply a snow texture as a color map or an rgbmult map on your color texture. The various parameters on the snow texture allow you to control the color of light, shadow and the transition in between.
- To change the direction of the simulated light, rotate the solid texture transform node of the snow texture. (See the toon_shader_defaults file for an example.)
Simulated airbrush fills:
- Use a non-banded shading map with texturing, such as sCloud. You can set the parameters on the sCloud texture so that blobs of paint spread out toward either the edges or the center.
Line Stability during Animation
There are several factors that can cause lines to jitter. Let's consider the jitter itself; generally, it's best to turn jitter OFF in Render > Globals. Usually, the line joins are better when the anti-aliasing level is 0.0. Problems can arise with joins between lines that are close together, especially if the two boundaries are between the same objects. With a long skinny plane in front of a larger plane, the sides of the skinny plane could become incorrectly joined, if its edges are within a pixel or so of each other. Fold angles can also cause problems on very thin edges.
When modelling the thickness of a shirt collar, the line along its edge may appear serrated when the edge is one or two pixels in width. Making the fold angle minimum or maximum the same value or using Oversample can improve this. It may be best to not model extremely fine features like the width of a cup or shirt collar in the first place.
Very low fold angle minimum and depth minimum values can also cause stability problems. If the depth minimum is small, then masses of lines can form near the edges of objects. This can confuse the line formation routines and cause dancing specks around the edges. If the fold angle minimum is very low, similar masses of lines can occur around curving features. In stills, this can sometimes create an interesting pencil shaded look; however, it will animate poorly.
The lines created are rendered with high quality anti-aliasing; however, the motion of the lines during an animation is not necessarily anti-aliased. Using Oversample can solve some of these problems.
Using Transparent Surfaces
There are many uses for transparency with PowerToon shading.
To see lines through a transparent surface:
You may want to use this effect, for example, to give blue lines to those parts of an object that are behind a blue glass bottle.
For the most part, objects seen through a transparent surface will pick up the line attributes of the transparent surface. These lines will only show fold angle and depth boundaries, not shader or object boundaries. If the minimum depth and fold angle thresholds are high enough, this will in effect turn off lines seen through the transparent shader. The same is true for lines from reflected/refracted surfaces in Raytracer. Make sure that anti-aliasing levels are 0,0, or the choice of line shader in transparent; otherwise, reflected areas will be appear to be random.
To erase lines from a certain area:
You may want to hide certain lines from a surface. Simply create a transparent surface with a line width of 0.0 in front of the lines you wish to erase.
To see lines through a transparent surface but not the boundaries of the surface:
You may want this effect, for example, to show a ship through a fog shader. Edit the SDL created by the PowerToon render and remove the capture shader from the transparent surface. The PowerToon render automatically layers a capture shader on top of all objects. Lines will be created as though there was no transparent surface.
|
Render menu >
PowerToon Editor
|
PowerToon Editor
|
|
|
|
| |
|
For useful overall tips on
these settings, see
PowerToon Tips on page 64.
|
The PowerToon Editor contains global parameters which control how lines and edges are created during rendering. The editor also contains a test render area for previewing the current scene. To open the PowerToon Editor select Render > PowerToon Editor.
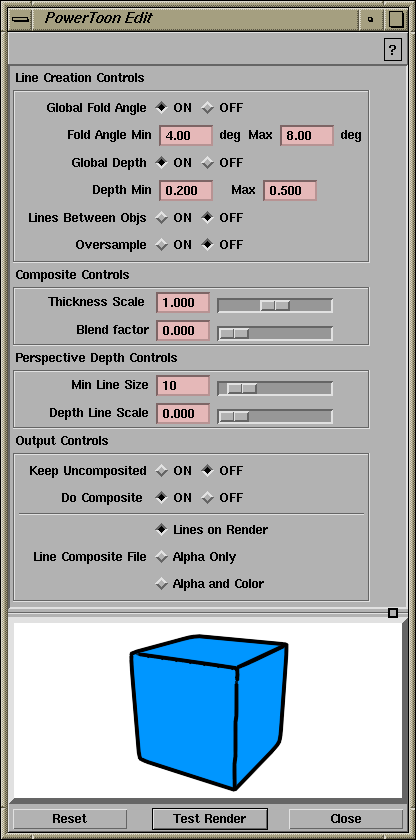
Line Creation Controls
The Line Creation Controls affect the creation of lines and edges. The PowerToon renderer generates a line file used in the post-compositing process that applies the lines to the final image.
Tips:
- Line creation depends on the global renderer, which creates edges by performing pixel-to-pixel comparisons of shader ID, object ID, surface orientation and depth. PowerToon uses these edges at the end of the rendering process to create lines as determined by these settings.
-
As a result of this process, the lines that are created by
PowerToon are influenced by the size of the rendered
image (as determined by the X and Y resolution values in
the Image File Output section of the Render Globals
window). A curving eyebrow ridge, for example, may be
curved on a large image, but appear as a simple line (or
not at all) on a smaller image, since the difference in
normals between pixels is less.
-
The best way to ensure a line is to model a definite fold or
use different shaders on either side of the fold; otherwise,
you can use a line object or line texture.
- Depth and fold boundaries are subtle, and require careful setting of the minimum and maximum thresholds for the best effect. If the value for depth minimum is too low, almost every pixel will act as an edge. If it is too high, there will be no lines where a surface occludes itself. A very slow render may result from an excess number of edges created with thresholds that are too low. This can also make the images look messy or like they are faintly cross-hatched.
- The cleanest boundaries are: 1) between shaders, or 2) between objects if Lines between Obj is ON.
Notes:
- Polylines are derived from an initial list of created edges.
- Lines are smoothed and simplified.
- For shader and shader boundaries, the line created belongs to the shader nearest the eye along the boundary.
- Objects at the boundary with the same depth will use the shader with the thickest line width.
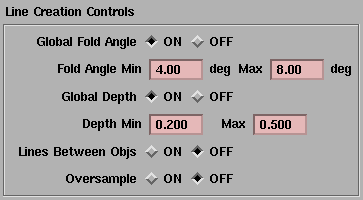
Global Fold Angle, Fold Angle Min Max
-
- The recommended range is 0 to 180. The default value is 4 for Fold Angle Min and 8 for Fold Angle Max.
-
- (min max) (0-180)
-
- If there is a sharp fold, PowerToon draws an internal edge for a single object. The folds that are used are determined by an angle threshold that you set. This threshold can be specified on a global or per shader basis. Setting the Global Fold Angle ON in the Render Globals window overrides any settings made to shader fold angle thresholds. When the angle between the normals of two adjacent pixels is greater than the fold angle minimum, an edge is created. When the angle is greater than the fold angle maximum, the line is at its thickest. Line thickness will diminish to zero and cease to be visible where the angle matches the minimum value. (This thick-thin effect is valuable in creating more realistic cartoon renderings.)
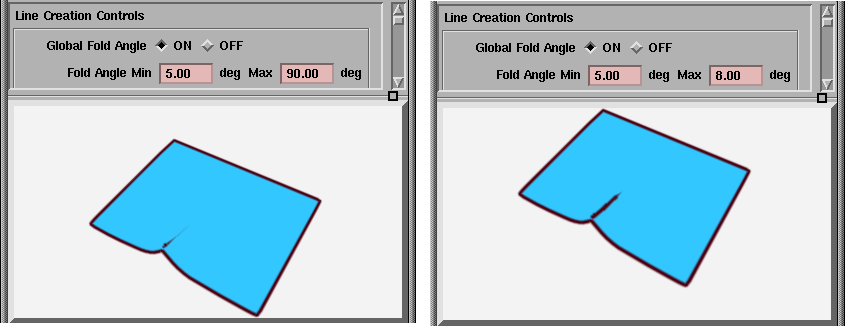
-
- For example, in the following example of a piece of paper with a crease in it, the fold angle is greatest where the crease is largest:
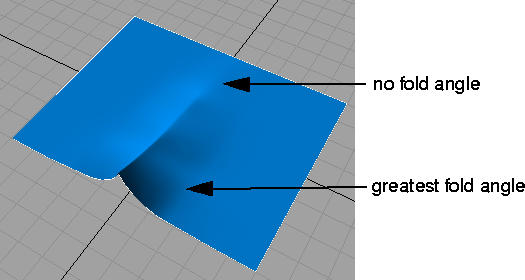
-
- In this example, PowerToon provides a line to represent the crease. The length and thickness of this line varies according to how you set the fold angle, as shown in the following test renders.
-
- It is a good idea to model fairly sharp kinks and folds where you wish to see lines. Rounded edges require lower thresholds up close. A fold from a distance may appear smoothly curving closer up, and even flat closer still. The fold angle can also create lines where a surface occludes itself or another surface with the same shader, based on normal discontinuity across these boundaries. The depth threshold is typically used for this but may not be low enough for all cases.
|
Tip:
|
For high resolution images where the folds are somewhat
rounded, the fold angle should get smaller.
|
Global Depth, Depth Min Max
-
- (min max) (0-inf)
-
- If there is a discontinuity in depth (a change beyond the slant of the surface), then PowerToon draws an edge internal to an object's silhouette. Any change in depth between two pixels that is greater than the minimum depth setting creates an edge. When the difference in depth is greater than the maximum depth setting, the line is full width. Examples where depth edges are useful is a nose in half profile against a cheek, or the near inside edge of a cup. The depths are defined in worldspace units, and levels vary greatly depending on the scale of a scene.
-
- Set the minimum depth low enough to produce the desired effects, but not so low that surfaces at sharp angles to the view are covered with lines. (An example of this would be the visible edge of a curved surface such as a cylinder or sphere.) The minimum depth value is also used when joining edges together to create lines. Depth values that are too large may produce more erroneous line joins between farther and nearer edges. Long thin square beams sometimes show this sort of problem.
|
Tip:
|
For high resolution images, the depth control thresholds
should get smaller.
|
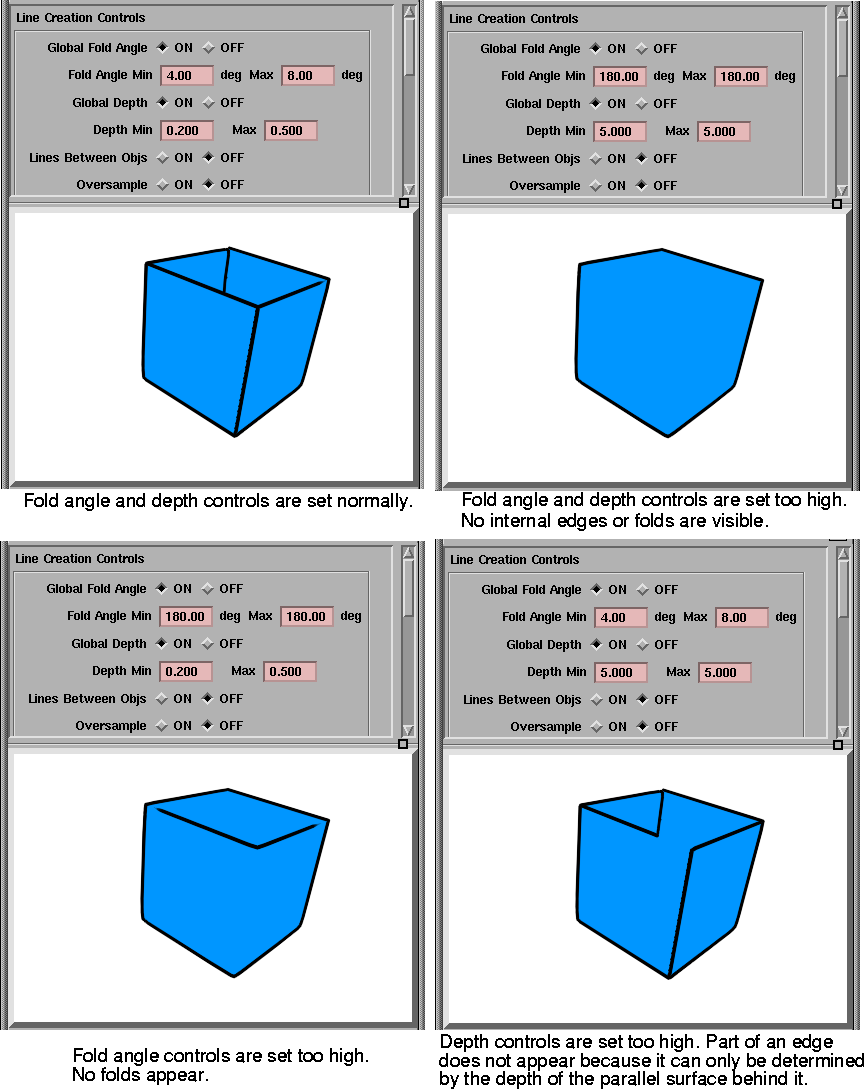
Fold Angle and Global Depth Control Examples
Lines Between Objs
-
- Lines are automatically created by depth discontinuities, internal folds, and shader boundaries. Additionally, lines can be created between objects. By default, this parameter is OFF.
Oversample
-
- When turned ON, Oversample helps correct the resolution problems during edge creation that may result in poor lines. It renders the image at double size, and then scales down the resulting image with filtering before doing the composite line render. For most animation work, it is recommended that you set this control ON and set antialiasing levels to 0,0 in the Global Rendering window.
-
- Because the image is scaled down only at the end of a render, do not attempt to view the render until it is finished.
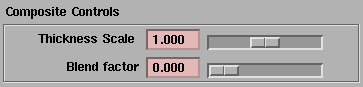
Composite Controls
Thickness Scale
-
- (0-infinity)
-
- This control is a global multiplier that is applied to all line widths during the compositing phase. Line width is initially specified at a per shader level. A thickness scale of 1.0 has no effect on the PowerToon lines. At 0.0, the lines will have no width and thus not appear; at 2.0 they will be twice as wide.
Blend Factor
-
- (0-1)
-
- This control sets the softness of the "brush" used to draw lines. At 0.0, lines are sharp edged; at 0.5, lines are smooth and fuzzy (especially large lines). Values above 0.5 are not recommended; at 1.0, lines are totally transparent.
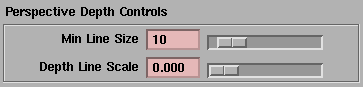
Perspective Depth Controls
Min Line Size
-
- This setting lets you keep lines from disappearing for objects that appear far away. Because it only clips the transformation applied by the depth line scale, this setting does not affect line size if the Depth Line Scale is set to 0.
-
- This setting is relative to the size of your screen. A value of 10 represents 1 pixel width at the typical NTSC (640x480) resolution.
Depth Line Scale
-
- (0-1)
-
- This control allows you to make lines that appear far away thinner than lines that appear close up. At 0.0, line thickness always stays the same regardless of depth.
-
- At 1.0, line thickness is totally proportional to depth. For example, a line that appears twice as far away will be half the width. Therefore, lines are drawn in perspective like regular 3D objects.
-
- When the depth line scale is between 0.0 and 1.0, line thickness is a blend of the normal thickness and the thickness calculated by perspective (as determined by the line thickness you set; see on page 78). A typical value that is useful for scenes is 0.1 or less.
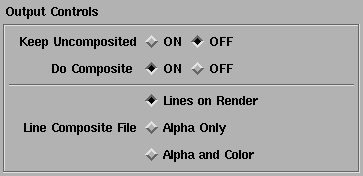
Output Controls
These controls determine which files are generated as output by the PowerToon feature. The files are stored in the pix directory.
You can choose to keep either or both of the following files:
- The original pix file (before PowerToon lines are added). This file is important to keep if you will be doing several PowerToon iterations, or if you plan on doing fills. For example, you may need this file to tweek lines later using linerendering, or to do your own composite of the lines with fills.
-
To keep this file, set Keep Uncomposited ON. The file's
name will have a suffix of ".noline" if Do Composite is
ON; otherwise it keeps its original name.
- Composited pix files where PowerToon lines are rendered over top of the original pix file and composited to it.
-
To keep this file, set Do Composite ON. It has the name of
the original file.You can determine its alpha and color
settings with the Line Composite File settings (see below).
In addition, a line file is always generated. This ASCII file contains a global list of parameters, line shaders, and polylines (including their 3D coordinates, their X,Y depth, and their brightness intensity). This file has a suffix of ".lines", and you can edit it further (see Line File Global Keywords on page 86).
The following table summarizes which types of files are generated for the Keep Uncomposited and Do Composite settings:
|
|
Do Composite is ON
|
Do Composite is OFF
|
|---|
| Keep Uncompressed is ON
| composite pix file(s) + original pix file + line file
| original pix file + line file
|
| Keep Uncompressed is OFF
| composite pix file(s) + line file
| no pix files (only line files)
|
Keep Uncomposited
-
- When this control is on, the original pix file (with no PowerToon changes) is saved. You might need this file to apply or change the lines later using the standalone line renderer and the line files or if you wish to do custom compositing of lines. Keep in mind, at this phase, line creation thresholds cannot be altered; only the color, thickness, and quality of the lines.
|
Note:
|
When this control is ON, you must re-display images to see
new PowerToon lines. These images are not updated
interactively.
|
Do Composite
-
- During the PowerToon render phase, an ASCII file with line compositing parameters is generated automatically. In addition, you can specify with this control whether or not the lines rendered by PowerToon are composited with the originally rendered scene.
-
- When this control is ON, rendered lines are composited with the base (uncomposited) render. When it is OFF, a separate pix file is generated instead. This file contains the composited lines, but not the base (uncomposited) render. You may want this separate file to composite-render the lines as a post process, or when you are interested only in the line file.
Line Composite Files
-
- If the Do Composite control is ON, then this control determines the type of line render done:
- The Lines on Render option draws the lines on top of the normal render. One pix file is produced.
- The Alpha Only option creates a mask (alpha) file that contains information on where the lines are. It can be used later to apply lines on the render in a later process. This file is produced in addition to the composite pix file containing lines on top of the normal render.
- The Alpha and Color option creates two files, a mask and a color line file. These two files can be used to composite colored lines on the render as a post process. The color file is not anti-aliased (that is, there are no fills in the pix file - only a black background), so when combined with the smooth mask it will produce good quality smooth lines with no color fringes.
PowerToon Shader Parameters
|
|
|
|
|
When you load PowerToon, shaders will have two additional sets of parameters. Use these parameters to control the appearance of surfaces.
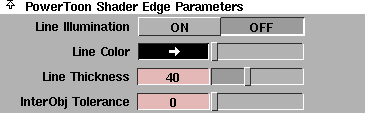
PowerToon Shader Edge Parameters
Line Illumination
-
- Causes the brightness of lines to be affected by the brightness of the surface beneath it. For example, a line will appear brighter around a highlight, or when backlit, or darker when it is in shadow. For best results, set Line Color to a light color, particularly if the surface color is dark. Brightness values are written out to the line file. You can toggle Line Illumination ON or OFF during post process line rendering, if desired. The default setting is OFF.
Line Color
-
- This control sets the line color for the shader. All geometry with this assigned shader will use Line Color during the render process. Changing the color will not affect the preview in the Shader Lister Window. A test render must be started with the PowerToon Shader Panel.
|
Note:
|
If two differently colored shaders share a common edge,
then the PowerToon line may become a dotted mix of the
two colors when viewed from certain angles. To minimize
this effect, make the line width slightly different between the
two shaders to establish a priority.
|
Line Thickness
-
- This control sets the maximum line width. Shader to shader boundaries will always be this width. Lines due to folds or depth differences will become this width when above the maximum thresholds and diminish to 0.0 when below the minimum thresholds. When the depth line scale is 0.0, a line thickness of 10.0 is 1 pixel in width at NTCS (640x480) resolution.
-
- If you render a smaller image, the line will also be proportionally smaller. At a depth line scale of 1.0, the line size is determined in 3D space. A line thickness of 100.0 will correspond to a tube 1 unit in diameter. Thus, objects appearing close up may have very large lines and those appearing far away will have smaller lines. Middle values of the depth line scale will be interpolated somewhere between these two definitions of thickness.
-
- The valid range is 0 to ·. The slider range is 0 to 100. The default value is 40.
InterObj Tolerance
-
- Often, a surface may be composed of objects that are joined in simple ways. A nose may be a simple sphere intersected with the face instead of a more complex blend surface, or an arm may be simply intersecting tubes with a ball socket. Often, you don't wish to see lines due to a fold angle across sloppy joins. This control simply increases the fold angle threshold across object/object boundaries. for example, if the fold angle minimum is 4.0 and InterObj Tolerance is 10.0, the angle along a sloppy join would need to be at least 14 degrees before an edge was created.
-
- The valid range is 0 to ·. The slider range is 0 to 8. The default value is 0.
PowerToon Shader Thresholds
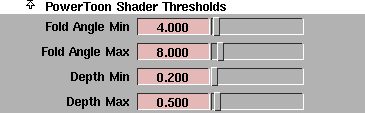
Fold Angle Min, Fold Angle Max
-
- These controls take effect for a given shader if the Global Fold Angle is OFF. They can have a value from 0 to 180 degrees, but the values within the sliders provide a useful range. For more information on fold angles, see Global Fold Angle (min max) (0-180) on page 72.
-
- The slider range is 0 to 100. The default value is 4 for Fold Angle Min and 8 for Fold Angle Max.
Depth Min, Depth Max
-
- These controls take effect for a given shader if the Global Depth is OFF. They can have a value from 0 to infinity, but the values within the sliders provide a useful range. For more information on global depth, see Global Depth Controls (min max) (0-inf) on page 73.
-
- The slider range is 0 to 10. The default value is 0.2 for Depth Min and 0.5 for Depth Max.
Line Render
|
|
|
|
|
The line renderer can render or rerender the polyline files that were created during a PowerToon render. This utility allows you to alter shaders in the line file and rerender the resulting composite quickly. You can also use it to set composite opacity and improve anti-aliasing quality.
The line files used by the linerender are created in the same directory as the rendered pix file with the name pixfilename.lines. These are simple ASCII files, like SDL files.
The line renderer executable is called linerender, and is located in the .../alias/bin directory. Type linerender without any arguments to see a list of options.
Using Line Render
linerender [-p n][-s n][etc..][-c] linefile [inpix]
outpix
| outpix
| A required option. Specify the file name you want for the resulting composite output.
|
| inpix
| The normal render image on which you want to draw lines. You must specify the x and y parameters if you don't specify this parameter.
|
| -x <value>
| The x size for output. (Required if inpix is not specified.)
|
| -y <value>
| The y size for output. (Required if inpix is not specified.)
|
| -B <value>
| The background color. This greyscale value can be any value from 0 (black) to 0.5 (gray) to 1 (white). If there is an inpix image, its background is used and this value is ignored.
|
| -L <value>
| The line color. This greyscale value can be any value from 0 (black) to 0.5 (gray) to 1 (white). It overrides line colors in inpix files. If it is not specified, the default is whatever line color is defined in the inpix file
|
| -o <value>
| The opacity value for composites.
|
| -s <frame_value>
| The start frame.
|
| -e <frame_value>
| The end frame.
|
| -b <value>
| The by frame value.
|
| - q <value>
| The quality of anti-aliasing, a number from 1 to 4. A value of 1 should be sufficient for most cases, and represents natural anti-aliasing. Occasionally, lines with 1-pixel widths may require higher an anti-aliasing value of 2. The values of 3 and 4 should rarely be used, and will use much memory.
|
Note:
|
Sometimes bad line quality is caused by
poor line formation during the Power
Animator render process, typically
because edge and depth thresholds are
set too low. Increasing the anti-aliasing
value will not improve this situation.
|
|
Note:
|
This parameter is ignored if you have
set frames. You must set the anti-
aliasing level (aa_level) in the line file
instead.
|
|
| -a
| Generates an alpha output file that can be used for compositing
|
| -c
| Generates a special color file for compositing with alpha. This file is not anti-aliased, so composites using the alpha file will not have color fringes. No inpix is allowed with this option.
|
| -f <filename>
| The name of the line file to use for shader settings. This option lets you update one file for an animation sequence, and then use this file to override the settings inside the other line files.
|
Examples
The following examples show how to use the linerender on a simple 10-frame PowerToon render. Assume that the output file name was "toon", so the following files were produced:
- 10 rendered files: toon.1, toon.2, .., toon.10
- 10 line files: toon.1.lines, toon.2.lines, ..., toon.10.lines
- Because Keep Uncomposited was ON, 10 original renders without lines were also generated: toon.1.noline, toon.2.noline, ... toon.10.noline.
-
(If Do Composite is OFF, then these files are simply named
toon.1, toon.2, ... toon.10)
Invocation 1
To simply render lines onto a single frame again:
linerender toon.1.lines toon.1.noline toonfinal.1
This will create the file toonfinal.1, which will look like toon.1. If you now edit the file toon.1.lines (using your favorite ASCII editor), change the thickness scale to 2.0, and run the above command, the thickness of the lines in toonfinal.1 will double.
Invocation 2
To rerender all of the 10 frames:
linerender -s 1 -e 10 toon toon toonfinal
This will create toonfinal.[1-10] using toon.[1-10].lines and toon[1-10].noline (the linerender knows to look for the appropriate extensions on the file names when rendering animations).
(In this new render, only toonfinal.1 will have the double line width specified in the toon.1.lines file, as defined in Invocation 1.)
Invocation 3
To render 10 frames using the shader and environment settings from one file (toon.1.lines):
linerender -f toon.1.lines -s 1 -e 10 toon toon
toonfinal
This invocation is useful for tweeking the look of an animation. You can change the settings in a single file, and then quickly preview the effect on your animation.
If you are interested in viewing only lines rather than fills, you can render the linefile at any resolution. In fact, you must supply a resolution if you do not specify an input pix file.
Invocation 4
To render an image with only lines against a white background:
linerender -x 640 -y 480 -B 1.0 toon.1.lines
toonfinal.1
To do the same for the whole animation:
linerender -s 1 -e 10 -x 640 -y 480 -B 1.0 toon
toonfinal
Line Files
|
|
|
|
|
Line files are created in the same directory as the rendered pix file, and have the name pixfilename.lines. These files are simple ASCII files, like SDL files, and can be edited with a text editor. The following list describes some of the more important keywords used in this file.
aa_level
-
- The lines are generally smooth at the lowest level (1), however higher levels are sometimes useful when the line width is less than a pixel. The valid range is 1 to 5.
fov
-
- Adjusts line widths for different fields of view when depth line scaling is used. The valid range is 0 to 180.
opacity
-
- When this is 0.5, lines will be composited on the original image with a 50% transparency. The valid range is 0 to 1.
blend
-
- Controls the fuzziness of lines. The valid range is 0 to 1.
thickness_scale
-
- Global multiplier for line thickness. The valid range is 0 to ·.
use_global_depth_scale
-
- Overrides the per shader depth scale when 1. Valid values are 0 and 1.
depth_line_scale
-
- The override value used if use_global_depth_scale is on. Controls thick thin modulation with distance from camera. The valid range is 0 to 1.
min_line_size
-
- See Perspective Depth Controls on page 75. The valid range is 0 to ·.
thickthin_min
-
- Allows for some thickthin control after linefile has been created. It allows the thickthin values on lines in the file to be clipped. If the min is 0.5, then line segments with a thickness value less than 0.5 will no longer appear. As shader-shader boundaries are always full width(1.0) they are not affected by this. Setting this to 1.0 will have the same effect as making the min depth and fold thresholds the same as the max. The valid range is 0 to 1.
thickthin_max
-
- See thickthin_min above. If this is lowered to zero then all the lines will be at full thickness, with no thick thin effects. It is like lowering the max fold and depth thresholds. The valid range is 0 to 1.
use_global_thickness
-
- Overrides the per/shader width when 1. Valid values are 0 and 1.
global_thickness
-
- Line thickness value used for all lines when use_global_thickness is on. The valid range is 0 to ·.
shader [ name(string) line_thickness(0-inf) line_illumination(0 or 1) depth_scale(0-inf) line_color_r(0-255) line_color_g(0-255) line_color_b(0-255) ]
-
- This keyword expects all the listed parameters to follow. It defines a shader for use by lines.
numlines
-
- The number of polylines defined in the file. The valid range is 0 to ·.
line[ shadername(string) num_segments (0-inf) ]...[x,y,z,width,bright]...
-
- Defines a polyline in 3D with varying width and brightness. The width values vary between zero and one, and -1 is used to denote a shader-shader or object-object boundary. The brightness value is ignored if the line_illumination is turned off on the shader.
Release Notes
|
|
|
|
|
See the Release Notes and Installation for information on how to perform a custom install of the PowerToon examples and default shaders.
The PowerToon tool consists of the following files:
- a single DSO (dynamically shared object) module: powerToon.plugin
- two OpenAlias shaders: edgescan.shader and capture.shader
- a standalone line rendering utility: linerender
You must press the Enter key to change values in the PowerToon Editor window.
The Raycaster is the only available render method. Raytracing currently does not work with these settings and is ignored by PowerToon. Likewise, PowerToon is not supported for multiprocessor renders such as PowerCaster and PowerTracer.
If Keep Uncomposited is ON, rendering in the test render window will not properly reflect the lines that are composited on the image. To see the image with lines, use File > Show pix after the render is finished.
PowerToon overrides global filters; you cannot use post-filtering parameters while it is loaded.
After you use PowerToon, some rendering and shading parameters will be overridden. To return to the default values for these parameters, load a file that was not rendered with PowerToon, or restart your Alias session.
The parameters that are affected include:
- In Render Globals, Blur Effects: Post Filter, Post Center, Post Adjacent, Post Diagonal.
- In Render Globals, Hidden Lines: Use Fill Color, Fill Color, Line Color, U Patch lines, V Patch lines.
- In Shader Hidden Lines: Use Fill Color, Fill Color, Patch lines, V Patch lines.
- In Shader Dynamics Properties: Density, Elasticity, Friction, Drag Coefficient.
|


