|
|
   
|
Winter Shelters A Word On Snow: To many people it seems stupid to build shelters out of snow. They assume that they will be warmer in a tarp or brush lean-to then they would be in a snow shelter. However, once it drops below freezing, nothing beats a well designed show shelter. Snow consists mostly of air (between 50-85%), and this air provides a large measure of insulation against cold. The Inuit know this, hence the reason why they live in Igloos. Another advantage of snow shelters is that in many cases it is quicker to build a simple snow shelter then it is to set up a tent or lean-to in deep snow. For most of these shelters you will require snow that is packed down, and can be cut into blocks. An exception to this rule is the quince, which is designed to be built out of powder show. If you do not have a sleeping pad you'll have to build one. About the
only way to do this in the winter is to make a brush pile, or to use your
pack and extra clothing. In the summer time you may be able to get away
without a sleeping pad, but in the winter you must insulate yourself from
the ground. Making Snow Blocks Making snow blocks is easy. The first thing you'll need is compressed snow. In the mountains this can be found by shovelling off the top layer of powder snow. This should expose an older layer of compact snow that can be cut into blocks. If this layer is too thin to cut blocks from, or if there is no layer of compact snow, you'll have to compact the snow your self. This can be done by using a ski, shovel, or back pack to press the snow into a firm mass. In cases where the snow isn't deep enough to make blocks (30 cm (1 foot) or less), you'll have to shovel the snow into piles, compress the piles and cut the blocks from that. Making the blocks is easy. Simply take a knife and cut a rectangle in the snow about 45 x 50 cm (18 x 20 in). The cut should be about 20 cm (4 - 8 in) deep. Then dig down on one side until you reach the bottom of the cut. Using a shovel or your arms, cut underneath the block and gently lift it out. You should end up with a block about 30 cm x 30 cm x 15 cm. The blocks are laid with the two 30 cm lengths in contact with the ground (so the blocks will be 15 cm "high"). The 30 cm x 30 cm x 15 cm size blocks are just a suggestion. Some shelters may require larger or smaller blocks, and some (such as igloos) require irregularly shaped blocks for some parts.
Powder Shelters Building a shelter of powder show is a simple process. First find a large snow bank. Dig into it near ground level. Once you're in about 30 cm (1 foot), dig upwards. Once you've dug up about 30 cm (1 foot) dig towards the back, forming a ledge. Form this ledge into a sleeping platform. The tunnel you made will act as a cold sink, trapping the cold air below the sleeping surface while allowing the warm air to rise into the sleeping area.
If you cannot find a bank large enough you'll have to make a quince. To start place a stick upright in the snow. Pile snow about 1.25m (5 feet) high and 3-4m (8-12 feet) in diameter around the pole. Then allow the snow to sit for several hours. Once the snow has hardened dig into the snow pile until you reach the pole. Then dig out the shelter around the pole, leaving walls about 30 cm (1 foot) thick. Remove the pole and your done. This shelter has the advantage that a candle or small fire can be used to warm the shelter. If your not using a candle or fire block the hole in the roof in order to hold in more heat.
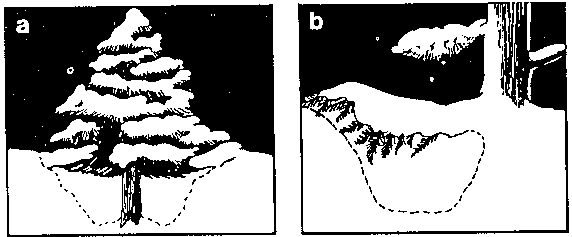
Tree shelters are excellent emergency shelters if you don't have time to build a more complicated shelter. These are quick to build because when it snows a natural depression forms underneath the tree. To make a tree shelter find a tree with a large depression, enlarge the depression until it is large enough to hold you. You now have a shelter that will keep you warm overnight.
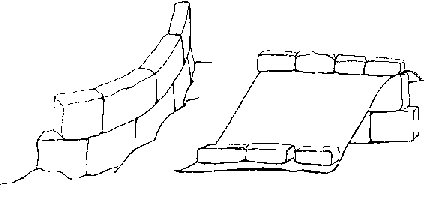
Snow blocks can be used to build several simple shelters. The first one in the diagram below is a windbreak. This can be build to protect your tent or cooking area. With a tarp and a few more blocks this windbreak can be turned into a simple shelter good for temperatures above -10 Celsius (15f).
For colder temperatures you will require a warmer shelter. A simple, 1 - person shelter is the snow trench (below). To build this shelter dig a trench the length of your body. The trench should be twice as wide as your shoulders at the head, and taper to about your width at the foot. To prevent the walls from caving in make the top of the trench slightly wider then the bottom (a). Cut block of snow and for a roof over the trench. The roof should be lower near the foot then at the head. To close the trench either have a snow block "door" (b) or close off the trench and dig an entrance tunnel (c).
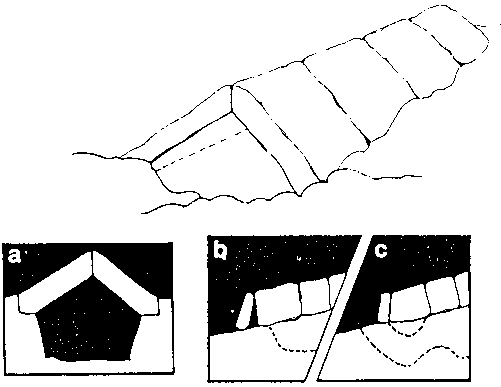
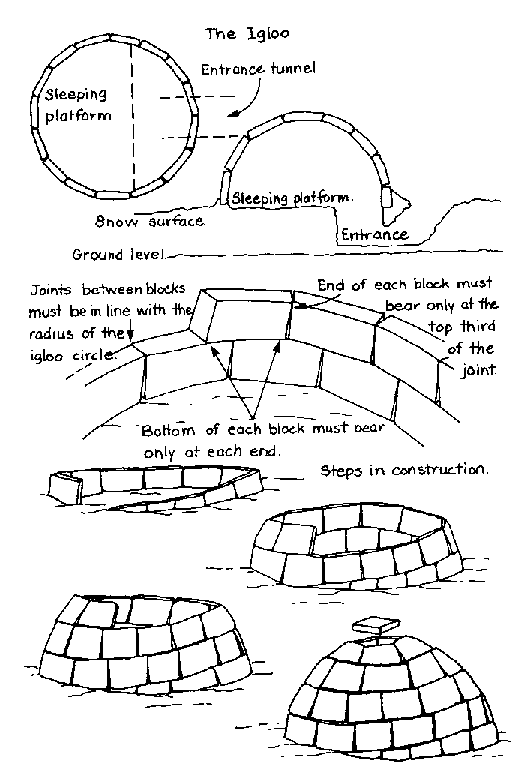
The best outdoor shelter is the igloo (below). With practise it is easy to build, and can be built to fit one to eight people. Start by making one layer of blocks. Then trim this row so that it slants in such a way that there is a continuous slope around the loop. Then continue to stack blocks, giving each block a slightly greater inward slant. Continue this until you are faced with a small hole on top. Fill in this hole with a block cut to shape. The next step is to burrow in underneath the igloo. Once inside dig out a small area, and leave the rest as a raised ledge. You sleep on the ledge, and the sunken area acts as a cold trap. You can use candles or small fires to help warm the structure, but if you do this make a small hole in the roof, and don't block the door. If your not using a candle or fire you can partially block off the door to improve heat retention, but leave enough room for some air flow.
|
This Page Copyright (2004), Knights of Dionysus
Authored by: Bryan Heit