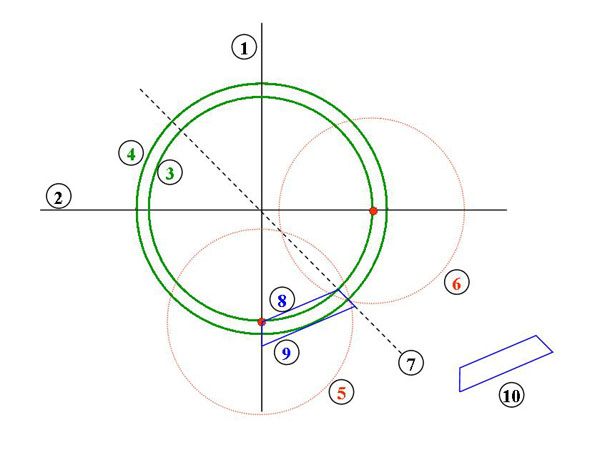
1. Draw the two line 1 and 2 as shown above using the triangle to make sure that the two lines are at 90 degrees to each other.
2. The point where the lines intersect is the center point for the circles you will draw with the compass. First draw the outside circle (number 4) with a radius of 5 9/16", which will give it a diameter of 11 1/8". The 1/8" is to allow a little room for error prior to final truing to 11". Secondly, draw the inner circle (number 3) with a radius of 4 11/16", giving in a diameter of 9 3/8", again allowing a little extra prior to truing and sanding to 9 1/2".
3. Now locate the red dot at the intersection of circle (#3) and line #1. You're going to put the point of your compass here, then adust the compass till it's anything over 1/2 the distance to the other red dot. Using that measurement, draw the circle shown above as #5. Without changing the compass setting, set the point in the other red dot, and draw another circle. (You don't have to draw the full circles if you don't want to -- just drawing the arcs (part of a circle) will do.
4. Where these two new circles (or arcs) intersect, along with the intersection of lines #1 and #2, will give you the points along which to draw line #7.
5. Repeating stepts 3 and 4 above one quandrant over will allow you to draw another line, like line #7, that will equally divide the circles into 8 equal parts (just like cutting a pie).
6. Now examine the diagram above, and draw line #8 (the blue one) on your diagram.
7. Along the middle of line #8 and perpendicular to it (90 degrees) measure the distance to the outer circle (#4). Once you've confirmed that, measure from the end points of line #8 (perpendicular to it) out the same distance. From these points, draw line #9.
8. You've now created the shape outlined in blue (above), and pulled out separately so you can see it as item #10 in the diagram. Eight of these pieces will add up to make an octagon, and eventually a circle.
On to the next step! Back Home