 |
|
|
|
|
|
|
|
|
|
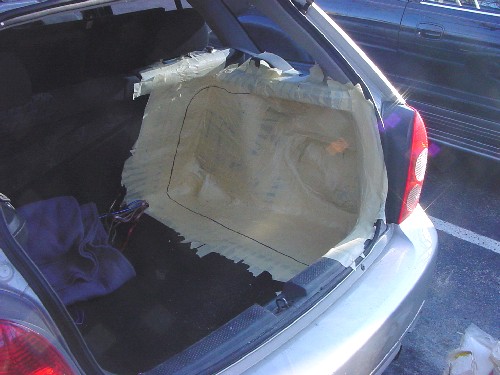
| Taping Up The tape is going to protect the car from the fiberglass resin. Using as much tape as you need, completely cover the area that will be molded. Use several layers of tape, until you are sure that your vehicle will be adequately protected. Use criss-cross layers, laying tape in opposite directions on each layer. I used about 120 yards of tape to protect my vehicle: |
 |
| It is also a good idea to draw a line in marker, to show the approximate dimensions of your finished enclosure. This will help you determine where to lay the fiberglass, and where you can stop. |
| This was one of the toughest portions of my project, and at times, I considered quitting before I went any further! The fiberglass mat has a tendency to stick to everything except where you want it � the brush, your hands, etc. Lay down your protective sheet, and put on gloves. To start this layer, I first cut the fiberglass mat into manageable sections. DO NOT cut the mat like I did! Instead, TEAR it into smaller pieces. The frayed ends will help the matting stick where you want. I broke up one package of matting into various sizes, from about 4� to 12� pieces. Next, I mixed the resin and hardener (catalyst) according to the manufacturer�s instructions. Go ahead and mix up at least 16 oz, or maybe more � depending on the size of the area you plan to cover. Adding more catalyst will speed up the curing time, and reduce the working time. Using less catalyst will increase the cure and work time. I found that using just what the can says is probably best (imagine that!). First, I �painted� some resin onto the tape, and tried to stick the mat pieces on to it. This worked eventually, but was still a bit of a struggle, as the mat had a tendency to pull away from the tape and fall off. I believe tearing the mat, and using a bristle brush would have helped me in this stage. Once you have a piece of matting stuck, proceed to brush on more resin. Do not use a true �brushing� motion like paint, more a �stippling� motion � tapping the resin into the mat. You will see the mat start to soak up the resin, and once it is transparent, it is saturated. |
| The First Layer |
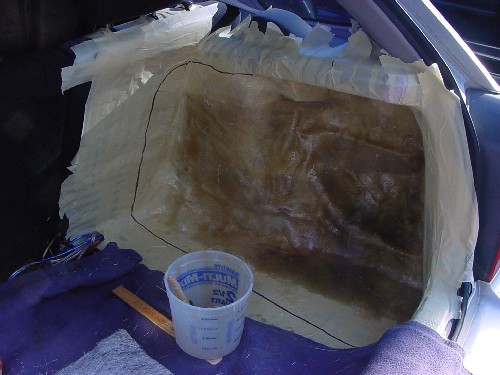 |
| Continue working like this, sticking on more mat and soaking it until your entire area is covered with the sticky mess. Once the mat is soaked, you should be able to once again see your marker line you made before. Make sure to glass past this line a little bit. Here�s a picture of my first sloppy layer: |
| This is one stage where I wasted a lot of resin. Because I used foam brushes, used scissors to cut the mat, and it wasn�t sticking very well, I really slopped the resin on there to get things to stay in place. |
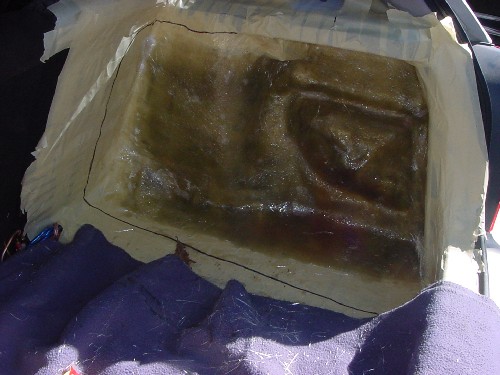
| It is recommended that for subwoofer enclosures, the fiberglass be at least 7 layers thick. This sounds like a lot, but you will find that things speed up greatly once you get the first layer done, and your confidence increases, too. Try to lay as many layers as you possibly can right now. It is better to do more layers at once than to do one, let it cure, then continue. And once you start to build up the mold, sticking on more mat becomes very easy, as it adheres almost instantly. If you can do 5-7 layers right now, you�re in great shape. Once I had about 5-7 layers done, here�s what my project looked like: |
| Don't worry - it gets easier!! |
 |
| Now go grab a beer or two � you�ve got 2-4 hours until this cures. |
 |
| Poppin� the Mold Is it solid yet? I was really excited when I finally went out to my car (just to check on things) and found that the sloppy, sticky mess had become rock hard! It made the work worthwhile. This is another stage where I realized my mistakes. First, I forgot to use a �mold release agent�. See, once the fiberglass is cured, it will be firmly stuck in place. Common practice is to use mold release wax (I have read that Vaseline or a spray with WD-40 works fine) on the tape to help the mold pop out after curing. Well, I forgot. AND � I think it would have made the already arduous process of getting that matting to stick to the car even more difficult. Regardless, this is why I recommended the use of the blue painter�s tape. Since my mold was stuck to the tape, and the tape was stuck to the car, it was quite difficult to remove. Using the blue tape will help the mold release with the tape still attached to it, which is fine. Using the standard masking tape like I did made things rather hard. I don�t feel that the mold release agent is totally necessary, in retrospect. After all, I DID get the mold out. Regardless, it should take some firm tugging to pop the mold. Be careful not to break the fiberglass. Another good reason to lay up as much as you can during the initial layering; it makes the mold that much stronger, thus there is less chance of cracking it when trying to pull it from the car. Keep working around the piece until you get it removed. After lots of pulling, mine came out with a loud �bang!�. Once the mold has been �popped�, you can determine what the final back shape should be. Clean up the tape from the car, and re-insert the mold. Using a marker, draw a line on the mold where you feel you�d like the final enclosure to be. This need not follow the line you originally drew on the tape. Create a nice shape that will work for you and your vehicle. You can now take the mold to a better workspace for trimming. To trim the mold, I used a dremel rotary tool with a small diamond cutoff wheel. This worked great, and is much easier, smoother, and maybe faster than a jigsaw. The pros will use air saws and the like � but we are home-builders, not pros! I found the dremel to be a great way to trim the mold to my line. A quick note on what is to come: Upon removing my mold from the car, I first put in the sub rings, the construction of which is detailed in the next section. I would definitely suggest trimming the mold first. In the section that shows the mounting of the subwoofer rings, you will see that my mold is �ugly� and the edges are ragged and untrimmed. Hopefully, yours will be cleaner and neater, because you will trim the mold before proceeding! |
| home |
| materials |
| taping & molding |
| ring making |
| ring mounting |
| fleecing |
| subwoofer mounting |
| finishing |
| misc info |
| email me |
  |