| Enclosing the Enclosure Okay � now it�s finally time to make this thing look like�.well�something! For the front of the enclosure, I used a polyester/cotton blend material from a fabric store. The elasticity is very important � you want to be able to stretch the material enough to remove any wrinkles and make the surface nice and taut. I cut a piece of material (which I�ll call �fleece� from now on) large enough to cover the front of the enclosure with some excess on all sides. Using the 3M spray adhesive, I started at one of the subwoofer rings. To use the adhesive, first spray both surfaces to be bonded together. You then let this sit for a minute or so. Once the adhesive is barely tacky to the touch, it�s ready to bond. After tacking the fleece neatly to a small area of one of the subwoofer rings with the adhesive, I began stretching it over the rest of the enclosure and sticking it down, working in small areas at a time. Try to pre-stretch the material, so you know what direction to pull to avoid wrinkles once the adhesive is sprayed on. |
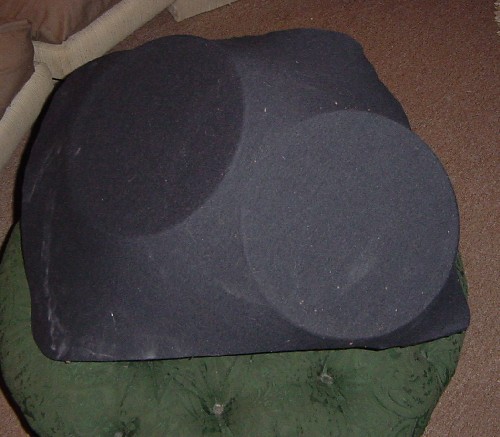 |
| Once the fleece is stretched and tacked, the enclosure really begins taking shape, and you can start to see the results of all your hard work: |
| It is important to note that the fleece should be pulled around the back of the mold, and the adhesive used to stick it down. Do not simply use the adhesive on the edges of the mold, and think that it is sufficient. It will stick for now, but once the resin hits it in the next step, it will release. If too much of your adhesive gets released by the resin, the fabric can pull off the enclosure or wrinkle. Be sure to tack it down well away from the edges, where it will not be affected by the resin. |
| Now get out the resin again, and soak the fleece well. Be sure to saturate the fleece thoroughly where it contacts the MDF rings, and at the contact points with the original mold. Once the resin cures, it will be permanently bonded to the back and rings. Depending on what material you use as your �fleece�, this step can take quite a bit of resin. The thicker materials will soak it up like a sponge. This is fine � just make certain that all of the contact points are soaked well, and the rest of the taut fleece has a good coating of resin: |
 |
| The fleece alone is nowhere near strong enough to be used as the final enclosure, so more fiberglass needs to be added for strength. My original plan was to cut out the subwoofer openings, and add fiberglass to the inside of the fleece, trying to maintain a nice smooth exterior surface. |
| This did not work out well at all! |
| Using the router with a flush-cutting bit (straight cutting bit with a bearing that follows the sub ring shape for a flush cut), I removed the fleece from the sub holes. I then attempted to lay fiberglass inside � this proved to be nearly impossible, as there is so little room to work inside, and the dowels were win the way of nearly every move I made. I did manage to get a few sloppy layers done, but it took a very long time, and I wasted a lot of resin in the process. Do yourself a favor � unless you are making a very large enclosure for an 18� subwoofer (big hole!), forget about doing it this way. Just add fiberglass to the outside of the front. Once I gave up on the inside work, glassing the outside was a joy. It was easy, quick, and came out fairly smooth, as I was careful to be as neat as possible: |
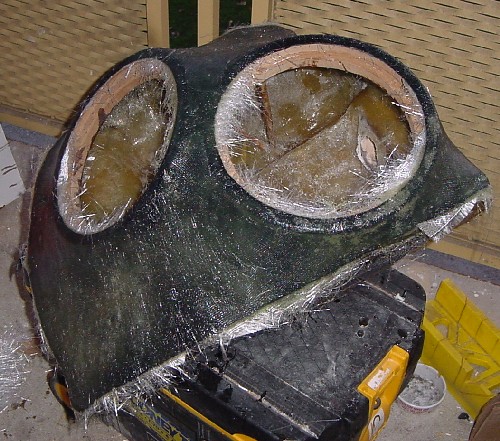 |
| Between the 2 sloppy layers inside, and these 5-7 outside layers, the enclosure became very strong once the resin cured. I have since been able to stand on it without consequence � I weigh about 155 pounds. Fiberglass is great stuff! After curing, I again used the dremel to carefully trim off the overhanging fiberglass, and used the router to re-trim the sub holes. |
 |
|
|
|
|
|
|
|
|
|
| home |
| materials |
| taping & molding |
| ring making |
| ring mounting |
| fleecing |
| subwoofer mounting |
| finishing |
| misc info |
| email me |
  |