TUTORIAL
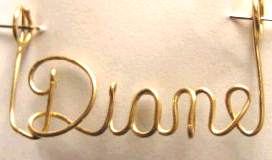
Part 5 "Diane" Pendant
By: Maggie Santiago
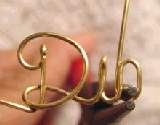
1.Start about 1� inches from the end of the wire, turning the long piece of the wire to the front of the pliers; bend and make sort of an �L� (see picture #1)
 2. Working on the long piece of the wire; pinch a little less than � of an inch and bend to the back
3. Press it down at the top, roll the top to the right just a little bit. You are rolling two wires together (picture #1 in tutorial #1)
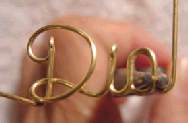
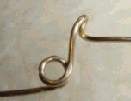 4. Leave the pliers there;working on the back of the wire; with your hands bend it to the left up and to the right, and to the back of the first part of the�D� you should have a �D with a loop at the bottom� (see picture #2)
 5. Grasp the wire at the bottom even with the �D� and bend up
6. Grasp the wire about the middle of the �D� and bend back and down this will be the �i�
7. Grasp the wire at the bottom and bring to the right and up
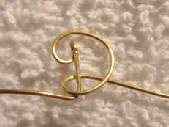
8. Grasp the wire even with the �i� and bend down working on the back..(see picture #3)
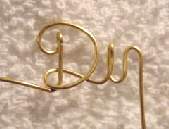 9. Grasp the wire inside the �a� and bring it up (working inside the �a�) (see picture #4) grasp the wire at the top of the �a� and bring down even with the bottom part .(see picture #5)
10. Grasp the wire at the bottom and bring to the right and up
11. Grasp it about the middle of the 'D' and bend it to the back, pinch a little.
12. Grasp it at the top and bring it to the right and down.
13. Grasp it even with the bottom of the �a� bend it back and up, pinch a little
14. Grasp the two wires from the back and bend to the right and down ( you are making the hump for the �n�)
15. Grasp at the bottom ; bring it up and to the right
16. Grasp it even with the top of the �n� and working on the back bring the wire down and a little to the right you are making an �e� (see finish name for reference)
17. Grasp it on the bottom of the �e� bend wire up
18. Grasp it at the bottom bring the wire up and to the right.
19. Congratulations you finish the name. Now, take the end; grasp it a little higher than the tip of the �D� (look at the picture for reference) and bend it up, fold it back and around the pliers twice, to form a double loop; then around the wire twice to finish it; cut the excess in the back. This is for the chain; do the same with the piece of wire that you left in the very beginning. Finish filing the ends and carefully crimp the ends. Polish it a little and Enjoy it!!!
If you have a problem I will try to help. Email me at:
Maggie
Please use these lessons for your personal use only. Do not include them in any lesson plans, in whole or part, that you are teaching or publish them on any web page or use them in any commercial way without permission from me.
These pages are all copyright 2001 by Maggie Santiago.
If you find something wrong with these pages please contact Micki