El
Estanque Chico
(The Little Pond)
|
| |
|
Este estanque empezo casi
por casualidad...Un primo mio le regalo para Navidad a
uno de nuestros chicos una pecera chica con un pescadito
naranja...Al tiempo nos dio lastima que tuviera tan poco
espacio...y decidimos hacerle un pequeño estanque para
que tuviera lugar donde nadar...El "pequeño
estanque" no fue tan pequeño...y ademas se fueron
agregando varios integrantes nuevos...De a poco nos
fuimos entusiasmando toda la familia y hoy pasamos una
buena parte del dia cuidando los peces, pescando alevinos
a la noche con linterna (un deporte fascinante),
espantando benteveos y biguas...Tambien el nacimiento de
las nuevas crias nos llevo a comprar pecera grande para
recriarlos...Les muestro las distintas etapas de este
estanque...
The beginning of this pond was just by chance...A cousin of mine
gave a little aquarium with an orange Goldfish as a Christmas gift to
one of our kids...Few days later we thought it would be good for him
to have a bigger place to swim...We decided to make a little
pond...and after that we put many new inhabitants in it...Day by day
we've got more excited, and now all the family spends a good part of
the day taking care of the pond, fishing milimetric fry with a torch
(a fascinating sport!), running away Benteveos and Biguas...Also, the
new fry took us to buy a big aquarium to breed them well...I show you
the different steps of the construction of this pond... |
| |
|
|

|
La Construccion - The
Construction
|
Recien terminado - Just
finished
|
| |
|
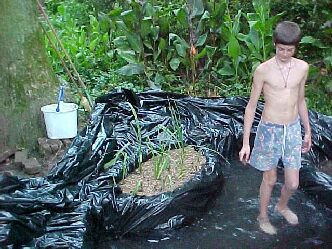
Para construirlo- To
make it
- Primero marcamos un circulo, poniendo un palito
en el medio del futuro estanque, con un piolin
atado, y mas o menos dos metros de hilo...marcamos
el borde...y luego hicimos el pozo (los chicos y
sus amigos). En la parte mas honda tiene unos 80
cm.Tambien dejamos unas "macetas" (ver
foto): En vez de cavar todo el estanque, marcamos
el lugar de las futuras macetas y despues,
dejando un borde de unos 15 cm (de tierra) ,
cavamos en su interior hasta una profundidad de
30 cm. Al poner el plastico negro, tambien
cubrimos las macetas y recien despues las
rellenamos con tierra negra, plantamos las
plantas y cubrimos la superficie con piedritas de
canto rodado.
First we marked a circle on the ground, with the help of a
little stick in the centre of the future pond, with a string of 2
meters long...we marked the contour of the pond...afterward we
digged the hole (the kids and their friends). In the deeper part
of the pond it has 80 cm. We also leave some water-pots (see
photo): Instead of digging all the pond, we marked the place for
future pots and afterward, leaving an earth edge of 15 cm, we
digged inside till 30 cm deep. While putting the black liner, we
also covered the pots and then we fill them with earth, we planted
the plants and put some cobbles on it.
- Lo mas dificil fue la nivelacion, y hacer que los
ladrillos quedaran parejos...Los pusimos
directamente sobre el plastico, pero hoy vemos
que algunos de ellos se han corrido hacia delante,
hasta a veces caer dentro del agua...Hoy estamos
construyendo un tercer estanque, y se nos ocurrio
ponerle una fila de ladrillos debajo del plastico,
para hacer mas firme el apoyo del borde...despues
les cuento si funciona o no...
The most difficult thing was the nivelation of the edges and
the bricks...We put them directly on the black liner, but today we
see that some of them have moved towards the pond (some has fallen
inside it)...Today we are constructing a third pond, and we are
putting one line of bricks under the plastic liner, so it's more
solid...afterward I will tell you if that works or not...
|
|
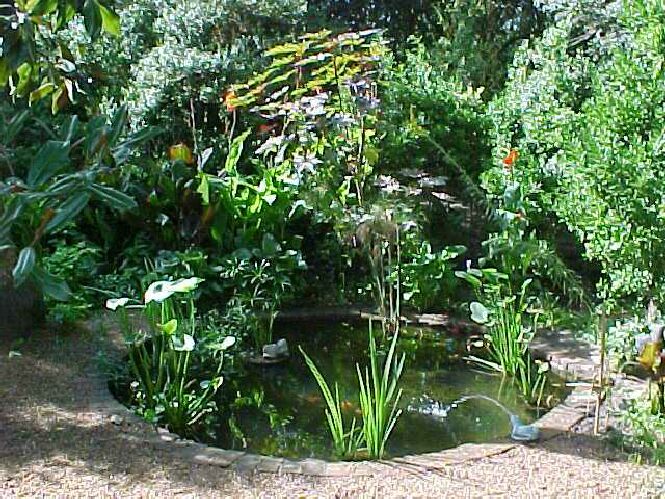
El estanque a unos
pocos meses de su construccion - Some months later
|
| |
|
- Otro error fue que cuando teniamos puesto el
plastico y lo estabamos llenando de agua, no
resistimos la tentacion y nos metimos adentro a
plantar, poner macetas, etc (junto con nosotros
entraron los perros...) Resultado: El plastico se
ve que se rajo, y el estanque pierde agua, asi
que siempre tenemos que cuidar que no baje mucho
su nivel...
Another mistake was that when we have just put the plastic
liner and we were filling the pond with water, we couldn't resist
the temptation and jumped inside to plant, put more pots, etc (the
dogs came into the pool with us!)...The result: The plastic liner
is not more waterproof...so we have to be always taking care of
the water level...
|
|
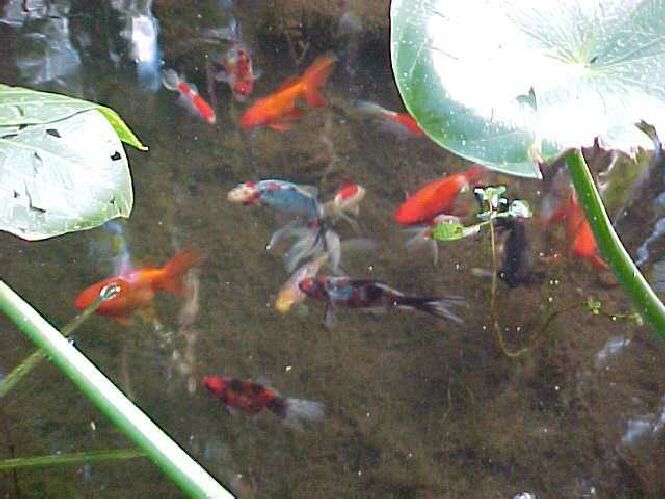
Estos fueron los
primeros peces... - First fishes...
|
| |
|
|
- Compramos en distintas etapas varias variedades
de Goldfish...Shubunkins, Telescopicos, Carassius,
Cometas...Por suerte se adaptaron muy bien...Al
principio se nos murieron dos (exceso de comida)...y
tambien tuvimos algunas bajas por los benteveos...Ahora,
al haber crecido las plantas, los pajaros no los
comen tan facil.
We bought different varietys of Goldfish...Shubunkins,
Telescopics (those black with big eyes), Carassius, Comets...By
luck they adapted ver well..At the beginning two of them died (too
much food)...and also the Benteveos ate some of them...Now, with
the plants that had grown up, the birds can't eat them so easy...
- El año pasado nacieron las primeras crias (reconozco
que nunca logre ver los huevos)...pero si
encontramos a los milimetricos alevinos...Habiamos
leido que habia que separarlos de sus padres, asi
que instalamos una palangana para recriarlos...anduvo
bien, algunos murieron, pero logramos unas
cuantas crias...Ahora perfeccionamos el sistema
con una pecera con aireador y luz (al aireador lo
prendemos solo un ratito cada dia, poca comida...casi
nada...NO cambiamos el agua de la pecera, solo
limpiamos los vidrios con un trapo por adentro,
dejando el vidrio de los costados sin limpiar -dicen
que es bueno que haya algas en el sistema-, le
hemos puesto plantas oxigenadoras que funcionan
muy bien...y practicamente sobreviven todos los
pececitos que ponemos adentro)
Last year the first fry were born (I have never seen the
eggs)...but yes we found very little fry...We read that we have to
separate them from their parents (so they don't eat them), so we
installed a little bath tub to put them in...it worked well, some
of them died, but we obtain many baby-fishes...Now we have
perfectioned the system with an aquarium with air-pump and light .
We switch on the air-pump only some minutes per day, not much
food...nearly nothing...we DON'T change the water in the
aquarium,the only thing we do is to clean the glass with a piece
of cloth, leaving the side glasses of the aquarium without
cleaning them.(They say that its good to have some algae in it),
we have put plants in it (Elodea) and nearly all the fry that we
put in it survive...
|
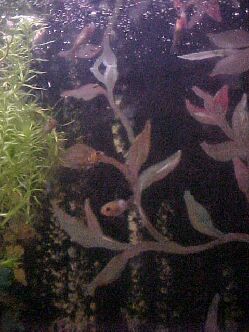
Esta es una foto de la pecera, con las
crias del otoño de este año...En el vidrio del fondo
pintamos unas plantas (del lado de afuera de la pecera) y
despues le dimos una mano de pintura negra arriba...Desde
adentro de la pecera se ve como plantas sobre fondo
oscuro...Es util para tapar el aireador, y poder ver bien
a los pececitos...(La planta verde es la aireadora natural (Elodea), la sacamos de un arroyo, despues la lavamos bien
con lavandina y iodo para matar posibles huevos o peces
del arroyo que vinieran en ella, recien despues la
pusimos en el estanque...y ahora en la pecera)
This is a picture of the aquarium, with Autumn fry...In the glass
at the back we painted some plants (from the outside side of the
glass) and then we covered the paintings with black painting...From
inside the aquarium you see like plants on dark background...It's
useful for hiding the air-pump, and to see well the little fish...(The
Elodea seems to be a natural aireator, we took this plant from a
stream, then we washed it well with "lavandina" and Yodo, to
kill not desired "visitors" like fry from the stream, just
afterward we put it in the pond...and now in the aquarium)
|
| |
|
|
| |
|
Home
- Estanque
Grande - Goldfish
- Ideas - Peces del Estanque Grande
- Flores y
pajaros - Los Canteros
- Los perros - E-mail
|