Assignment 5
NTU Grand Prix!!


The Start of the Demo greets the user with hilly terrain
complete with a racing track near South Spine of NTU!


The Sky is implemented using a Skybox, a gigantic box with sky textures giving the illusion of a very large unbounded scene.


Using the Terragen tool to create the height map.
The degree of black and white represents how deep each point is.
There are also many other simple tools to glacierise or canyonise
a terrain in this application.


An Awesome South Spine Building overlooks the race circuit!


A simple check was inserted into my code to ensure that the "solar-powered" go-cart does not take off into the sky.


On clicking the LEFT MOUSE BUTTON, the mesh/gridlines are seen.
The skybox's shape (the blue lines) is now exposed!


Going Downhill, but enjoying the scenery!


The terrain is created using the rows of GL_TRIANGLE_STRIP.
The process of creating the whole strip is likened to the
process of mowing the lawn.


The UG-K (Unmanned Go-Kart) does not take off
but bounces up a little.


Dangerous 90 degrees corner coming ahead

Skyboxes and Height Maps are often used to give the game environment a sense of the boundless sky and terrain respectively.

I remember in one of my childhood games, Doom, there were scenes where I would run into open space and see dark clouds casted over me, adding a lot of realism to the environment and making me feel immersed into the world. That sky, which I found out later, was done by a skybox also!


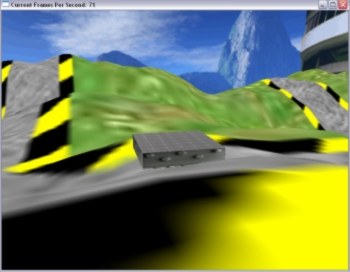
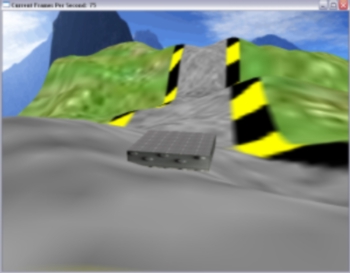
Approach Used

The main points of this assignment is to create a simple world using at least 3 objects: The terrain with texture, the skybox with texture and the racing machine which can be just 2 rectangles. Due to the time constraints (completion within a week), we are also not required to add in advanced features like score boards, buildings, trees, weather conditions, physics, etc.

My Approach:
The unique space-ship like shape North and the South spine building brings about immediate identification that the location in a picture is NTU. Hence I decided to to my race at the grass patch near South Spine. (See Picture on Left)

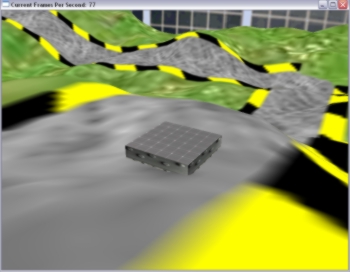
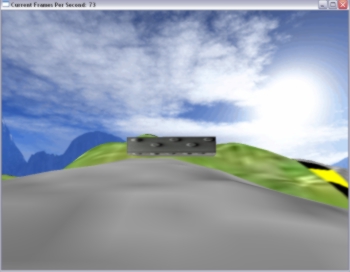
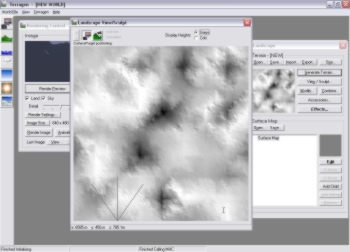
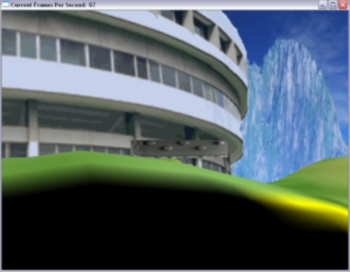
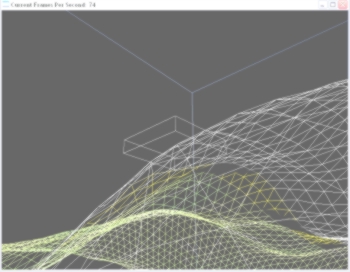
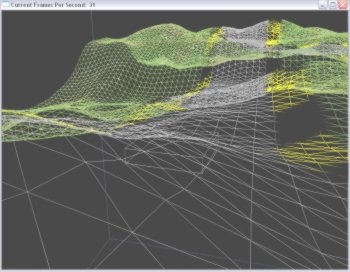
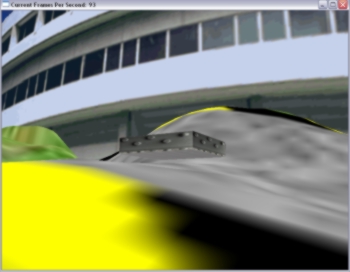
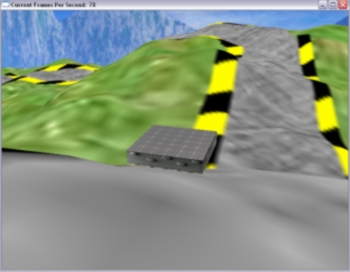
Below is the description of how I create the core features required in my assignment.

Terrain

The terrain is generated using the Height Mapping technique. I learned this technique from gametutorials.com through its height map demo. Height mapping exploits the fact that a file, e.g. RAW file, can store a single value of information in each of its coordinate/pixel. And in this case, we store the height (Y- values) of the terrain in our RAW file. This is because the XZ plane is going to be proportional to the width and height of the picture file. This way, loading up of heights and storage of the height information can be very efficient.

With a terrain/landscape generation tool called Terragen, I managed to create a hilly terrain for my demo (that was exported into a .RAW file). Also, the race track with its yellow-black strip was manually drawn by myself through the editing tool The Gimp 2.0.

Skybox

The sky of the demo is created by placing the scene inside a gigantic box with matching sky textures. My skybox texture is an edited version of the skybox taken from the demo on Skybox also from gametutorials.com. I superimposed the South Spine picture from the NTU Photo Gallery which Dr Prakash introduced in our assignment handout.

By superimposing the South Spine building into one side of the skybox. The race feels more like an NTU Grand Prix!

Clamping:
glTexParameter(GL_TEXTURE_2D, GL_TEXTURE_WRAP_S, GL_CLAMP_TO_EDGE);
glTexParameter(GL_TEXTURE_2D, GL_TEXTURE_WRAP_T, GL_CLAMP_TO_EDGE);

was used to make sure that seams do no happen at the edge of every side in the skybox, hence exposing the great sky illusion. :)


Unmanned Go-Kart

This unmanned Go-Kart simulates a radio controlled mini go-kart which runs on solar power, hence the solar panel texture (which was taken from BP Solar) was mapped onto the top of my kart.

A 3rd Person perspective was done by placing the kart at the point of my View in the glLookAt() function and translating according to the movement changes. The collision detection of this Go-Kart is done by a simple height check comparing the corresponding Y-heights of the X-Z coordinates with only the centre of the bottom side of my blocky kart.

On top of these, I also need to make sure that the kart does not fly off the ground like a plane and will always be near or on the ground through a simple height check comparing with the ground's height.

Some quick facts of my project:
1. Language and APIs used: OpenGL in Visual C++
2. Number of polygons used for the Unmanned Go-Kart: 6
3. Scene Modelled after:Part of Yunnan Garden near South Spine
4. Collision Detection Method Used: Simple Height Check with height map's Height value
at the corresponding X-Z position
5. Terrain Map Generated by: Terragen


Game Storyline (Read Before Playing!)

" Well Done with the previous mission at LT 12 and 13. The success in that critical mission and the fact that you are a Computer Engineering senior in NTU has caught the eye of Her Majesty and she has personally asked me to task you with the next mission.

You will be participating in the annual NTU Grand Prix, a competition for students with self designed unmanned go-karts to compete with each other.

Through this competition, you will"test-drive" the effectiveness and controls of our latest espionage gadget. The UG-K Ver. 0.98. It runs on a BP Solar Panel and is controlled by your notebook keyboard's direction buttons.

Take it for a spin and I expect your full report on my desk by 19 September 2004.

Good Luck!

This message will self destruct in 5 seconds... "


Key Controls in this Game:
The Main keys that demonstrate collision detection in this assignment would
be the direction keys of the go-kart.


1. Go-Kart Movement
(New)
Move Forward: Up Arrow
Move Backward: Down Arrow
Move Left: Left Arrow
Move Right: Right Arrow

2. Others
Show Triangular Mesh and Gridlines: Click Left Mouse Button once (New)


Conclusion:

This assignment allowed me to understand key illusion techniques using skyboxes and the effectiveness of height maps to generate terrains.

Not only that, this assignment also further enhanced the lessons taught in class and leaving me with a very deep impression of the importance of terrain generation and skyboxes in almost every 3D game (including my game demo) nowadays.

Hope you enjoy playing my racing demo! ;)


<---Download Code and Executable--->

If you have difficulties downloading the file, please feel free to contact me at: [email protected]


Credits and Acknowledgments:

1. I wish to thank Dr Edmond C. Prakash for this opportunity to do some valuable hands-on on the concepts of skyboxes and terrains learned in lecture. Doing this assignment allowed me to gain a valuable experience that will definitely benefit my upcoming game demo. Thank you sir!

2. To DigiBen, ([email protected]) from www.gametutorials.com for without his well-explained tutorials and sample codes on skyboxes and heightmaps, I may not have gone so far. Parts of my code on initialisation of the window and OpenGL were coded with close reference to his sample codes.

3. To Marco Monster, because his mini skybox tutorial on
http://home.planet.nl/~monstrous/skybox.html
is so informative and more importantly, readable!

4. My family members for testing my demo during my 3.5 days of doing this assignment.

4. Other Important References I could not do without:
The OpenGL Redbook
OpenGL Website


Best viewed in 1024x768 :: Sitemap
Copyright© Ryan Ko Kok Leong 2004.All Rights Reserved.

Hosted by www.Geocities.ws

1