Swaps:
Sarah's April Showers, Spring Flower Swap
Colleen's Small Paper Piecing Swap
Patty's Recipe Book
Challenge Swap V
RAK Ideas:
Links:
For Scrappers
Miscellaneous:
Tips and Techinques:
DJ Fish Class
Hi! Here are the instructions for the Fred Mullett style embossed
fish... Please let me know if you have any questions.... this technique is much easier than it looks or sounds! You can also find the technique in the May/June issue of Somerset 1997 page 37.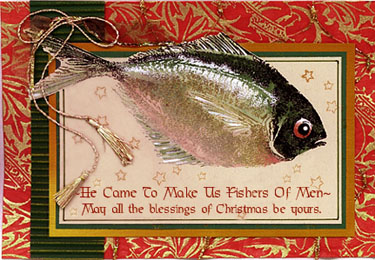
SUPPLIES:
*Large fish stamp of choice (I have used Fred Mullett BG 15 - Big
*Pompano) It is about 6.25 inches long.*Black Color Box ink pad
*Lt Gray Color Box ink pad
*Small piece of sponge (any kitchen sponge will do)
*Cardstock of choice. (white or a light color)
*coffee/cocktail straw that has been cut off at an angle like a bevel
and/or ice cream sample spoon*small piece of paper for a mask
*Heat Gun
*Watercolors (inexpensive kids type in the little pallet thingy- I used
semi moist Prang)*White Tempera Paint for highlights
*Markers for deepening details
*Black EP (I like detail or fine line)
*Clear EP (again, I prefer detail)
*One or two other EP colors of choice:
*On the Christmas card, I used Black, Clear, White and Translucent Gold
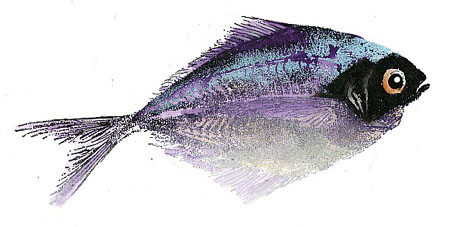
*The scan that is attached to this post uses Black, Clear, an opaque
Turquoise and a transparent Plum PearlTECHNIQUE:
While the ink is wet, you will apply different colors of EP using a
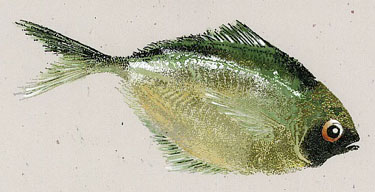
cocktail straw that has been cut off at an angle like a bevel, or a small ice cream sample spoon (like the sample spoons at Baskin and Robins). You will tap each color on the area and leave it there. When all the colors are on, the excess is tapped off. This wastes what you pour on, so only pour on enough to barely cover the area that you want embossed with that color. After heating, it is water colored in your choice of colors.1. Ink large fish stamp with black pigment ink on the top 1/3 and light
gray pigment on the bottom 2/3. Using a small sponge, tap and blend the ink so that it remains black on the top and a gradual blending to the gray at the bottom. Stamp the image on CS.2. Make a mask in the shape of the black area on the head and gently lay
it on inked image. Be careful not to smear wet ink. When mask is on, tap on just enough black EP to cover, and lift off mask.3. Apply a thin line of an opaque turquoise blue EP along the top of
the fish about 1/4 of the way from the top -running from the head to the base of the tail.4. Tap a thin coat of black on top portion of fish (above the blue), and
top of tail. Depending on fish stamp, this would be about the top 1/8 of image. Now you have the head and the top 1/4 of the fish lightly covered with EP.5. Using clear EP, hold the spoon about 4-5 inches above the image and
sprinkle a small amount over the lower fin and bottom area of the tummy. (this preserves the light gray on the lower portion of the fish which gives it a rounded dimensional look)6. Fill in the remaining tummy area with a transparent plum pearl.
7. Tap the bottom of the card with your fingers, and make the EP
"dance". This slightly blends the EP and fills any areas that were left uncovered when you sprinkled them on. Pour off excess EP and toss or save for a party mix of EP.8. Heat and emboss.
9. Then....... add watercolor washes and viola! you have a beautiful
fish.* On this one, I used straight purple on the top, lots of pigment-not
real watery.
* Lay the dark color along the top edge. Then wet the rest of the body with plain water (not the fins, head or tail). You don't want it soppy, just damp wet. Begin blending the dark down into the body about half way, but leave the pure pigment at the very top... pull it down into the body without using the very top area of pigment. You want a nice gradual blending down to none at the bottom and pure pigment at the top. Then add some color to the fins and tail.
* Next, paint in the black on the face. This will fill in where there is no EP and make the face solid black. Pull off any areas where you want it to be transparent (like the gills).
* Using orange, brown and the smallest touch of black, mix an orangy color. Use this color undiluted on the eye. Stroke some color in the eye area (4 o'clock to 10 o'clock) and rinse your brush out and blot off.
* Then blend the pigment that you have on the eye upwards toward the top so that you have a gradual blending to bare paper, leaving the lightest part for a highlight
* You can add more highlight with white tempera paint if needed. Also, you can add some highlights on the tail and fins with the tempera.
* Dilute the eye color with water and paint an orangy wash over the lower tummy area.
* If you like, you can come back with markers after the fish is dry and deepen any areas or accent areas with darker colors.
The saying on the Christmas Card is computer generated. I printed
it out and then stamped the fish on...... |
 |
Topic of the Week: