Project
Inject
Dave's Modifications Site
gives a guide to the DIY conversion of Blue/Black Holden motors
to Black motor EFI
Page 2
To purchase all the conversion items in Page
1 from your average wreckers, you will need around $450 to $500.
Set aside a little extra for any miscellaneous items, like
wiring, connectors, solder and tape.
The wiring for the conversion could have been done in a
variety of ways. The approach adopted with the project car was
to retain as much as possible of the original wiring setup.
This ensured a higher degree of simplicity in installation.
The main EFI harness was used in its entirety. A VK EFI fuse
box and battery harness was used. The engine harness was
weeded out to provide just the required functions to do with
the EFI. Descriptions of what wires can be weeded out are
available by email
at
this address.
The hose setup for the VK EFI system is very
similar to that of previous 202s. There are equivalents to the
carb setup's ported and manifold vacuum sources, which can be
used for the same purpose. Some hoses were longer/shorter than
those for the carb setup, so collect as many as possible from
the donor vehicle to ensure convenient installation. The only
real new hose requirement is a hose between the manifold and
the fuel pressure regulator.
A few checks were performed before the
initial startup. Ensure all fuel lines are connected properly,
as these have a much higher pressure than that of the carb
fuel lines. Ensure there are no obvious electrical problems
(wrong polarity of wires, exposed sections of wire, or loose
connectors.) The first attempt at starting the converted car
proved to be quite puzzling. The car was cranking but the
injection was not doing anything. The computer input and
output signals were tested and were coming up fine. Eventually
(after much head scratching) the solution was found. The fuel
pump and return lines were installed the wrong way around! The
fuel pump line connects to the side of the fuel rail closest
to the firewall. The return line connects to the line coming
from the fuel pressure regulator.
(text continues next
page)
page 1 | page
2 | page
3 | page
4 |
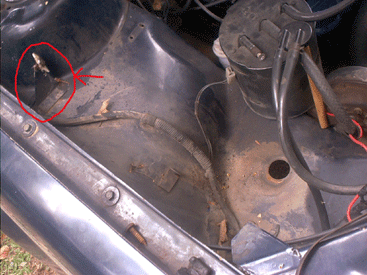 The
side of the car after the old bottles were removed. Note
the old bracket that was in the way of the new water
bottles. This was bent out of the way.
The
side of the car after the old bottles were removed. Note
the old bracket that was in the way of the new water
bottles. This was bent out of the way.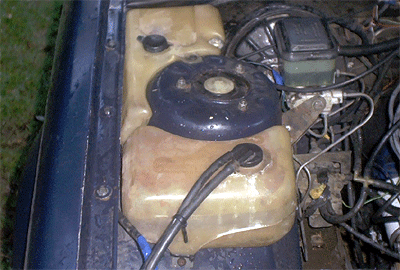 The
new bottles were then fitted. This gives the room to
install the VK EFI Airflow meter and air box in the
factory location.
The
new bottles were then fitted. This gives the room to
install the VK EFI Airflow meter and air box in the
factory location.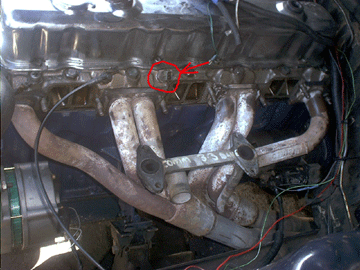 The
carb and manifold were then removed. While the opportunity
was there, the Coolant Temperature Sensor was fitted, as
shown.
The
carb and manifold were then removed. While the opportunity
was there, the Coolant Temperature Sensor was fitted, as
shown.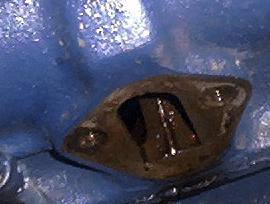 The
old carb mechanical fuel pump must be removed, and the
hole where it was mounted must be blocked off. The hole in
the picture was blocked off using a piece of aluminium
(which was cut to shape) due to not getting one of these
with the conversion gear.
The
old carb mechanical fuel pump must be removed, and the
hole where it was mounted must be blocked off. The hole in
the picture was blocked off using a piece of aluminium
(which was cut to shape) due to not getting one of these
with the conversion gear.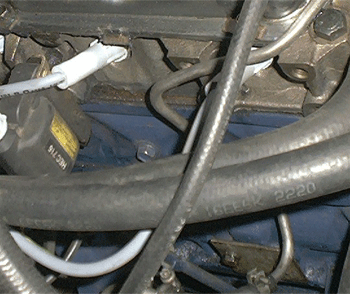 The ignition coil and bracket must now be
moved, so that the VK EFI throttle cable bracket (with Auxiliary Air Valve and
fuel damper) can be installed. Note only VK heads have the bolt
holes for the coil to be relocated. Pictured is the new
position of the coil. The homemade block-off plate can
also be seen.
The ignition coil and bracket must now be
moved, so that the VK EFI throttle cable bracket (with Auxiliary Air Valve and
fuel damper) can be installed. Note only VK heads have the bolt
holes for the coil to be relocated. Pictured is the new
position of the coil. The homemade block-off plate can
also be seen.