|
.: E900 Patch Creation :.
This guide explains how to fully create you own patch. Steps
1-2 are only needed once to convert the .s3 firmware into a .bin. Steps 4-5 are
just shown to find the address of the sounds and images tables. You don't need
to do these each time you create a patch and use can just enter the table
addresses (for reference 0x20A45E70 for images and 0x20C8BF74 for sounds).
Note: The Samsung Firmware Editor does not currently support the Samsung E900,
therefore creating custom picture patches does not work correctly. For this
reason I have not included details on how to do this in this guide. A new
version of the Samsung Firmware Editor is expected out soon, and I will update
the guide accordingly. Do not ask for a release date, as I don't know, but check
the website http://editor.sgh.ru (Russian).
Installing these invalidates your warranty and has no
guarantee to work. Installing these could permanently damage your phone, and I
will not be held responsible for any damages causes to your PC or phone
or data losses occurred.
|
|
|
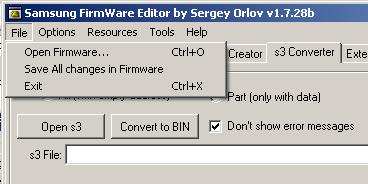
- First you need to convert your .s3 firmware into a .bin file. Open the
Samsung Firmware Editor and click on the 's3 Converter' tab. Then click
'Open s3' and select the firmware in .s3 format.

- Now click 'Convert to BIN'.
This will take quite a while, as the resulting .bin file is quite large,
usually around 665 MB, but only needs to be done once.

- Now that you have a .bin
firmware file, click File -> Open Firmware
and select the new .bin file. It will ask if 'You want to find all Resource
tables'. Click No.
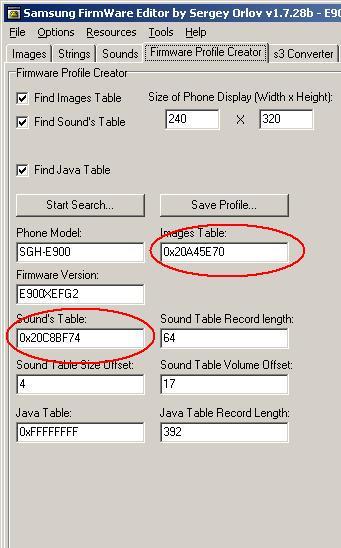
- This has now opened the new
.bin file in the program and we now need to find the addresses of the sounds
and/or images table. To do this, click the 'Firmware Profile Creator' tab
and fill in the width and height with 240 and 320 as shown below:

- Click 'Start Search'. This may take some time
but will fill in all data as below. This only has to be done once, the two
important numbers to remember are the Images table and Sounds table.
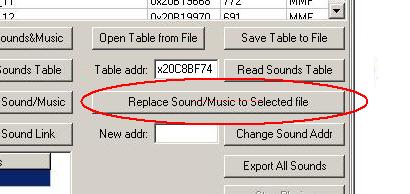
- To find all the sounds in
the firmware click the 'Sounds' tab and put the Sound's Table address (from
the previous screenshot) into 'Table addr' text box. Click 'Read Sounds Table
'.
All the sounds in the firmware will appear in the list.

- To replace a sound, select
the sound from the list on the left and browse for your own replacement mmf
file in the File browser
on the right. Click 'Replace Sound/Music to Selected file'. If your own
mmf file is small enough to fit you can replace it. Replacing with sounds
larger than the space available can corrupt your firmware, but a message box
will appear warning that your mmf file is too big.
- To create the patch with
your new sound, go to the 's3 Converter' tab
again and your sound should be in the list. Tick the box next to it and click
'Create s3
Patch'. You can also create a restore .s3 patch here, which will undo the
changes of the patch.

- The newly created .s3 patch can now be installed using my
patch installation guide.
|
|
Web site contents � Copyright Ben May 2006, All rights reserved.
Website templates
|
|
|