Applying the generated animation to a wire file is a three step process.
To apply the current animation to a wire file, select File  Apply To Wire... from the menu bar. The following window appears:
The wire file to apply the animation to must contain an identical (or at least similar) set of geometries and hierarchies so that the animation is applied correctly.
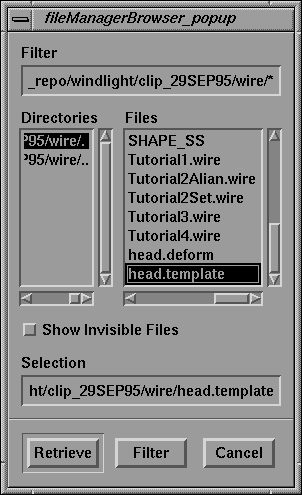
Select the wire file head.template from the file browser. Click the Retrieve button.
The wire file head.template loads and is analyzed.
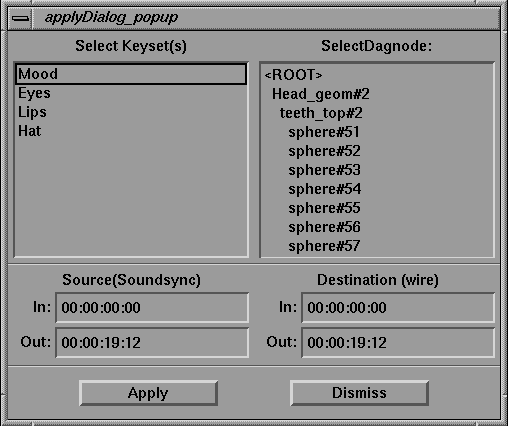
When the wire file is loaded and has been analyzed, the Apply dialog is displayed and appears as follows:
The Apply dialog is used to set which keysets and which dag nodes the animation is applied to in the wire file. It is also used to determine how much of the animation is applied to the wire file and where the application occurs.
On the left side of the dialog is a list of all of the keysets in the current SoundSync session. You can select one or more of these keysets for application by clicking them with the mouse to highlight them.
On the right side is a hierarchical list of all of the dag nodes in the wire file. By selecting a dag node, you can control where SoundSync searches for the dag nodes to apply the animation to. SoundSync searches by name below the dag node you select, ignoring any # suffixes that have been placed on dag nodes.
If you had two characters in a wire file, both from the same basic hierarchy, each set of dag nodes could have separate animation applied to it by selecting appropriate dag nodes on which to apply the animation. Only a single node can be selected at a time. The animation is applied to all dag nodes below the selected dag node that match the selected name. Therefore, only one character at a time is animated.
Press and hold down the Shift key. Click all four of the keysets on the left side of the dialog. Release the Shift key when all three are highlighted.
Click the <ROOT> node at the top of the column on the right side.
At the bottom of the dialog are Source and Destination frame numbers for the animation. The Source numbers on the left side are for the animation in SoundSync. The Destination numbers on the right side are the for the wire file you want to apply the animation to. The Source side is used to select how much of the animation is applied, and the Destination side is used to select where it is applied.
Because you have selected the entire animation region, the frame range on the Source side encompass the full range of the animation beginning with frame 0.
Click-drag to highlight the numbers in the In edit field of the Source side. Type 10.
Notice that the selected region in the soundtrack changes and that the Destination numbers now reflect the reduced frame range.
Replace the Destination In numbers with 10 as you did for the Source side.
Notice that the Source and Destination In numbers now match as follows:
This takes the SoundSync data from frame 10 onward and applies it to the wire file beginning at frame 10.
Click the Apply button to apply the animation.
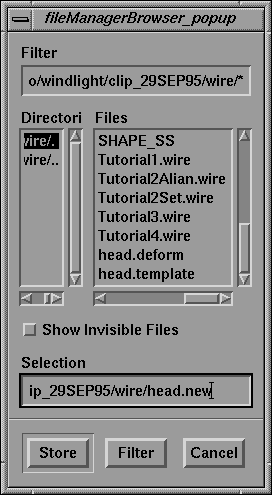
When the application process is complete, the following File Browser gives you the opportunity to save the wire file:
Type in the name head.new. Click the Store button.
The saved wire file can now be loaded into Alias and further manipulated or rendered.
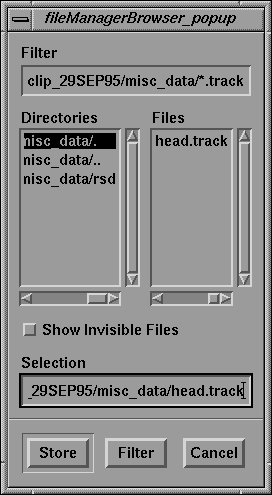
To save the animation track, select File Save Track... from the menu bar. This opens a File Browser as follows:
You can use the File Browser to type in a filename or select an existing file to overwrite.
For this exercise, click the Cancel button to avoid writing over any files.
While the original keyset file must be generated explicitly, once it is loaded you can make changes by configuring recognizers or by changing the images that are used for the keyshapes.
To save the changes to the keyset file, select File Save Keysets, which opens the File Browser.
Normally you would click or type in the name of the keyset file you want to save and click the Store button. For this exercise, click the Cancel button.
The saved keyset includes the keysets as well as any configured recognizers and their links, so you won't have to enter that data again when you use that keyset.