|
About the VRML 2.0 Translator
Features
- Cameras are converted to VRML2.0 Viewpoints.
- Ambient Lights are converted to a VRML point light with ambient properties.
- Per-vertex normals and texture coordinates (if desired).
- Material animation is converted.
- Animation is converted intelligently (only dynamic objects have animation information).
- Initial navigation mode can be specified in the translator.
- Double-sided/single-sided setting (in Render stats) is converted for groups.
Limitations
- Does not support VRML2.0 embedded textures.
Installation
The VRML translator does not require any installation.
Running the VRML Translator
To run the VRML2 translator with MakeGame options, either:
- From the modeling window, choose File > Export > VRML2-
 . The VRML2.0 Translator Options window appears. . The VRML2.0 Translator Options window appears.
- From the MakeGame window, choose VRML2 from the list of translators. Set the options in the MakeGame window, then click Go.
To go to the VRML2 translator where you can specify further VRML translation options:
- Select Go from the VRML 2.0 Translator Options window you opened above.
- From the modeling window, choose File > Export > VRML2.
VRML2.0 Translator Options
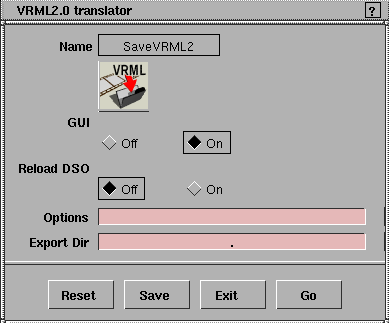
GUI
-
- ON - Use the VRML 2 translator's graphical user interface.
-
- OFF - Use the saved settings from the last time you clicked Save in the VRML 2 Translator
window (do not open the graphical user interface).
Reload DSO
-
- ON - unload the translator after each use.
-
- OFF - keep the translator in memory for multiple runs.
Options
-
- Do not type anything in this text box. It is provided for any command line options that might be added in the future. To set options for the VRML 2 translator, use the translator's graphical user interface.
Export Dir
-
- The directory in which to put converted VRML files.
VRML2.0 Translator Additional Options
|
|
This window appears when
you select Go from the
options window described
above. Alternatively, you can
access it directly by selecting
File > Export > VRML2.
|
After you have used this window to set translation options, click on its Go button to start converting.The translator creates a file (<scene>.wrl) containing VRML code describing the scene.

Pushbuttons
Save
-
- Saves the current settings in the window.
Go
-
- Starts the conversion.
-
- During conversion, this button changes to Abort. Click on it again to stop the conversion.
Exit
-
- Closes the translator window.
Text Section
This section appears at the top of the window. Type a comment for saving with the scene. To clear its contents, click on Clear text.
Animation Section
The text at the top of this section indicates the animation frames available for export. If you add frames while this window is open, this number will no longer be accurate. (Click Update to update the frame count.)
Start Frame and End Frame
-
- Specify the start frame and end frame of the animation you want to convert.
Frame step
-
- Defines the number of animated frames between exported frames.
Frames per sec
-
- Specifies the playback speed of the converted animation.
Animate
-
- Lets you choose what to animate. Select one or more of transformations, vertices, shaders, and lights.
View frames
-
- When checked, lets you view the animation frames in the Alias view windows while you export them.
Hierarchy Section
Hierachy
-
- World-do not export hierarchy (all vertices use world space)
-
- Flat-one level of hierarchy: transformations use world space, vertices use local space
-
- Full-export the full DAG tree hierarchy: transformations and vertices use local space
Export
-
- All-export everything visible in the scene
-
- Picked-export everything picked in the scene (items lower in the DAG tree from the DAG nodes of picked objects are not included).
-
- Active-export everything picked in the scene (items lower in the DAG tree from their DAG nodes of picked objects are also included).
Navigation Section
These settings control the initial set-up of the VRML browser when it opens the .wrl file:
Viewer
-
- The initial type of navigation.
Headlight
-
- When ON, the viewer will cast light on the scene.
Travel speed
-
- The initial speed of the viewer.
Other Options
Textures
-
- Export textures.
Normals
-
- Export normals.
Color per vertex
-
- ON - calculate color for each vertex.
-
- OFF - calculate color for each polygon.
Long Lines
-
- ON - save the VRML text file with long lines.
-
- OFF - break the VRML text file into short lines (each value on a separate line).
-
- Turn this option OFF if you want to edit the output file with a text editor that does not handle lines longer than 80 characters well (such as vi). Note that turning this option off will increase the size of the output file.
Auto launch viewer
-
- When ON, opens the new VRML file in Netscape Navigator after export.
-
- To view VRML files in Netscape Navigator, you must have the Navigator VRML plug-in installed.
Sample Textures
-
- Converts procedural textures to image files.
Textures
-
- Imbedded -includes texture image data in the .wrl file (not currently supported).
-
- SGI image file - converts texture images to SGI format and reference.
Use texture path in URL
-
- Includes the texture path in the URL of the .wrl file.
Texture path
-
- Save textures to this directory.
Output Section
Scene name
-
- Base name for the scene, to which the translator will add the suffix .wrl.
Setting VRML2 Properties in Alias
VRML Plug-ins
The VRML plug-ins let you attach tags to objects that have no effect in Alias (sometimes called "blind data"), but will be converted to VRML code.
To add VRML properties to objects while modelling in Alias, first load the VRML plug-ins and then use the VRML palette:
-
1
-
Select Utilities > Plug-in Manager.
-
2
-
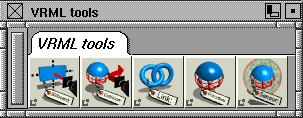
Click the Load check box next to the VRML plug-ins (VRML2Billboard, VRML2Collision, VRML2Coord, VRML2Link, and VRML2Primitive).
|
|

|
-
1
-
Choose Object Edit > VRML tools > LinkVRML
in the Tool palette.
-
The system prompts:
-
Select object or enter URL:
>
|
Note:
|
You must load the VRML2Link plug-in from the plug-in
manager before it is available from the Tool palette.
|
-
2
-
Click on the object (or objects) you want to link.
-
You can select several objects before using the tool. When
you enter a URL, it will be linked to all the selected
objects.
-
3
-
Enter a Universal Resource Locator (URL). For example,
-
http://www.aw.sgi.com
-
You can also add a description of the destination using the
form
-
URL*DESCRIPTION
-
where URL is the destination, the * (asterisk) is a separator,
and DESCRIPTION is a description that will be displayed
in the VRML browser when the user points at the link.
-
For example:
-
http://www.aw.sgi.com*Alias|Wavefront Web
Page
-
4
-
When you output the scene using File > Export > VRML, the objects will become active VRML links.
Notes
- To verify a link, choose LinkVRML
and then pick the object. If the object is a link, the link information appears in the command line.
- To remove a link, choose LinkVRML
and then pick the object. Type "-" (a hyphen) in the command line to remove the link information.
Creating preset VRML Viewpoints
Viewpoints are predefined camera positions and views in a VRML world. Viewpoints help viewers navigate your VRML worlds (for example, allowing them to return to an entrance point, or view close-ups of objects).
To create VRML viewpoints, do the following:
-
1
-
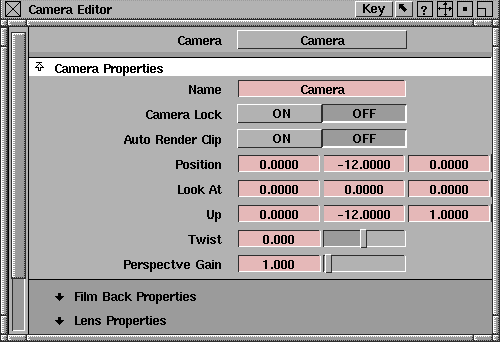
Create a new camera by choosing Layouts > New camera.
-
2
-
Open the Camera Editor (Windows > Edit > Cameras). In the Name field, give the camera a meaningful name (for example, EntranceView).
-
3
-
Select Object Edit > VRML tools > LinkVRML. Pick an object that will trigger the change of viewpoint. The system prompts:
-
Select object or enter URL:
-
4
-
Type the name of the viewpoint this object will trigger, preceded by "#". For example:
-
#EntranceView
|