|
|
Solid Imaging
|
|
|
4
|
Solid Imaging Data Transfer
|
|
In this Section
Exporting STL/SLC
|
|
|
|
|
This feature is available in Alias AutoStudio and SurfaceStudio, and is a purchasable Designer and Studio option
Purpose
For STL, to create an SLA (StereoLithographyApparatus) triangle format ASCII or binary file.
For SLC, to create a SLC (StereoLithography Contour) file.
Some Definitions
What is Solid Imaging
Solid Imaging is a sector of Rapid Prototyping which uses a database to translate three-dimensional geometry into physical models or parts using a variety of resins and other materials. The file formats used by Alias for outputting files for Rapid Prototyping are the STL
and SLC
file formats.
What is an STL File?
An .stl file is a tessellated file (binary or ASCII), which means the NURBS surface is described by a series of triangles. The resolution of this polygonized data base is defined in Alias by the subdivision characteristics of the original NURBS surface. Once the tessellated geometry is sent to the SI technology, the geometry is sliced, and then those slices are used to describe the physical model that will be produced. With STL as the transfer format, you can send geometry to most SI technologies while controlling the resolution of the finished model by setting the subdivision characteristics.
The STL file exported from Alais conforms to 3D systems file format version 2.0.
What is an SLC file?
An .slc
file (StereoLithography Contour) cuts 2D contours of the 3D data base. These contour lines are polylines. The advantage to using this file format is that the NURBs geometry description in Alias is directly sliced and therefore fewer iterations are required between the original geometry and the data sent to the SI machine to be built.
How to Use
-
1
-
Select File > Export > STL/SLC.
The File Requestor is displayed.
|

|
|
>
|
Note:
|
If the SLC
option is selected, Export SLC appears in the File
Requestor. If the STL option is selected, Export STL appears.
|
-
2
-
Type a file name. It must be a valid UNIX file name.
-
The model geometry must be in positive X,Y, Z space.
Otherwise, the following message appears:
-
model is not within positive X, Y, Z space:
-
When the triangle rendering is complete, the following
message appears:
-
Finished output of triangles.
-
When done, two files are placed in the user_data/
<project>/sla directory.
-
The file with the name you specified and the .tri
suffix
added is an Alias triangle rendering file.
-
The second file has the .stl suffix added and is a 3D
Systems triangle format file.
Important Notes:
- The
user_data/<project>/sla directory contains the files output by this feature. If this directory does not exist, it will be created in the current project by the feature.
- The model must totally enclose a three-dimensional volume. Gaps or openings between surfaces are not permitted. Failure to meet this requirement will result in a failure of the slicing program.
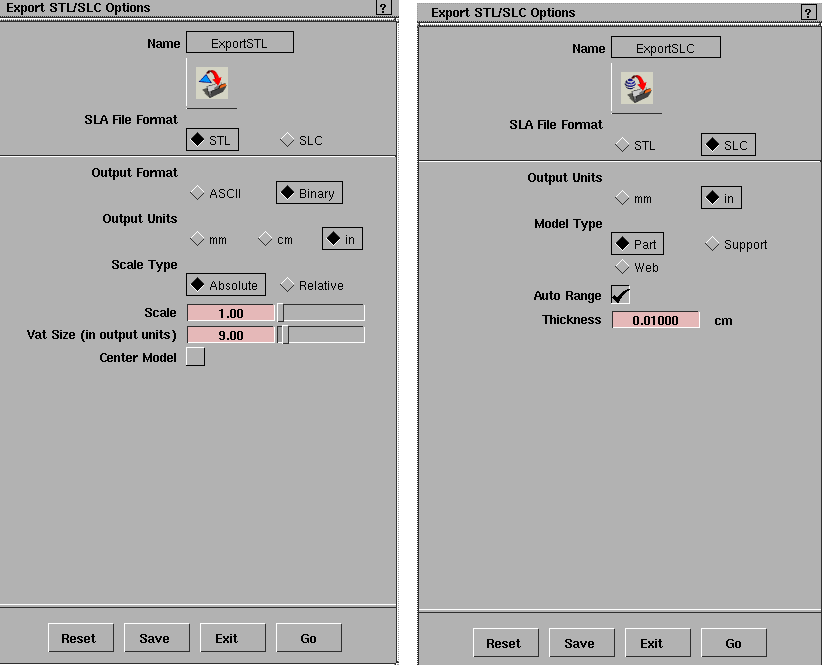
Save STL/SLC Options
Select File > Export > STL/SLC- to display the Save Export STL/SLC Options box. to display the Save Export STL/SLC Options box.
|
|
|
SLA File Format
-
- Click to select either STL
or SLC
file formats.
STL Options
Output Format
-
- Click to select either ASCII
or Binary
to specify the format of the output STL file. The default is Binary.
Output Units
-
- Select the linear units used for the triangle data in the .stl
file. This also specifies the units of the vat size. The default is inches.
Scale Type
-
- Click to select either Absolute or Relative. The default is Absolute.
-
- Relative specifies that the triangle data is automatically scaled to fit the specified percentage of the SLA vat volume.
-
- Absolute specifies the number of default model space units equal to one specified world space unit in the final SLA model. The default world space unit is inches.
-
- The options change depending on which scale type you choose. For information, see the following sections.
Absolute Options
If Absolute
is selected, the following options are available.
Scale
-
- Specifies the scaling on the triangle data so that it will fit within the SLA-1's 9 or 12 inch on-a-side vat.
Vat Size (in output units)
-
- Specifies the vat size of the SLA device. It is assumed that the length and width of the vat are equal, so this value specifies the size at one side of the vat.
-
- The default is a vat with 9.0 inch sides.
Center Model
-
- Specifies whether or not the model is created to position at the center of the vat volume. The default is to place it adjacent to the zero axes with a margin of 0.1 inch.
-
- (The SLA-1 SLICE program ultimately controls the position of a model within the vat by providing controls to translate the model.)
Relative Options
If Relative
is selected, the following options are available.
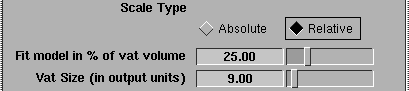
Fit model in % of vat volume
-
- Adjusts the percentage of the vat volume into which the model will be fit.
Vat Size (in output units)
-
- See the definition above under Absolute Options.
SLC Options
Output Units
-
- Indicates in which units you want to output the SLC data. This choice (millimeters or inches) will be reflected in the output .slc file's header's keyword "-UNIT". By default the value will be inches.
Model Type
-
- Specifies the StereoLithography model type.
- Part or Support-must be closed contours (polylines). By default, the model type is Part.
- Web type-can be open polylines or line segments.Typically used to support contilever regions on parts.
-
- The choice will be reflected in the output .slc file's header's keyword "TYPE".
Auto Range
-
- If toggled ON (default) this option uses the bounding box of the object to determine where to compute the slices (contour data). The slices will be produced for the entire object, no matter what its position is in space, If toggled OFF, two exra sliders are displayed.
Thickness
-
- Specifies the spacing (in cm) of the slices (contoured layers). By default the value is 0.01 cm.
Start Z and End Z
-
- These sliders let you set the range of the slice positions manually (and appear when Auto Range is OFF).
-
- By starting with the position corresponding to the Stat Z, slices will be positioned one by one, at Thickness intervals, until the End Z value is surpassed.
The Header Section
The header section of the .slc file is an ASCII character string (up to 2048 bytes) containing global information about the model.
The output in the header provides the following information:
- SLC file format version number (-SLCVER2.0)
- Output units (-UNITS<INCH/MM>
- Type of model (-TYPE<PART/SUPPORT/WEB>)
- Vender package and version number (which produce the SLC file (-PACKAGE ALIAS STUDIO V9.0)
- Calculations and sets from SLC output x,y,z extends of the model (-EXTENTS mx,Mx,my,My, mz,Mz)
- Header keywords (CHORDDEV, ARCRES, SURFTOL, GAPTOL, MAXGAPFOUNS, EXTLWC, STHICK, STARD and ENDD) are set to 0.0.
Preparations of Geometry for Solid Imaging
|
|
|
|
|
Purpose
This section documents the process of preparing Alias wire geometry to be used to create .stl files and .slc files.
It describes the STL and SDL formats, and how to toubleshoot the geometry in Alias before doing the conversion.
Overview
Alias wire files exist as NURBS data. To use that data to create physical models using solid imaging technologies,you must translate the NURBS to either the .stl or .slc format so that the geometry can be read by the solid imaging machine's software. Included in the list of solid imaging technologies is SLA (Stereolithography), SLS (Selective Laser Sintering), LOM (Laminated Object Manufacturing), SGC (Solid Ground Curing), FDM (Fused Deposition Modeling) and others.
|
|
|
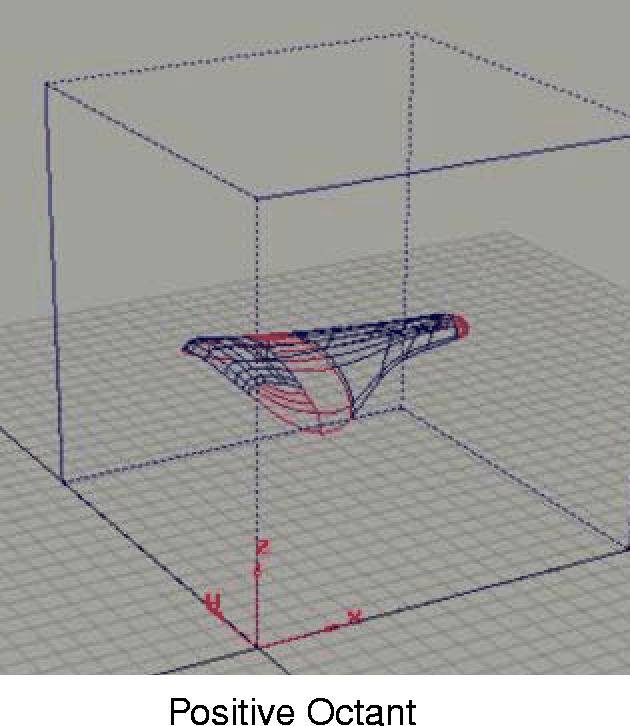
Converting the Alias geometry to the .stl format or the .slc format can be done from within Alias. Note that, in preparing geometry for creation of either .stl files, the NURBS geometry must be in the positive octant (positive x, y, and z).
This means that, for the Alias geometry to be included in the calculation of the .stl or .slc file, it must reside in the volume described by the cube shown in the illustration at left. The size of the volume will be dependent on the vat size being used to build the part, but will always scale from the co-ordinates 0, 0, 0.
In addition, the geometry must be able to reside inside this volume without coming within 0.1 cm of the extents of the volume. This is to allow for accurate reflection of the laser which cures the resin.
The 0, 0, 0 co-ordinate in the Alias work environment is equivalent to the bottom, front, left corner of the vat in which the part will be built. Therefore, unless the geometry is in this positive octant when being processed in Alias, it will not be within the building volume of the solid imaging machine when transferred.
|
Tip:
|
Consult with the operator of the solid imaging machine in
order to optimize the transfer of data.
|
How To Use
To export Alias geometry to STL:
-
1
-
Select File > Export STL in the Alias interface. To specify options, select File > Export STL-. (The options are described below.)
-
The translation of Alias geometry to the .stl format is an
automatic two step process:
- The NURBs geometry is tesselated, or polygonalized. Once this step is completed processing, the system puts a .tri file in the current project's sla directory.
- The system takes the .tri file and creates the .stl file from it. The .stl file is an Alias triangle file with additional information which enables the file to be read and processed by solid imaging software.
-
2
-
Once the .stl file is created, you can use a post processing stand-alone utility called Surfmate to close the gaps between vertices to a tolerance that will be acceptable to the solid imaging software. Surfmate is an Alias utility and is not supported.
-
An alternative to Surfmate is to use the polygonal
confirmation method-see Using the Polygonal
Confirmation Method on page 84.
-
3
-
Read the .stl file into the solid imaging software; there it is sliced at the resolution at which it will be built.
Geometry for Solid Imaging - Notes for Export STL Options
When you select File > Export > STL/SLC, the Export STL/SLC Options window appears (for details, see Save STL/SLC Options on page 78).
The following notes apply to the STL option settings you should use for solid imaging geometry:
Output format
-
- If you select the STL option, the Output Format will be binary since the .stl file will be several times larger in file size when produced as an ASCII file.
Output Units
-
- Are dependent on the technology that will be used to build the part. Consult with the operator of the solid imaging machine for the best choice.
Scale Type
-
- Is Absolute if you want to control the exact scale of the part being built; for example, 1:1.
Vat size
-
- Also should be given to you by the operator of the solid imaging machine.
-
- Of the various vat sizes, all are square in terms of width and length, but vary in height. Therefore a vat size of 9 in this case means that the length and width of the vat are 9 units, in this case inches.
Center Model
-
- This option is not required, because you have already placed the geometry correctly.
|
|
This method is not available for
SurfaceStudio.
|
Using the Polygonal Confirmation Method
In the default scenario described above, tessalation of the NURBS geometry in Alias will be dependent on the settings in the Render Stats window.
While the default method may be adequate for many situations, there is an alternative which gives you increased control of the tessalation of the NURBs geometry and eventuallly, tolerance of the vertices of the tesselated geometry:
I. Create polygons
|
|
|
Select Polygons > Create Polygons to convert the NURBs geometry to polygons.
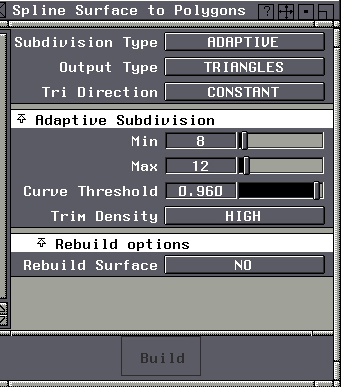
- For Subdivision Type, use Adaptive so as to have the tessallation of the surfaces be dependent on their form, as opposed to a fixed u and v value. (The Renderer settings may be acceptable in some cases, but tessellation settings which can be used for rendering and therefore acceptable for a 2-D image may not be desirable in the built part.)
- For Output Type, use Triangles, as opposed to quadrilaterals.
- Triangular polygonal geometry is the representation of geometry that is used in the slicing operation. The Tri Direction default is Constant.
The Adaptive Subdivision settings will depend on the character of the model being tessellated. The following values are a good place to start:
- Curve Threshold-0.960 (as opposed to the default 0.600 which is intended for the character of tessellation for the games industry).
-
If the curve precision setting in the current work session is
high enough, you can select Use Curve Precision instead.
(Set curve precision from the Curve Edit palette, which
lets you choose the number of straight line segments
between edit points that will be displayed on the screen.
The default is 16; you may find it necessary to go as high
as 30 or 40.)
- Rebuild Surface-set to NO
View the results of the settings by using QuickRender with Flat Shading turned on.
The newly created polygonal geometry will be made up of polysets, dependent on the number of surfaces in the original geometry.
II. Combine polysets
Since each NURBS surface will generate a single polyset, you must take the multiple polysets and combine them.
To end up with one polyset, select Polyset > Combine Polygons. After selecting this tool, and during each step in this procedure, you should verify that only the appropriate geometry is active. This will avoid processing incorrect geometry and thereby getting unexpected results.
III. Merge vertices
Setting construction options:
For the eventual Alias .stl file to be successfully sliced once read into the solid imaging software, the Alias .stl file must be created without gaps beyond the tolerance of the solid imaging software.
Before merging the vertices of the polygonal geometry, you must set the Polyset Vertex value in the Construction Options window:
-
1
-
Select Preferences > Construction options. The Construction Options window appears.
-
2
-
Select the Tolerances section, and then its Polygon section.
-
3
-
Set the Polyset vertex value to be equal to or larger than the gap between the vertices which must be merged.
Merging vertices:
Because the entire model needs to have its vertices within a tolerance acceptable to the solid imaging machine that will be building the part, it is necessary to have the entire model described as one polyset before doing the merge calculation.
-
4
-
From the Polygon Edit palette, select Vertex > Merge.
-
5
-
Check Use distance tolerance and set the appropriate Distance Tolerance value. (Distance tolerance determines the distance within which polyset vertices must be in order to be merged.)
|
|
The Polyset Vertex tolerance
in the Construction Options
window is used to address
vertex merging algorithms
elsewhere in the software; it
does not apply to the Vertex
> Merge calculation.
|
-
You must determine the tolerance the part must be
described by, to set the Distance Tolerance value correctly.
This value can be determined in conjunction with the
person who is operating the solid imaging machine.
-
The units referred to in this setting are cm. The setting of
0.01 cm is likely to be more than sufficient, but this can be
confirmed by the operator of the machine.
-
6
-
Select Go. This will merge vertices of a single polyset together to the distance tolerance value as set in the Vertex Merge option box.
IV. Write Out STL File
Write out the .stl file from the "fixed" polygonal data.
Alias to SLC Format (.slc Files)
When using the Save SLC command a file in the .slc format is created.
These files differ from the .stl format prinicipally in that the NURBS geometry is sliced in Alias, to a resolution at which the part will eventually be built. This means that there is only one abstraction of the original NURBS geometry. It also means that there is an increased responsibility on the part of the Alias user to confirm the integrity of the NURBS geometry in Alias before creating the .slc file.
I. Stitching
Stitching is the process that drives the creation of the SLC file intersects a plane with the model and creates a polyline where the plane intersects the first NURBS surface. For this reason, before the calculation is carried out, all of the NURBS surfaces must be stitched together using Shell Stitch, to be read as one piece of geometry by the Alias slicing code.
A by-product of stitching the surface geometry is that you can see surface boundaries with gaps that would cause problems when the slicing operation takes place. If the stitching operation identifies surface boundaries that are not within a tolerance acceptable to the stitching code, then the gaps would also be recognized as a gap large enough to produce broken polylines and therefore unusable in the building of the part. Surface boundaries that do not stitch together must be recreated with a lower curve fit tolerance.
A good work flow is to model a small part of the model which is typical of the geometry to be produced and test-stitch it to ensure the chosen tolerances before a lot of time is spent modeling. The stitching process uses the tolerance in calculating whether or not surfaces exhibit the necessary conditions to stitch together.
When geometry is stitched unsuccessfully (you can see that the interior surface boundaries did not stitch together), you can use the key command, Control-z, to undo the stitch command. This is different from using the Shell Unstitch command in that during the stitch operation NURBS geometry may be altered; the geometry is not returned to its original state when "Unstitched".
To stitch geometry:
|
|
For more on stitching, see
NURBS Modeling in Alias.
|
-
1
-
Select Stitch > Stitch- from the Surface Edit palette. The Shell Stitch Options window appears.
-
2
-
Choose the following options:
- Detach periodic surfaces-When stitching trimmed periodic geometry (for example, a primitive sphere or a surface of revolution), enable this option for the system to detach these surfaces into two pieces, ensuring a successful stitching operation.
- Detach single curve boundaries-Addresses the passing of stitched geometry from Alias to CAD packages. If a closed trim curve exists, as would result from intersecting a plane with a primitive cylinder and trimming back the plane, this option will detach the closed curve into two pieces.
- Shrink surfaces-ensures that any trimmed surfaces are reduced in physical size to the minimum needed to represent the trimmed portion of the surface.
II. Slicing
|
|
For details on the STL/SLC
settings, see Save STL/SLC
Options on page 78).
|
-
1
-
Select File > Export > STL/SLC. The Export STL/SLC Options window appears.
-
2
-
Select SLC file format.
-
3
-
Set Output units according to the units the solid imaging software will be using to process the STL file (millimeters or inches). The default units are inches.
|
|
Almost exclusively, the
Model Type will be Part,
which is the intended
selection for creating .slc
model files. (Support and
Web files will be created by
the solid imaging technology
operator.)
|
-
4
-
Decide whether the geometry should be sliced according to the volume of the geometry bounding box (which is the default setting, Auto Range on). If you want to define the minimum and maximum Z height of the volume to be processed, click Auto Range off.
-
5
-
Set Thickness to set the distance between contour lines that will be used to build the part. The average is between 0.006 inches and 0.003 inches, but can go as low as 0.0005 inches for some technologies. This value should be determined in conjunction with the person who will actually be building the part.
-
6
-
Click Go.
-
The .slc file can be read back into Alias and will be
created as an Alias wire file upon doing so. For this reason
you should avoid reading .stl files of a high resolution
back into Alias as the size and density of information will
make the geometry unmanageable
-
|


