|
For more details on revolved
surfaces see the NURBS
Modeling book.
|
Local axes are used by Xform > Rotate to perform a rotation around an arbitrary axis of rotation, and by Xform > Move to move along an arbitrary axis. They are also used when creating a revolved surface in Local mode.
How to Use
-
1
-
Pick an object whose local axes you want to change.
-
2
-
Select
Xform > Local > Set local axes, or click its icon.
-
3
-
The local axes for that object are displayed (with the X, Y, and Z labels at the end of each of the axes).
-
The system prompts:
-
Enter Local Axes ROTATION amount
(x,y,z)(ABS):
-
4
-
Either type in the X, Y, and Z values from the keyboard, or use the left, middle, and right mouse buttons to rotate the object's local axes around the world X, Y, and Z global axes respectively.
-
The orientation of the local axes is changed to the new
values.
>
|
Note:
|
You can also enter rotation amounts for a DAG node's local
axes from the keyboard.
|
|
|
For absolute rotation amounts, precede the values with an
A. For example, "A 30 0 45" sets the selected DAG nodes'
local axes to be rotated 30 degrees around the world X-axis,
and 45 degrees around the world Z-axis.
|
|
|
For relative rotation amounts, precede the values with an R.
For example, "R 30" rotates the local axes a further 30
degrees around the world X-axis.
|
Additional uses
|
|
To always display the local
axes for picked objects, select
DisplayTgls > Pivots- , and
set Local Axes Display ON. , and
set Local Axes Display ON.
|
Once you've set the local axes for an object, you can use them to transform the object. For example:
- To rotate an object around its local axes, select Xform > Rotate- to open the Rotate Options window, and set the Type option to Local.
- To move an object along its local axes, select Xform > Move- to open the Move Options window, and set the Type option to Local.
Set Local Axes Options
Select
Xform > Local > Set local axes- to open the Set Local Axes Options window.
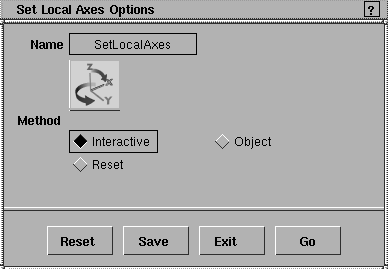
Interactive
-
- This is the default option. Use Interactive to reorient your local axes by using the left, middle, and right mouse buttons to rotate the local axes around the global X, Y, and Z axes respectively.
Object
-
- Sets the local axes of all picked objects to be the same as another object's. The system prompts you to select another object whose local axes you want to match.
-
- Once selected, all of the picked objects have the same local axes orientation as the selected object. After using this mode, you are automatically returned to Interactive mode so that you can fine-tune the orientation of the picked objects.
Reset
-
- Resets the local axes of all picked objects to match the orientation of the world co-ordinate system. After using this mode, you are automatically returned to Interactive mode so that you can fine-tune the orientation of the picked objects.
>
|
Note:
|
If the selected DAG node is a root node, then Reset is the
same as entering a value of 0,0,0 at the keyboard. However,
if the DAG node is not a root node, and some ancestor nodes
have rotations that will affect the selected DAG node, then
the local rotations needed to re-align its local axes with the
world coordinate system cannot be zero.
|
|


