|
Purpose
To pick a joint node from a modeling window.
How to Use
-
1
-
Create a skeleton with several bones using Objects > Draw skeleton.
-
2
-
Select Joint
from the Pick menu, or click its icon.
-
3
-
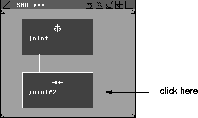
Click on the representation of a joint in the SBD window to make the joint node active.
-
4
-
Drag a pick box in a modeling window around one or more bones. The joint DAG nodes representing the lower ends of the selected bones are picked.
-
When a joint DAG node is picked, all the bones below it in
the hierarchy are highlighted in the modeling window.
The bone from the picked bone joint node to its ancestor
joint node is highlighted in dashed lines. This indicates
that although the dashed line bone is above the picked
dag node in the hierarchy, it will still be affected by
operations such as Xform > Move or Xform > Local > Set pivot,
and therefore must be drawn as if it were active.
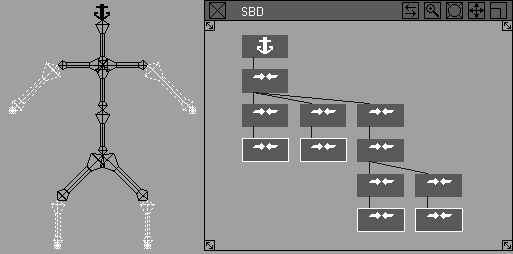
Example: Picking the lowest joints in a hierarchy
-
1
-
Select Objects > Draw skeleton to draw a skeleton of a character with a head, two arms, and two legs.
-
2
-
Select Pick > Joint, then drag a pick box around the whole character. The lowest joint DAG nodes in the hierarchy are picked (that is, the arms and the legs).
-
The following image shows how this is represented in the
SBD window.
Tips
- This function can also be used to pick any DAG node from the SBD window.
|


