Training:
Just reading about
underwater navigation is not
enough to be able to use it - you
need to practice the skills as
well. Below are a series of
out-of-water and in-water
exercises to familiarize yourself
with the basic underwater
navigation techniques.
Index:
Out of Water:
All you need to learn the basics
of compass use is a small field, a
buddy, and your underwater
compass. The goal of these
exercises is to familiarize
yourself with the compass and it's
use.
Exercise
1: Setting & Following Bearings
The first exercise is to set &
follow bearings. To start this
exercise pick a starting
location. Move to your start
location and have your buddy pick
a bearing for you to follow. If
using a direct compass turn your
body until your are facing the
bearing your buddy has selected;
if using an indirect compass set
the bezel to the appropriate
bearing and align your compass
properly. Both of these
techniques are covered in the
basics page.
Once you have
turned your body to face the
bearing, have your buddy walk
along the bearing for a short
distance. Once your buddy is in
place try to follow your compass
to him/her. Try not to look at
anything but your compass. If you
go off course return to your start
point and try again.
This exercise will
teach you to set and follow
bearings - and most importantly
teach you to trust your compass.
Exercise
2: Course Reversals
This exercise is similar to
the previous exercise. Have your
buddy pick a bearing and position
themselves on the bearing as they
did in the first exercise. Use
your compass to walk to them -
like before try and look at
nothing but your compass. When
you reach your buddy mentally
calculate your return (reciprocal)
course, turn until you face it,
and follow it back to your start
point. Try using both the
traditional system of adding or
subtracting 180 degrees to
calculate your reciprocal, as well
as the
"cheater" system. Which do
you like better?
This exercise will
teach you to calculate return
courses, as well as give you
practice with the "cheater" system
of navigation.
Exercise
3: 90 Degree Turns
The next exercise it to
practice 90-degree turns. Have
your buddy give you a bearing.
Set and follow the bearing like
you did in the last exercises. As
you move have your buddy tell you
to turn 90 degrees to the right or
left. Make sure your buddy pays
attention to your turns, and makes
sure that you are actually turning
90 degrees. As in exercise 2, try
this with both the traditional as
well as cheater navigational
systems. For added difficulty
have your buddy throw in the odd
180 degree turn as well.
This exercise will
teach you to calculate 90 degree
turns.
Exercise
4: Square, and Box Patterns
Pick a start point and use your
compass to complete square and box
patterns. These patterns are
described in the
patterns
page. Instead of counting
kick cycles count step cycles -
i.e. every time your right foot
hits the ground would be 1 step
cycle. At the end if each pattern
you should have returned to your
start point. Like in the other
exercises try to look only at your
compass.
This exercise will
familiarize you with the basic
patterns, as well as give you some
practice counting kick cycles. Of
course, you can practice other
patterns if you desire.
Exercise
5: Random Bearings:
This exercise teaches you to
mentally calculate new bearings.
Have your buddy pick a start
bearing, and start walking along
the bearing. As you move have
your buddy tell you to move
x-degrees to the right or left.
For example your buddy may first
tell you to turn 15 degrees left,
followed by 120 degrees to the
right, followed by 280 degrees to
the right, etc. Try to keep your
bearings to multiples of 5 or 10
degrees - it's rare that you'll
have to be more accurate then that
underwater. Try this using both
tradition methods (i.e. bearing
addition/subtraction) as well as
the cheater system.
This exercise will
teach you to calculate new
bearings in your head.
Exercise
6: Measuring a Bearing:
The last skill to learn on land is
how to use your compass to measure
a bearing to an object. The way
in which this is done depends on
if you're using a direct or
indirect reading compass. Taking
a bearing with both compass types
is described in detail in the
basics page.
For the exercise take turns
picking an object (trees,
buildings, parked cars, etc.).
Each buddy then measures the
bearing to the object. Now
compare results - your reading
should be very close. They need
not be exactly the same, but if
they are way off then someone is
doing something wrong.
This exercise will
teach you ton take bearings.
In Water
Exercises:
These in-water excises can be
mastered in one or two dives.
Ideally you want to do this in a
calm area that is shallow (less
than 20'), with little or no
current. When learning you'll
probably hit the bottom a lot
during these exercises, so it may
be a good idea to pick a place
with little silt. Unfortunately,
pools tend to be too small for
these exercises. These exercises
can be combined with other skills
(buoyancy drills, etc.) for a
full-day "skills day".
Each person will
need a compass, a slate and a
pencil. The group will need the
following items for these
exercises:
-
2 buoys with a
30m /100' rope attached such
that the rope will be suspended
between the buoys, approximately
5' off of the bottom.
-
A 3rd buoy if
working with a larger group
(small groups can get away with
2 buoy's).
Set up the buoys
so that the rope is taunt between
them, and suspended off of the
bottom. This is the line which
you will use for calculating kick
cycles and timing. These buoy's
can also be used as start points
for swimming patterns - if you
have a large group you may want to
have separate buoys for patterns.
Exercise
1: Swimming a Bearing on the
Surface
From your entry point take a
bearing on one of the buoy's you
have placed. Swim along the
surface, using your compass to
navigate to the buoy. Try to look
at nothing but your compass. If
you miss the buoy return to shore
and try again. Repeat this
exercise several times until you
can surface swim to the buoy
accurately every time. Try this
exercise from a different start
point each time you do it - this
way you won't "get used" to one
bearing.
This exercise
teaches you to follow a bearing
in-water.
Exercise 2: Swimming a Bearing on
the Bottom:
After finishing exercise 1 return
close enough to shore so you can
stand comfortable in the water.
Take a bearing on the buoy, and
carefully submerge yourself.
Follow your bearing, but follow
the bottom rather then swimming on
top. You should end up at the
buoy's anchor. If you miss the
buoy return to shore and try
again. Don't forget to constantly
monitor all of your gages while
you swim.
This exercise will
teach you to follow a bearing
underwater, as well as teach you
how to scan your instruments are
you swim.
Exercise 3:
Kick Cycles
Start at one of the buoys
connected to the rope. Swim along
the rope at your usual swimming
speed, counting your kick cycles
are you go. Record this number on
your slate. Turn around and
repeat this exercise, going the
other way. If time permits you
should swim the line 3-4 times.
Later you can average you kick
cycles and determine how far you
move per kick cycle.
This exercise will
allow you to determine how far you
swim per kick cycle. Later you
can use this information to
calculate distances underwater.
Exercise 4:
Timed Swim
Start at one of the buoys
connected to the rope. Swim along
the rope at your usual swimming
speed, and use your timer to
determine how long this takes.
Record this number on your slate.
Turn around and repeat this
exercise, going the other way. If
time permits you should swim the
line 3-4 times. Later you can
average you time and determine how
far you move per second.
This exercise will
allow you to determine how far you
swim per second. Later you can
use this information to calculate
distances underwater.
Exercise 5:
Square Pattern
Starting at one of the buoys swim
a square pattern. Make sure you
are swimming at least 10 kick
cycles per side. If done properly
you should return to the buoy
where you started. Repeat this
exercise at least four times.
Each time pick a different start
bearing, and mix up right- and
left-turning patterns. You can
also try using timed swims rather
than kick cycles. If using time
make sure to use at least 20
seconds per side.
This exercise will
allow you to practice 90 degree
turns and the swimming of a square
pattern.
Exercise 6: Box
Pattern
If time/air remains start at a
buoy and swim some box patterns.
Make the long sides of the box at
least 20 kick cycles (or 30
seconds) in length, and the short
sides at least 5 kick cycles (or
10 seconds) in length. As in the
square pattern mix up your start
bearing and right-/left-turning
boxes.
This exercise will
allow you to practice 90 degree
turns and the swimming of a square
pattern.
Exercise 7:
Taking a Bearing
Surface, a pick a landmark located
in-line with your entry/exit
area. Determine the bearing to
this object, set that bearing on
your compass, and use that bearing
to return to shore (via a surface
swim).
This exercise will
teach you to take bearings in
water, as well as give you
additional practice in following a
bearing.
Optional
Exercise: Distance Measurement
Return to the line suspended
between the buoy's. Swim the
length of the line counting your
kick cycles, or timing your swim.
Calculate how far you have moved.
How does that compare to the
length of the rope? If your
estimated distance is off you need
to re-check your distance
estimation for kick cycles and
swimming speed.
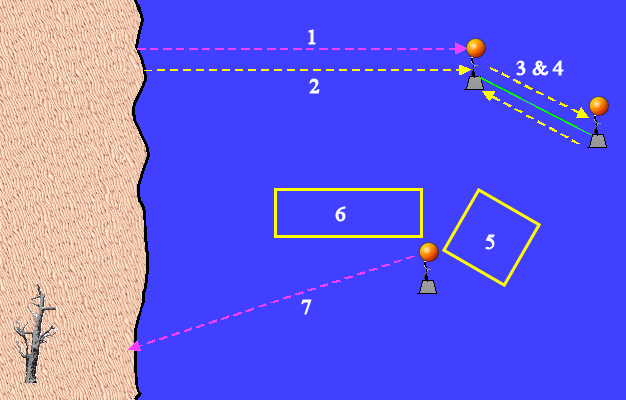
Figure 1: The
in-water exercise. Pink lines
represent items done on the
surface, yellow lines represent
things done underwater. Numbers
correspond the exercise numbers.


