Basic Skills:
Before you can start navigating underwater you
must master 2 basic skills - distance measurements and compass
use.
Index:
Distance Measurement:
Measuring distance underwater is a central skill for
underwater navigation. It is central to swimming patterns,
and can play an important role in finding a dive site. There
are several techniques which can be used, but we'll only cover
the main 2: kick cycles and time.
Kick Cycles:
A kick cycle is defined as a complete "rotation" of your fins
(i.e. one up and one down stroke = one kick cycle). But
before you can start estimating distances you must first
determine how far you move per kick cycle. To do this you'll
need two underwater markers a known distance apart. The best
way to do this is to stretch a 30m (100') line across the
bottom of a lake or bay. Start swimming at one end of the
line, counting the number of kick cycles it takes you to get
to the other end of the line. Repeat this three or four
times, and average the number of kick cycles it takes. Using
this information you can calculate how far you move per kick
cycle. For example:
- You swim the 30m (100') line 4 times. The first time it
takes you 20 kick cycles, the second 22, the third 18, and
the fourth 21. So your average kick cycles per 30m (100')
is: (20+22+17+21)/4 = 80/4 = 20. So it takes you 20 kick
cycles to travel 30m (100'). So:
- You will move 1.5m (5') every kick cycle. This is
calculated by dividing the length of your rope by the
number of kicks cycles it took to swim it's length (30m/20
kick cycles = 1.5m/kick cycle).
One thing to keep in mind is that this distance will change
if you change your gear configuration. Simply adding a small
underwater camera can change this number, as can using a
different BCD, a thicker wet suit, or a smaller tank. It can
also change if you're feeling tired, or your physical
condition changes. So if estimating distances is important it
may be a good idea to re-measure you kick cycles on a frequent
basis.
Time:
Time is also a useful measure for distance. To use time you
will need a timer with seconds on it. First you must
calculate how fast you swim - to do this use the same set-up
as we used in the kick cycles section, but instead of counting
your kick cycles time how long it takes you to swim the length
of the line. For example:
- You swim the 30m (100') line in 30 seconds. This equals
a speed of 1m/sec (this is calculated by dividing the
distance you swim by the amount of time it takes for you to
swim it).
It is a good idea to swim the line several times and
average your speed. Also, remember to swim at a "normal" pace
- there is no point in racing unless you are planning on
racing every time you need to measure distances.
Compass Use:
This section covers the basics of using a compass underwater.
In this section we will review the two major types of
underwater compasses, as well as discuss how to set a bearing
and take a bearing using both types of compasses.
Types of
Compasses:
Underwater compasses come in two types - direct reading and
indirect reading. Both types of compasses work on the same
principal - a portion of the compass is magnetized, and as
such will always point towards the magnetic north pole. The
difference is in how the compass is read and how we enter
bearings.
Direct-reading compasses: These
compasses have a magnetized disk which will rotate as you
move. The bearing markings are written directly on this disk
in a counter-clockwise order. To read the bearing your are
facing in you simply look through a small window - this window
limits your view to a small portion of the disk where you can
directly read the direction you are facing. The main
advantage of these compasses is that it is easy to determine
your heading - you simply look in the little window! Many
direct reading compasses also have a rotating bezel on them
which allows them to be used as an indirect compass as well.
Indirect Reading Compasses: Indirect
reading compasses are identical to land compasses. They
contain a magnetized needle, with bearings written on a
rotating bezel. Following a bearing is a little more
difficult then on a direct reading compass - this is discussed
in detail below. The main advantage of indirect reading
compasses is that it is easier to measure bearings to
objects.
Many compasses these day's can be used as both
direct and indirect compasses, and are probably your best bet
if you're looking to buy a compass.
Using a
Compass:
Unfortunately using a compass underwater isn't quite as simple
as on land. Because we are swimming it is possible to have
the compass aligned on the correct bearing, but swim in
another direction. To prevent this the compass must be
centered on your body, and pointed in the same direction as
you are swimming. To ensure this is the case you can:
-
Wrist mounted compass. Stick your arm
without the
compass on it straight out in front of you. Grasp the elbow
of that arm with the compass arm. Your arm with the compass
on it should now be bent at a right angle with the compass
directly in front of you. By swimming like this you ensure
that the compass is centered on your body and pointing in
the same direction you are swimming
-
Slate mounted compass: Hold the slate with
both hands in front of you. Keep both of your elbows bent
at about 45 degrees and the slate level. This should keep
the slate aligned with your body.
-
Consol mounted compass. This is the hardest
compass to align properly. Make sure the hose is long
enough for your consol to be easily moved in front of your
face. Using both arms hold the compass in front of you,
making sure each arm is bent equally. It is easiest to keep
your arms held properly if you tuck them against your body.
Concentrate on keeping the consol in line with your body -
if the consol is angled you'll swim in thhe wrong direction!
Following
a Bearing:
The main purpose for a compass when diving is to allow you to
follow a bearing while you swim. Direct-reading compasses
excel in this, whereas it can be quite difficult with an
indirect-reading compass. Both methods are described below.
Direct
Reading: At the base of your compass should be a small
window. When you look through the window only a small portion
of the magnetic disk should be visible. To follow a bearing
simply hold the compass properly in front of you and rotate
until you see your desired bearing in the window - you are now
facing the direction you want to swim! For example, if you
wanted to swim at a bearing of 60 degrees you would turn until
you see "60" in the window.
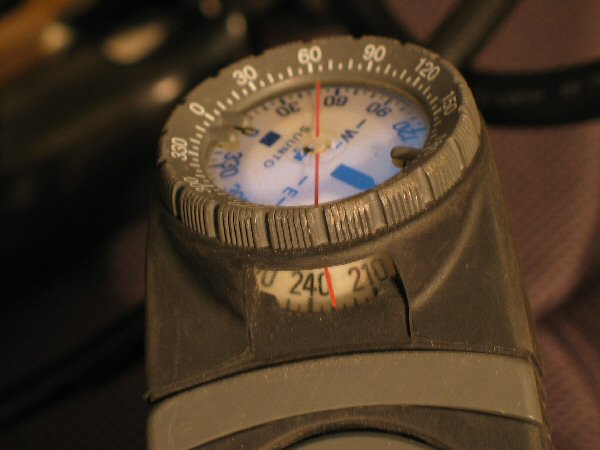
Figure 1: This compass can be used as both a
direct and indirect compass. To use as a direct compass read
the bearing in the small window. If we were to move in the
direction of the red line we would be moving at a heading of
230 degrees.
Indirect Reading: Following a bearing
is a little more difficult on an indirect reading compass.
Around the compass should be a rotating bezel. On the bezel
should be bearings (in degrees) and alignment markings. At
the top of the compass should be a mark which does not rotate
when you turn the bezel (termed the set mark), and in the
compass there will be a floating magnetized needle. The
following steps will describe how to use the compass to set a
bearing.
-
Rotate the bezel until your desired bearing
lines up with the set mark (i.e. if you want to swim a 60
degree course, rotate the bezel until "60" is at the top,
immediately below the set mark).
-
Holding the compass level and in front of
you rotate until the magnetic needle is in-line with the
alignment markings (the needle will be pointing to the '0'
or 'N' on the bezel if you've aligned things right).
-
You are now facing in the direction you want
to swim.
|
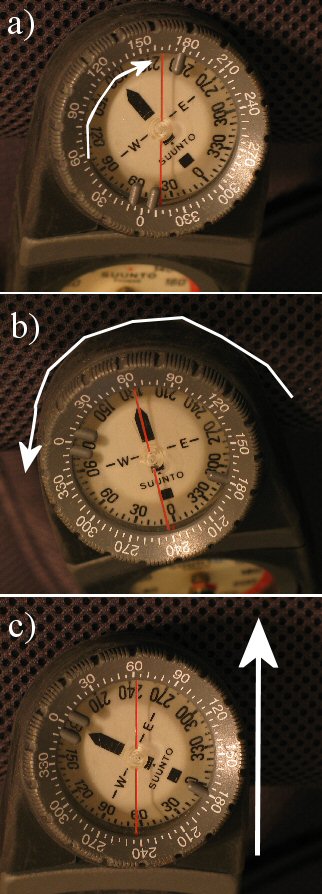 |
Figure 2: This is the same compass used in
figure 1, but we are going to use it in the indirect
mode. To set a bearing using the indirect mode:
- Rotate the bezel until the desired bearing is in
line with the set mark (in this case that is the red
line on the face of the compass).
- Once the bearing is entered (in this case 60
degrees) rotate your body until the magnetic needle
(black needle on floating disk) aligns with the
alignment markings (the double plastic lines attached to
the bezel.
- To follow the bearing you must move in the same
direction as the red line on the face of the compass.
|
Setting a
Bearing:
On occasion you may want to determine what direction an
object lies in. For example you can use this to
map the location of a dive site. Although this process is
easier on a direct-reading compass, indirect reading compasses
tend to be more accurate for this application.
Direct Reading: Hold the compass level
and in front of you. Line the compass so that it is pointing
towards the object. Read the bearing out of the window.
Indirect Reading: Hold the compass
level and in front of you. Line the compass so that the set
mark is in a direct line with the the object you are taking
the bearing to. Rotate the bezel until the magnetic needle is
in-line with the alignment markings. The bearing to the
object can be read off of the bezel - it's the number below
the set mark.
Important Note:
One important thing to know about compasses is that they can
be deflected by electrical or steel objects. So make sure
when you use your compass that no metal objects are near the
compass. Also, some dive computers put out enough energy to
interfere with a compass. To test if yours computer does this
hold it near your compass. If the computer interferes with
your compass the needle on your compass will move when you
place the computer near the compass. If you see that this
occurs you must not wear the computer near the compass.


