Personel . Rigging . Boats . Reiger . Designs . Email me .
RIGGING
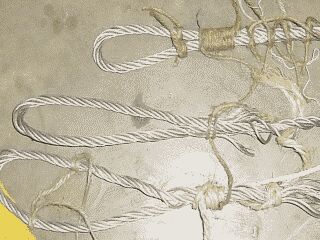
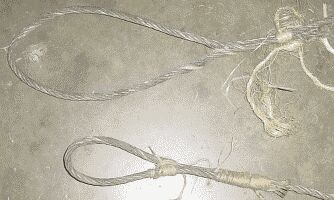
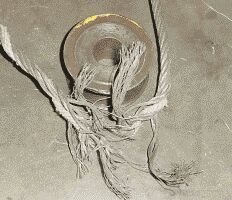
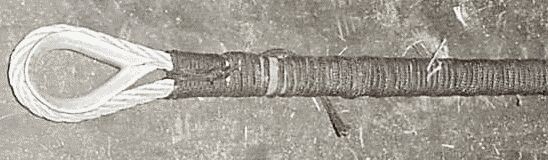
Flemmish eye splice tests
I have been doing some experiments to try and work out the best way for me to do the rigging work, this is a summary of my results.It seems that the flemmish eye (also called the Molly hogan splice), taking only 10 minutes to make and costing almost nothing it seems to be stronger than most of the common options.
 |
 |
The Results suprised me and hopefully will reassure you guys with flemmish eyes on those horrible windy nights. I will never do a splice again!!
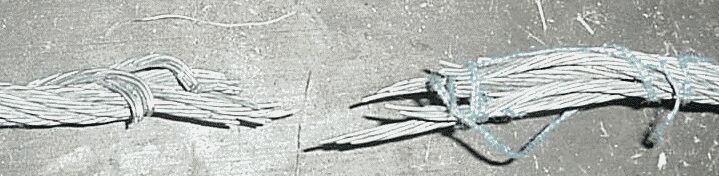
The first tests were comparing FE to a splice The first two splices were dodgy and failed easily so I found the best splice i could and tested a FE against It. FE still won by Miles even though my eyes were small and tails short.
 |
 |
 |
 |
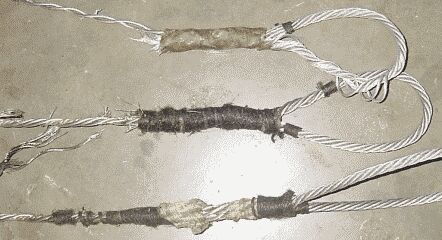
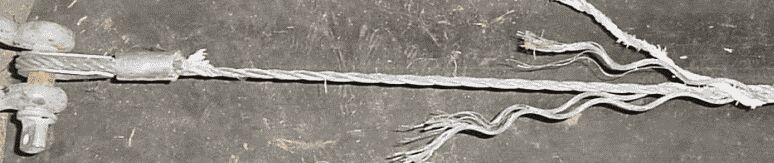
 Finally I tested one against a Talurit (alloy swage). The wire broke
were it came out of the swage at 8 tons (12mm 6xlots), what a Bugger because all my
rigging is talurited at the moment and so is my parents.
Finally I tested one against a Talurit (alloy swage). The wire broke
were it came out of the swage at 8 tons (12mm 6xlots), what a Bugger because all my
rigging is talurited at the moment and so is my parents.
 I must get around to testing some differnt types of endings, to find out the minumium
number of wraps and also 1X19 in Galv and SS to see what the results are. If
you have any Ideas or types that you want me to try out Email me I'll give it a go.
I must get around to testing some differnt types of endings, to find out the minumium
number of wraps and also 1X19 in Galv and SS to see what the results are. If
you have any Ideas or types that you want me to try out Email me I'll give it a go.
Testing wooden blocks
Here is the Email I sent to Adrain after testing his Block. I do not have any pictures, but I think I might have a few bits of acetal and wood splinters. The block was built out of glued tas oak and used a 50mm plastic ronstan sheave.
Hi adrian
tested your block
interesting !!
got a pile of splinters of wood, plastic and rope- hope you didn't wont the block back in one piece. should have worn safety goggles !!
first failure mode between 1000kg and 1500 kg the pin crushed down the wood untill the sheave rested on the lower part of the block. this was not noticed untill the second failure mode hence uncertain result. at least 1000 kg beacuse crappy polyprop let go at 994 kg and no sign of wear then. poly replaced with 12 mm wire.
second failure 1784 kg rope parted at fishermans bend
spliced into grommet and tried again, sheave still resting on bottom of block. explosion somewhere around 1960 kg and bits everywhere.
spent 5 mins cleaning up
conclusions
*wear goggles
1) do not groove entire cheek only top and bottom this should increase 1st failure to around 1300 kg giving wll around 260 kg
2) for highly loaded blocks consider bushing the pin or a bigger pin to increase bearing surface on the wood.
3) for blocks with grommet can reduce size of the rope sightly from blocks with rope tail ie 12mm (aprox 2100 kg) to 9 or 10mm ( not 8 mm, to small).
4) increase space for rope at top, because 12 mm rope would not fit, and ensure gap at bottom to allow for slight wear of pin hole.
5) check blocks for wear in pin hole which will cause block to jamb as the sheave touches the lower spacer well before full failure. this can be seen as an excellent safety feature.
Excellent block, when ultimate failure occured most componets failed together. Also proves that the traditonal shape having a bulge around the pin area is optimised but I think you have improved on it with the opposing grain.
cheers Ben
I Started my rigging in a rather destructive way when I was two or three by acidently 'dismantling'the rig of my fathers model clipper 'Sea Witch'(He never managed to repair it!). Since then I guess I have always enjoyed messing about with ropes and took over the role of bosun and rigger on my parents gaff ketch. This was a good aprenticeship because money was tight and to change anything usually required changing lots of things to scavange the right combination of blocks, shackles and rope.
I also worked as a rigger as well as being first mate on the 100'Brigantine Soren Larsen for 2 years. We completly stripped the foremast and replaced all the standing rigging. Hand splicing 24mm 7x7 was bloody hard work!(we used Liverpool splices). I also worked on the bark 'James Craig', rigging for 4 months during the last stages of her refit.
*glue joints mostly OK.
*major problem with design is the wood compressing under the pin. this is made worse by the grove for the rope running over pin hole decreasing cheek thickness from 12 mm to 9mm on each side
* the glued up nature with the grains of the cheeks and spacers Recommendations
Summary
My rigging background
Some Rigging Links