|
|
|||
| Image with link | Image without link |
Now that you've seen in detail the ways you can mark up text for emphasis and add images to your Web pages, it's time to take the leap into making the pages useful on the World Wide Web by adding hypertext links. Hypertext links can be described as a shortcut to the next Web page. A user will click on the hypertext link, and be taken to the Web page or position the hypertext link has specified.
Tags and Meaning |
Description |
| Anchor Tag <A></A> |
The basic link for creating
hypertext and hypermedia links are the <A></A>, or anchor tags, and are used as follows: <A HREF="URL">Text describing link</A> HREF is simply an attribute for the <A></A> tags, and basically describes or defines the Internet address or URL of the page to be opened or called by the link. Consider the following example: You have a link on your Web page that reads "My Favorite Links", and when the user clicks on the link, your favorite link page with the file name links.html is loaded: <A HREF="links.html">My Favorite Links</A> In the browser the link will be displayed in a different color and underlined. As soon as the user moves his mouse cursor over it, the mouse cursor will change, indicating to the user that he/she can interact with it. Below is an example of a link, to come back to this page when you've finished looking at the result, click the Back button of your browser. Only the text between the <A></A> tags will become the active link, in other words, if you were to specify the link as follows: Click <A HREF="links.html">here</A> for my Favorite Links The output will look as follows, to come back to this page when you've finished looking at the result, click the Back button of your browser: Click here for my Favorite Links The <A></A> tags also have other attributes. The MAILTO: attribute allows the user to send an e-mail message via their Internet account. This is how it is defined: <A HREF="mailto:e-mail address">Send me e-mail</A>
so in this case your MAILTO: link will look as follows: <A HREF="MAILTO:[email protected]">Mail me</A>
You can also specify a Subject for your e-mail message,
with the SUBJECT: attribute. You can add a subject to the link as
follows: Note the question mark (?) to divide the two commands. Be advised however, that floating around out there is the occasional e-mail client that doesn't know what to do with that subject. If this occasional glitch is a concern to you, then don't specify a subject. Click the following link, and find out whether your e-mail client supports the SUBJECT: attribute.
Once the user has clicked on this link, a window will pop up asking the user to specify where he/she would like to save the specified file. Click the following FTP link to see how your browser will handle this: |
| Section Links <A NAME=""></A> |
Aside from creating hypertext
links to documents on your local computer or elsewhere on the Internet, you can create
links to other parts of the same document in which the link appears. This is done
with the following two definitions: <A HREF="#section_name">Link description</A> <A NAME="section_name">Beginning of new section</A> The first example defines the link, while the second defines the position in the document to which the browser must move the cursor. Consider the following example: There is a document with an index at the top of the page containing the following: Introduction, About, Contact and Summary. Each has an associated heading in the document. Section links are created on all the items in the index list. As soon as the user clicks on an index item, he/she is taken to the specified heading in the document. In order to jump from the index to its associated heading in the document, you have to give each heading a unique name of sorts, so that the browser will be able to determine to which heading to move the cursor. In this example the index Introduction will have the unique name INTRO, About will be ABOUT, Contact equals CONTACT and Summary is SUM. It doesn't matter what you call the section link name, as long as it's unique for each specified link. But first, let's define the links or pieces of text the user will click on, note the hash (#) in front of the link name: <A HREF="#INTRO">Introduction</A> <A HREF="#ABOUT">About</A> <A HREF="#CONTACT">Contact</A> <A HREF="#SUM">Summary</A> As soon as the user clicks on these links, the cursor will automatically jump to the heading specified for that link in the HTML document (In this example the heading for Introduction is Introduction to HTML, About equals About the Company, Contact equals Contact Information and Summary is Summary Report). But only if the following lines are defined for the headings. <A NAME="INTRO">Introduction to HTML</A> <A NAME="ABOUT">About the Company</A> <A NAME="CONTACT">Contact Information</A> <A NAME="SUM">Summary Report</A> This tags the location of the text to which you want the browser to move the cursor. For that reason the NAME attribute's value must be the same as the link value. To demonstrate this click on the link below to jump to the top of this page. Section links do not necessarily have to be in the same document. You can also jump to a section link on another page. To accomplish this you will still specify the section link name for the header as follows: <A NAME="INTRO">Introduction to HTML</A> However, the link itself, will be specified with the HTML page followed by a hash (#) and then the section link name, like this: <A HREF="example.html#INTRO">Introduction</A> For example, you have two HTML documents, page1.html and page2.html. On page2.html you have the following headings: Introduction, About the Company, Contact Information and Summary. On page1.html you have a section link to the heading Summary (declared with name equal to LINK4) and the link description as Go to Summary. This would mean on page2.html you would have defined the heading Summary as follows: <A NAME="LINK4">Summary</A> And on page1.html you would have defined the link like this: <A HREF="page2.html#LINK4">Go to Summary</A> To demonstrate this click on the link below to jump to the first time colors were discussed. To come back to this page when you're finished looking at the result, click the Back button of your browser. |
| Path Directory <BASE> |
This tag is especially useful
when your Web pages may appear in different sub directories of a single main directory.
Consider the following:
If the <BASE> tag was not defined, your link would have had to be described like this:
In short, the <BASE> tag is used to define a set parameter, that will be constant throughout your Web page. |
Creating links to other local and distance HTML documents is a relatively straightforward process, but you can also include links within and together with other HTML tags to make them more interesting, better organized, and more accessible to your users. As an example; let's say you have a image, this image represents a certain action and you want to use the picture as your link. The link will then be defined like this:
Note however that when defining an image as a link, in some browsers a colored border will appear around the image. To prevent this from happening just specify the image attribute BORDER and set it equal to zero. The example above would thus be defined as follows:
<A HREF="http://www.website.com"><IMG SRC="image.gif" ALT="Action image" BORDER="0"></A>
With the following example the first image is defined as a link while the second image is not. Move your mouse cursor over the two images and notice how you mouse cursor reacts in both cases. Note however, clicking on the image link below will only reload the current page.
|
|
|||
| Image with link | Image without link |
Link Colors
The browser normally has default colors specified for links. But these colors might not go with your defined color scheme. To overcome this little problem, you can define your own colors with the following <BODY></BODY> tags attributes.
The LINK attribute specifies the color for links. Either the color name or code can be used as a value.
<BODY LINK="BLUE"> or <BODY LINK="#0000FF">
The ALINK attribute specifies the color for an active link meaning, when the user has the mouse clicked on a link until the user releases the mouse button. Once again either the color name or code can be used as a value.
<BODY ALINK="WHITE"> or <BODY ALINK="#FFFFFF">
The VLINK attribute specifies the color for a followed link, meaning a link that has been clicked or selected previously. Once again either the color name or code can be used as a value.
<BODY VLINK="YELLOW"> or <BODY VLINK="#FFFF00">
All of the above <BODY></BODY> tags attributes can be used simultaneously. For example:
<BODY LINK="#FF0000" ALINK="#000000" VLINK="#0000FF">
The example above will result in your links being displayed in a RED color on your page. As soon as the user clicks on it, the link will change to BLACK in color until the user releases the mouse button, whereas the button will register as a followed link and therefore be BLUE in color whenever the user returns to that link at a later time.
Clickable Image Maps & Graphical Interfaces
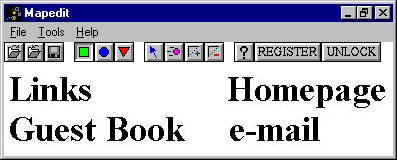
Up to now, it has been made to look as though the Web is about text, but that doesn't mean that you can't use some great graphics to spice up your presentation. With image maps, you can create an entire interface for your Web pages and sites. Image maps begin as a normal graphic (usually in GIF or JPEG format), designed with the Web in mind. Another program is used to map hot zones (clickable areas) on top of the graphic. In this case we'll be using MapEdit, which is available for all versions of Windows. You can access and download the latest version of this program via the MapEdit Web site: http://www.boutell.com/mapedit/ or from my download page.
But what is an image map? Well, in short it's a single image with two or more clickable areas or links. Previously I showed you how to make an image into a link, but that one picture only had one clickable area, meaning no matter where you clicked on that image, the same URL or Internet address would have been called. With image maps you can now have one image, but depending on where you click on the image, a different link will be followed. These different clickable areas are referred to as hot zones. The various shapes of hot zones are as follows:
The following tags are used to map an image.
Tags and Meaning |
Description |
| Hot Zone Mapping <MAP></MAP> <AREA> |
This tag is used to map hot zones
or clickable areas on an image that is defined in your Web page. The following example is
how the image should be defined in your HTML script: <IMG SRC="image.jpg" USEMAP="#name" BORDER="0"> The USEMAP attribute defines the map image. In short, a name is assigned to the image so that one can refer to that image at a later stage when defining your hot zones or clickable areas. Note the hash (#) in front of the image name. Just to refresh your memory, if the BORDER attribute is left out, a colored border is drawn around the image. To add the hot zones look at the following example:
NAME is an attribute of the <MAP></MAP> tags and the image name between the quotes ("") should be the same as the image name given in the image declaration. In other words if USEMAP="#mymap" then NAME="mymap". The <AREA> tag defines the hot zone, where SHAPE is the attribute that defines the shape of the hot zone, being either RECT, CIRCLE, POINT, POLY or DEFAULT, see previously mentioned shapes of hot zones. The COORDS attribute defines the position and coordinates of the hot zone on the image, however in most cases one will use other software, like MapEdit to determine the coordinates for you. Notice that the rest of the image is also defined as having no link with the attribute NOHREF. See default in the previously mentioned shapes of hot zones. Most coordinates will have an X and Y value. Take the rectangle shape for instance, it's coordinates will be defined as follows: <AREA SHAPE="rect" COORDS="X,Y,X,Y" HREF="URL"> Every screen is divided up into pixels. If your screen size is 800 by 600, you can plot an X (Width) and Y (Height) coordinate where X is not greater than 800 and Y is not greater than 600. A circle shape though only uses one X and Y coordinate to define the center of the circle, and then one extra value, the circle's radius, which will look as follows if defined: <AREA SHAPE="circle" COORDS="X,Y,R" HREF="URL"> |
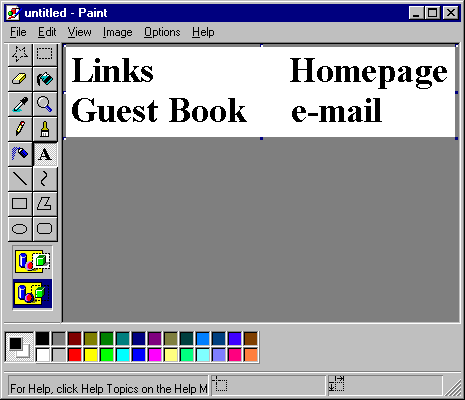
So let's do an example of creating an image map with links:
- <HTML>
- <HEAD>
- <TITLE>Map Hot Zone Example</TITLE>
- </HEAD>
- <BODY>
- <IMG SRC="mapimg.gif">
- </BODY>
- </HTML>
- Links = http://www.links.com
- Homepage = http://www.homepage.com
- Guest Book = http://www.guestbook.com
- E-mail = mailto:[email protected]
- <HTML>
- <HEAD>
- <TITLE>Map Hot Zone Example</TITLE>
- </HEAD>
- <BODY>
- <IMG SRC="mapimg.gif" USEMAP="#mapimg" BORDER="0">
- <MAP NAME="mapimg">
- <AREA SHAPE="rect" COORDS="3,4,92,39" HREF="http://www.links.com">
- <AREA SHAPE="rect" COORDS="220,6,383,44" HREF="http://www.homepage.com">
- <AREA SHAPE="rect" COORDS="3,47,187,79" HREF="http://www.guestbook.com">
- <AREA SHAPE="rect" COORDS="222,47,317,81" HREF="mailto:[email protected]">
- <AREA SHAPE="default" NOHREF>
- </MAP>
- </BODY>
- </HTML>
| Click here to see what the output of the above code would look like. To come back to this page when you've finished looking at the result, close the new window it opened in. |
| Click here to go to the personal homepage example, for this section of the tutorial. |
[Next Section - HTML Forms] [Back To Index Page]

