HTML Forms


The next set of HTML tags are designed to enhance the interactivity of your Web pages by increasing your ability to request information from users. Using the forms tags, you can ask users to enter text information, choose from menus, mark checkboxes, make choices from radio buttons and send that information to the Web server for processing. Don't worry too much about what a Web server is right now, it will be discussed later on. All you have to know for now is that a Web server is the computer where all the files for your Internet page will be stored so that other people from all over the world can view it. Forms can be compared to the paper forms you get to fill out all the time. A form is simply an area on your web site that is considered by the browser to contain information. There really are no limits concerning what you can do with the content of the form once it is entered and submitted. Usually it is either sent as an email, as an input to a database or as an input to a web page.

Tags and Meaning

Description

Form Tags

<FORM></FORM>

The basic construction of an HTML form is this:

<FORM> begin a form.
<INPUT> ask for information in one of several different ways.
</FORM> end a form.

When defining a form, one must tell the browser where to send the data we gather and how to send it. One way would be to send the data to a CGI script for processing or you can have the data e-mailed directly by using the MAILTO action. The MAILTO action is simpler but less reliable. Every so often, depending on the users e-mail configuration, using the MAILTO action might just bring up an empty new mail window instead of sending the form data, or sometimes nothing will happen. To prevent this from happening, you will have to go straight into using some sort of form handler like CGI or ASP.

But what is CGI and ASP you might ask? Common Gateway Interface, or CGI is a mechanism that allows a Web server to receive values in a specified format, run a program or script on the server and send the output to a Web browser. Same applies for ASP or Active Server Pages. Sounds confusing I know, but basically CGI script and ASP is a small separate program you write that will accept certain values or parameters, then uses the values or parameters to perform a certain task, which in turn, once completed, returns a result set that is displayed in the browser. Consider the following example: Your Internet guest book will be maintained with a CGI or ASP form handler. The user will be prompted to enter their name, e-mail address and comment. Once completed, that information will be send to a CGI script or ASP page, which in turn will use that information to regenerate the current guest book Web page to include the new entry, in short the CGI script actually re-writes the HTML code of the current guest book page, and replaces the old file with the new. This means the next time the guest book page is loaded by a browser the new guest book entry will appear on the list. CGI and ASP form handlers however is a tutorial all on its own, and therefore we will stick to the MAILTO action for this tutorial.

But if you are adamant on using CGI scripts or ASP, the most reliable way to process your form data is to send it to a script on a server for processing. The most obvious place to look for such a script is your own ISP (Internet Solution Provider) or Web host. Most have a form mail script that you can send the data to. If you look at their help pages, you will probably find directions for using their script. They may also require that you insert some hidden fields in the form so they know where to send the processed data to and where to send your visitor after he/she fills out your form. If for some reason your ISP or Web host is unable to provide a form mail script, all is certainly not lost, you still have a few options. One option, but only if you have access to your servers' CGI bin, is to run your own script. The reason Internet providers usually do not allow customers to run their own scripts is that a bad script can crash or lay down the entire server, and running scripts on a server makes it possible to hack into the server, to gain access to sites you should not have access to. Finally, accepting customers' scripts usually means accepting way more administration, this is also the reason that most providers that do allow customized scripts charge higher prices. Another option is to use one of many free form processing services out there on the Internet. These are simply form, ASP or CGI scripts that reside somewhere else but are offered for use to the general public. You do not need to program your own CGI scripts or ASP page, in fact you don't even need to have CGI or ASP scripts on your own server to use them. You can just use the free CGI scripts if you can't run scripts on your own server or if you don't know how to program them. Check out my links page for some places where you will be able to find a CGI or ASP script that meets your requirements.

To declare a form that uses CGI or ASP script, look at the following example:

<FORM METHOD="POST" ACTION="URL of CGI script or ASP page">
</FORM>

So let's say you have an ASP page called myscript.asp stored at the URL http://www.fake.com/cgi-bin. The form definition will look like this:

<FORM METHOD="POST" ACTION="http://www.fake.com/cgi-bin/myscript.asp">
</FORM>

Just keep in mind that the form declaration is not the input or information prompts, but just a declaration for the browser of how or where to send the data entered by the user. The form acts as a capsule of sorts. Let's say you declare two forms, each contains a submit button, but the first form has the inputs, Name, Surname, and Phone Number, while the second form has Age, Sex and Date of Birth. If the user clicks on the Submit button of the first form, the only data or information that will be submitted or available for processing would be Name, Surname, and Phone Number, and vice versa. In other words, the form basically encapsulates the various inputs defined for the specific form. You can add all kinds of HTML tags between the <FORM></FORM> tags. This means that a form can easily include an image along with the form fields mentioned underneath. The form entered above is simply comparable to a blank sheet of paper.

The <FORM></FORM> tags takes various attributes:

The METHOD attribute accepts either POST or GET as its value. This specifies how the data or information entered in the form should be sent off and retrieved from the specified location.

If the METHOD attribute is set to GET, the browser will send the inputs defined inside the form to the page or script specified in the ACTION attribute, by appending the input names and values on the browser address line. Clear as mud, right? An example might explain this better.

Lets say you have a form with three input values in it: Name, Phone and Sex with Sex being two radio buttons marked male and female. You enter the following values for each: Tentacle, 555-1234 and select male, then click the submit button. The browser detects you set your METHOD equal to GET and automatically sends all the inputs with their values to the next page or script specified, by appending them to the address line. For example if we specified the page "http://www.mypage.com/addressbook.asp" in the ACTION attribute, the address line of your browser should look like this once the addressbook.asp page has loaded: "http://www.mypage.com/addressbook.asp?name=Tentacle&phone=555-1234&sex=male&B1=Submit". The page addressbook.asp will have the necessary scripts to use all this information and do something with it, but like I mentioned before, a different tutorial all together. But don’t worry, you don't need to know how to write ASP pages or CGI scripts to understand forms and inputs.

Note however that if you submit any information from a form and your ACTION attribute is not pointing to a URL or Web page on a Web server, the values will not be displayed on your browser’s address line even though you set your METHOD to GET. So unfortunately you won’t be able to test this on your local machine. But to see a good example of this go to http://www.hotmail.com and watch the address line of your browser as you surf the site.

As you can see from the previous example all the values are displayed in the browser address line for everyone to see. So what happens if the user entered a password which of course you don’t want anybody else to see, well this is where the POST value for METHOD comes in. If you set the METHOD attribute equal to POST the browser do more or less the same as when you set METHOD equal to GET, but this time sends the information to a buffer on your Web server, which means only the page you specified in your ACTION attribute can read the values, it is not displayed on the address bar of your browser.

As you probably figured out by now the ACTION attribute accepts the URL of the next page to be loaded when the user clicks the submit button or the location of the script that will process the data from your form. The ACTION attribute is required with every form, even forms that don't use CGI or ASP.

But getting back to the MAILTO action. In the case of the MAILTO action, the METHOD attribute will be set to POST. In the case of the MAILTO action, the <FORM></FORM> tags are defined as follows:

<FORM METHOD="POST" ACTION="MAILTO:mail address">
</FORM>

The only thing you have to do is enter your email address after the MAILTO: action. To send the data to more than one email address, separate them with commas. And with actual values, the form with a MAILTO: action will be defined like this:

<FORM METHOD="POST" ACTION="MAILTO:[email protected]">
</FORM>

Another attribute one can use to define a form is the ENCTYPE attribute. In most cases you will not need to use this attribute at all. ENCTYPE can have one of the following three values: multipart/form-data, application/x-www-form-urlencoded and text/plain. The default value, if you don't use this attribute at all, is application/x-www-form-urlencoded, which is sufficient for almost any kind of form data. ENCTYPE determines how the form data is encoded. Whenever data is transmitted from one place to another, there needs to be an agreed upon means of representing that data.

File uploads allow you to send an entire file from the users' computer to the web server as part of your form input. ENCTYPE must be set to multipart/form-data if you want to accomplish this. And to send the form data as plain text ENCTYPE needs to be set to text/plain. The following example shows how to use ENCTYPE:

<FORM METHOD="POST" ACTION="MAILTO:[email protected]" ENCTYPE="text/plain">
</FORM>

Unfortunately, our complete form doesn't do anything yet. All we have defined up to now is how and where the data from the form must be processed. This is where the <INPUT> tag comes into play.

Input Empty Tag

<INPUT>

The <INPUT> tag gives you the opportunity to be more specific about the type of input you're going to accept from the user. Remember the <INPUT> tag is defined within the <FORM></FORM> tags. Consider the following script:

<INPUT TYPE="type of input" NAME="variable" SIZE=number MAXLENGTH=number>

Notice that <INPUT> is an empty tag, there's no </INPUT> element.

Every input needs a NAME. When the user types in a value, for instance his address, the address will become the inputs' value and be paired with the NAME given to the input. For example, you defined NAME equal to ADDRESS and the value entered by the user was 2020 Some Street, the end result after processing will be ADDRESS=2020 Some Street, which will be the format the data is sent off to the specified location. Let's say you have the input types Name, Age, Address and e-mail, each given a unique name. Name = NAME, Age = AGE, Address = ADDRESS and e-mail = MAIL. That would mean the data returned will look as follows:

NAME=John Nobody
AGE=25
ADDRESS=2000 Burg Street
[email protected]

Sometimes you will receive the data in a very strange format. Instead of something nice and neat like the example above, the information might come back looking like this:

NAME=John+Nobody&AGE=25&ADDRESS=2000+Burg+Street&
[email protected]

There is a program that converts this data into a readable format. For Windows users, one such program is Mailto Converter. Just click on the link to download the application.

SIZE determines the size or length of the form input. The default value is usually 20.

MAXLENGTH specifies how many characters a user can input. This means if MAXLENGTH is equal to 10, the user will not be able to enter more than 10 characters for that specific form input.

The VALUE attribute allows you to specify a default value for an input. This means that if the user doesn't change the input value, the specified or default VALUE will automatically be paired with the NAME. The following is an example of input without the VALUE attribute specified:

First Name:

This next example is the same input but with the VALUE attribute specified, and where the VALUE equals "Enter your name here":

First Name:

The TYPE attribute is discussed in detail below, but basically what this attribute defines, is the specific input device you want to use, to acquire information or data.


As we discussed previously, defining a form does not provide for any inputs. An input must be defined within the form, which will allow the user to enter information. There are various inputs to choose from. The following is a list of input types and an example of what they would look like in the browser: Feel free to interact with the output examples.

TEXT - creates a single-line textbox of a length you choose. The following example is a textbox with a MAXLENGTH of 10, so go ahead try and enter more than 10 characters in the output:

First Name: <INPUT TYPE="TEXT" NAME="fname" SIZE="40" MAXLENGTH="10">

This is what the output will look like in your browser:

First Name:

A return data example would look as follows:

fname=XXXXXXXXXX where X equals user input

All possible attributes for this input would be:

SIZE = Characters shown.
MAXLENGTH = Max characters allowed.
NAME = Name of the field.
VALUE = Initial value in the field.

PASSWORD - this is identical to the TEXT option except that it responds to typed letters with bullet or a similar scheme to keep the words from being read. A sample password box could be the following:

Enter Password: <INPUT TYPE="PASSWORD" NAME="password" SIZE="25" MAXLENGTH="25">

This is what the output will look like in your browser:

Enter Password:

A return data example would look as follows:

password=XXXXXXXXXX where X equals user input

All possible attributes for this input would be:

SIZE = Characters shown.
MAXLENGTH = Max characters allowed.
NAME = Name of the field.
VALUE = Initial value in the field.

CHECKBOX - this value for TYPE will be used when there are two or more possible answers for a given choice. You can also determine whether or not a checkbox will already be checked, by using the attribute CHECKED. Note however that even though you have different descriptions for each checkbox, the VALUE for each checkbox in that group must be the same. Here's an example of adding checkboxes to a form:
Type of computer(s) you own:<BR>
<INPUT TYPE="CHECKBOX" NAME="choice_1" VALUE="yes" CHECKED> Pentium
<INPUT TYPE="CHECKBOX" NAME="choice_2" VALUE="yes"> 486 - Series PC
<INPUT TYPE="CHECKBOX" NAME="choice_3" VALUE="yes"> Macintosh

This is what the output will look like in your browser:

Type of computer(s) you own:
Pentium 486 - Series PC Macintosh

Note however that if you wanted the buttons below each other and not next to each other, just add the <BR> tag at the end of each button definition.

The user can choose one or all of the options. Their choices will be returned, meaning if they choose nothing, nothing will be returned. So in this case if all the options were selected, the following would would be an example of what the return data would look like:

choice_1=yes
choice_2=yes
choice_3=yes

All possible attributes for this input would be:

NAME = Name of the field.
VALUE = Initial value in the field.
CHECKED - Makes the associated checkbox checked by default.
RADIO - like CHECKBOX, RADIO is designed to offer the user choices from pre-determined options. Unlike CHECKBOX, however, RADIO is designed to accept only one response from among its options. RADIO requires that you use the VALUE attribute, and that the NAME attribute be the same for all of the <INPUT> tags that are intended for the same group. VALUE on the other hand, should be different for each choice. For Check Boxes the NAME changes and the VALUE stays the same and with Radio Buttons, the VALUE changes but the NAME stays the same. Look at the following example:
What type of Web browser do you use most often?<BR>
<INPUT TYPE="RADIO" NAME="browser" VALUE="N" CHECKED> Netscape
<INPUT TYPE="RADIO" NAME="browser" VALUE="I"> Internet Explorer
<INPUT TYPE="RADIO" NAME="browser" VALUE="W"> Web Crawler

This is what the output will look like in your browser:

What type of Web browser do you use most often?
Netscape Internet Explorer Web Crawler

Note however that if you wanted the buttons below each other and not next to each other, just add the <BR> tag at the end of each button definition.

Depending on the option selected, the return data example would look as follows:

browser=N or browser=I or browser=W

All possible attributes for this input would be:

NAME = Name of the field.
VALUE = Initial value in the field.
CHECKED - Makes the associated checkbox checked by default.
HIDDEN - This input type allows the designer to place fields in his form which can not be seen by the user. In other words it does not show on the form. This is mostly used if you have to send default information with your form, which you don't want the user to change. An example would be, if you had more than one form on your Web page, you would define a hidden input for each form specifying a unique name for each form, that way one can figure out which form the user submitted. Look at the following example:

<INPUT TYPE="HIDDEN" NAME="hidden1" VALUE="address form">

This is what the output will look like in your browser (Note you are suppose to see nothing):


A return data example would look as follows:

hidden1=address form

All possible attributes for this input would be:

NAME = Name of the field.
VALUE = Value that will be sent when form is submitted.

RESET - creates a push button, named with the VALUE attribute, that resets all of the elements in that particular form (being all the inputs between the <FORM></FORM> tags) to their default values, erasing anything that the user has entered. An example would be the following, note however if you do not specify the VALUE attribute, the button will read Reset:

<INPUT TYPE="RESET" NAME="button1" VALUE="Reset the Form">

This is what the output will look like in your browser:

All possible attributes for this input would be:

NAME = Name of the button.
VALUE = Text shown on the button.

SUBMIT - the only purpose of the SUBMIT type is to send off all the other form information that had been entered by the user to the Web server or execute the action specified within the ACTION attribute. A submit button is simply a button that, once clicked, starts the action mentioned in the above section, either being: send the content of the form to the CGI program or perform the action specified, for example, MAILTO:. And this is how you define it, note however if you do not specify the VALUE attribute, the button will read Submit:

<INPUT TYPE="SUBMIT" NAME="button2" VALUE="Send it in">

This is what the output will look like in your browser:

All possible attributes for this input would be:

NAME = Name of the button.
VALUE = Text shown on the button.

You can also make a simple button that just takes the user to another page or URL. To accomplish this you leave out the METHOD attribute and only define the ACTION attribute when defining the form. The ACTION attribute's value will be a URL or HTML file name, the user will be taken to the page specified when clicking on submit button. Consider the following:

<FORM ACTION="http://www.fakeurl.com/index.html">
<INPUT TYPE="SUBMIT" NAME="button" VALUE="Go to my Homepage">
</FORM>

This is what the output will look like in your browser, to come back to this page when you've finished looking at the result, click the Back button of your browser:

IMAGE - You can make an image a submit button, and this is how you define it:

<INPUT TYPE="IMAGE" SRC="button.gif" NAME="ibutton" WIDTH="94" HEIGHT="26" ALT="Submit Form" BORDER="0">

Note that the IMAGE input type is, by default a SUBMIT button only. You can't make a RESET image button.

This is what the output will look like in your browser:

submit.gif (1567 bytes)

All possible attributes for this input would be:

SRC = Name and location of the image.
NAME = Name of the button.
WIDTH = Specify the width so your browser can load your page quickly and efficiently.
HEIGHT = Specify the height so your browser can load your page quickly and efficiently.
ALT = If someone is running without images they can still submit your form.
BORDER = Make this equal to zero if you want the little link colored box to go away.
FILE - With the File Upload input your visitors can send you a file right off their hard drive. When using this input type, you must set ENCTYPE equal to multipart/form-data in your <FORM></FORM> tags. Also be aware that the occasional older browser doesn't support this type of input and that when this input is used in a MAILTO: form, the results can sometimes be unpredictable. Take note however that this input type does not actually upload the file to the server, all it does is point to the directory of where the file to be uploaded can be found on the users' computer. This is how you will 
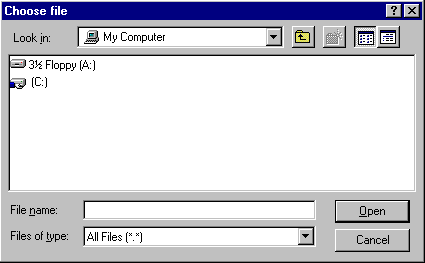
define it:

<INPUT TYPE="FILE" NAME="upload">

This is what the output will look like in your browser:

Once the user clicks on the browse button and is using any version of Windows, the following window will pop up:

cfpic.gif (4631 bytes)

With this window the user will select the file they want to use for whatever purpose. The directory structure of the selected file with the file name will be displayed in the text field next to the browse button once the user selects the Open button of the Choose file window.

All possible attributes for this input would be:

NAME = Name of the field.


There are however two more form inputs, but they are not defined with the <INPUT> tag. The first is a text field covering several lines. The second is a select box or drop down list box, and allows the user to choose one or more options from a set list.

Tags and Meaning

Description

Text Field Tags

<TEXTAREA></TEXTAREA>

The <TEXTAREA></TEXTAREA> tags create a box for typing several lines of text. You can set this tag to control the number of rows and columns it displays, although it will generally accept as many characters as the user desires to enter. It takes the following form:
<TEXTAREA NAME="variable_name" ROWS="number" COLS="number">
default text
</TEXTAREA>

The default text inside the <TEXTAREA></TEXTAREA> tags works like <PRE></PRE> formatted text, any returns or spaces you add to the text are displayed in the browser window. In fact hitting Enter after the opening <TEXTAREA></TEXTAREA> tags, means you would be inserting a blank line at the top of the text area.

The NAME attribute declares the name of the input. ROWS and COLS can accept different numbers to change the size of the textarea box.

<TEXTAREA></TEXTAREA> tags will also accept one other attribute, WRAP.

WRAP can be set to OFF (which is the default if WRAP is not included), VIRTUAL or PHYSICAL. Setting WRAP to PHYSICAL forces the browser to include actual line breaks in the text when sending it to the Web server. VIRTUAL makes the textbox seem to offer line wrap, but sends a continuous stream of words to the Web server (unless the user has entered returns on his or her own). Below is how you would define it within the <FORM></FORM> tags:

<TEXTAREA NAME="comments" ROWS="5" COLS="40" WRAP="VIRTUAL">
Dear BigCorp:
</TEXTAREA>

This is what the output will look like in your browser:

A return data example would look as follows, depending on what ever WRAP was set to:

If WRAP was equal to PHYSICAL, this is what the return data would look like:

comments=XXXXXXX XXX XXXXXXX
comments=XXXXX XX XXXXX where X equals user input

However if WRAP was equal to VIRTUAL, and unless the user has entered returns on his or her own, this is what the return data would look like:

comments=XXXXXXX XXX XXXXXXX XXXXX XX XXXXX where X equals user input

All possible attributes for this input would be:

ROWS = Rows in the field.
COLS = Columns in the field.
NAME = Name of the field.
WRAP = Format the data is transmitted. Possible values: off - turns off line breaking, virtual - shows line breaking, but sends text as entered, and physical - inserts line breaks when needed and even sends it.
Menus

<SELECT></SELECT>

The <SELECT></SELECT> tags can be used to create different types of pop-up and scrolling menus. The following is the basic format:
<SELECT NAME="variable">
<OPTION SELECTED VALUE="value"> Menu text
<OPTION VALUE="value"> Menu text
</SELECT>

The NAME attribute declares the name of the input. The attribute SELECTED is designed to show which value will be default in the menu listing, note also that this does not have to be assigned to the first item of your list, but in most cases the first item in your list would be the default. VALUE defines the unique description for each item in your menu list. An example might be:

Choose your favorite food:
<SELECT NAME="food">
<OPTION SELECTED VALUE="ital"> Italian
<OPTION VALUE="texm"> TexMex
<OPTION VALUE="stek"> SteakHouse
<OPTION VALUE="chin"> Chinese
</SELECT>

This is what the output will look like in your browser:

Choose your favorite food:

You can also use the SIZE attribute to display the menu in its entirety, by simply changing the first line of the example to the following:

<SELECT NAME="variable" SIZE="4">

This is what the output will look like in your browser:

Choose your favorite food:

The first example is without the SIZE attribute and the second is with the SIZE attribute.

However if you made SIZE less than the total items in the list, let's say you have 10 items but you set SIZE to 5, a scroll bar will appear on the right of the list box, like so.

Household Income:
<SELECT NAME="list1" SIZE="5">
<OPTION VALUE="choice1"> $10 - $50
<OPTION VALUE="choice2"> $51 - $100
<OPTION SELECTED VALUE="choice3"> $101 - $500
<OPTION VALUE="choice4"> $501 - $800
<OPTION VALUE="choice5"> $801 - $1000
<OPTION VALUE="choice6"> $1001 - $1500
<OPTION VALUE="choice7"> $1501 - $2000
<OPTION VALUE="choice8"> $2001 - $3000
<OPTION VALUE="choice9"> $3001 - $5000
<OPTION VALUE="choice10"> $5000+
</SELECT>

This is what the output will look like in your browser:

Household Income:

Note how the item defined with the SELECTED attribute is highlighted, showing it as the default value.

Now this is all fine and well, but currently the user can only select one item on the menu form. To overcome this we use the MULTIPLE attribute. In most cases you will use the SIZE attribute with the MULTIPLE attribute, so as to display the menu in its entirety. To apply this you simply change the first line of the example to the following:

<SELECT NAME="variable" SIZE="4" MULTIPLE>

If we take the first example, this is what the output will look like in your browser with the MULTIPLE attribute. To select multiple items, one item at a time press and hold the control key (Ctrl) on your keyboard and click on the items you want, click on a selected item to deselect it, while still holding down control (Ctrl). To select a whole list of items at once click the first item you want, then press and hold the shift key (Shift) on the keyboard, then click the last item in the list, to deselect the items release the shift key (Shift) and click any of the items:

Choose your favorite food:

All possible attributes for this input would be:

NAME = Name of the field.
SIZE = Number of items in list.
VALUE = The value that will be sent if item is chosen.
MULTIPLE - Allows multiple choices.
OPTION - Individual items in the menu.
SELECTED - Make an item default.


Now, let's design a Web page with all the new goodies we have learned so far. Follow the instructions carefully. You may use other tags that we have done up to now as well to make the following exercise more interesting, just make sure that the required forms are in place. Although the solution is available, try to create the Web page without having to look at the answer until after you've completed the exercise.

screen.gif (1270 bytes) Click here to see what the output of the above code would look like. To come back to this page when you've finished looking at the result, close the new window it opened in.
 
correct.gif (1081 bytes) Click here to see the solution to this exercise. To come back to this page when you've finished looking at the answer, close the new window it opened in.
 
output.gif (894 bytes) Click here to go to the personal homepage example, for this section of the tutorial. 


[Next Section - Adding Tables] [Back To Index Page]

Introduction | Basic Tags | More HTML Tags | List Tags | Adding Graphics | Creating Links | Adding Forms | Adding Tables
Creating Frames | Multimedia | Uploading Files | Downloads | Questions & Answers | Useful Links | e-mail Me
 
Example Page 1 | Example Page 2 | Example Page 3 | Example Page 4 | Example Page 5 | Example Page 6
Example Page 7 | Example Page 8 | Example Page 9 | Example Page 10
 
Color Chart | HTML Tester
bar.gif (1848 bytes)
Copyright © 1999 - 2000 Green Tentacle. All rights reserved. This tutorial is protected by SA and international copyright laws.
Hosted by www.Geocities.ws

1