Main Menu
Index Page
About SWTNZ
Links
Creative
Build a LightSaber
The Vacuum-Saber
DIY 12' Bandolier
Inside the X-Wing
Restoring Toys
Creative Reviews
Inside RC R2D2
Broken 12' R2D2
Prop Reviews
The Hildebrandt's
Collecting
Vintage Collectibles
Collecting & Pricing
Toy Concepts
Wampa Revealed
Behind the Beast
Behind the Vehicle
Droids & Ewok
From Steve to Star
Death Star Play Sets
Downloads
Video Edits
Rebel TieFighter
Wallpapers
Star Wars Browser
R2M-Player
Toy Company's
Kenner
Toltoys
Palitoy
Remco
|
|
How to Build a lightsaber from a vacuum cleaner |
 |
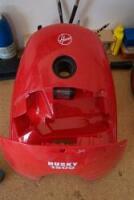
After running an article on "How to make a lightsaber",
i decided that i would take up the challenge myself.
I had a look about the house and garage and found a
few lengths of tubing that might be of use but i wasn't
so sure that this would do, so i took another look in
the garage and an old vacuum cleaner that was ready
to be dumped caught my attention. I examined the
tubing and the plastic fittings and said to myself, this
is exactly what im looking for.
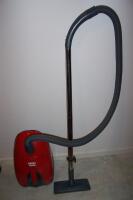
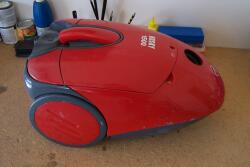
A "Husky 1500 Hoover Vacuum Cleaner"
|
|
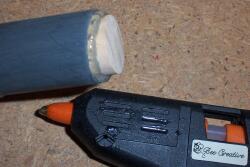
Tools used and extra bits for the finish |
Below are a list of simple tools that were used to build the lightsaber as
well as a list of extra items that were added for the finishing touches.
|
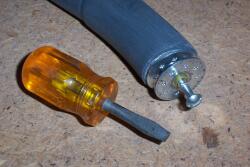
Tools
Hack saw or hobby saw
Metal file or rough sandpaper
Light sandpaper
Electric glue gun
Hand drill or Drill press
A vice to lock your work down
Screw drivers
Soldering iron
Ruler and marker
Craft knife
|
Other Parts
Reed bulb or other
Thin electrical wire
"C" sized Battery's
Red cap from Marker
Key ring laser pointer Tip
Fastening Nuts
Plastic Holding tube
Small colored beads
Rubber tap washer
|
|
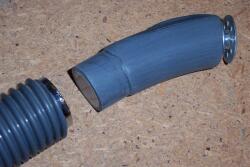
lets examine the parts of the vacuum cleaner |
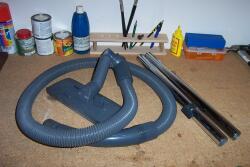
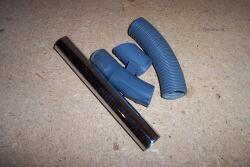
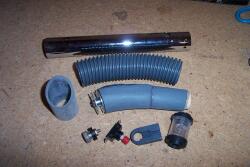
Above you can see the basic disassembled parts of a common vacuum cleaner
tube and fittings, we have a ribbed flexible gray tubing, two chrome tubes
which are joining halves and two plastic fittings. One plastic fitting connects the
flexible tube to the chrome tube and the other fitting connects the chrome tubing
to the floor brush. all the parts are light yet strong and fairly easy to cut.
|
|
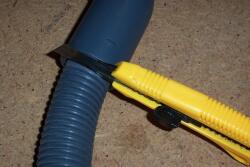
Begin by cutting away what will be used |
Lets start by cutting away the first plastic fitting, this is the end which rotates
and connects the floor head to the chrome tubing. I used a simple but useful
hobby saw which easily cut through the plastic tubing.
Then the same was done with the handle end of the plastic tubing, i wanted only
part of the curved shaft with the internal sleeve intact as this would be used
as the bottom end of the Lightsaber handle.
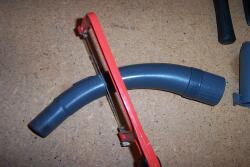
The ribbed rubber tubing is easily cut away with a handy craft knife, i removed
both plastic fittings from either end.
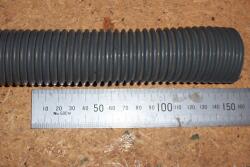
I cut to size 15cm of rubber tubing, the internal diameter of the rubber tubing
matches the diameter of the chrome tubing almost perfectly.
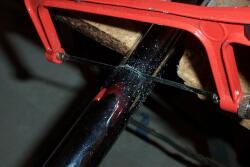
Next i measured 24cm of chrome tubing and clamped it down so i could cut
it as straight as possible, the tubing cuts much easier than expected.
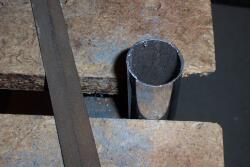
Ok next you need to clean up all the pieces, you can use a file on the metal
tube ends or even a rough 40 grit sand paper held against a narrow length
of wood. I used the sandpaper to straighten the cuts made to the plastic
fittings and a pair of scissors to trim the edges of the rubber tube.
The plastic fitting which connected to the floor head was then pushed onto one
end of the chrome tube and cut at an angle, this would be the top end of the
lightsaber and where the emitter would normal be housed.
So far so good, we now have all four basic fittings for the handle..
|
|
Cleaning up what we have so far |
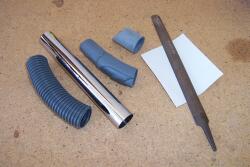
Above you can see all four parts after they have cleaned and set aside for the
next job. The plastic fittings were sanded with a light grade sand paper to remove
any bits of protruding plastic bits and to get rid of that shine, this will look awful
at first but with care to sand in one direction only ( length wise ) the fittings will
turn out ok and wont resemble their former selves so much. The insides of
both the plastic and chrome tube were thoroughly cleaned with a bottle brush
as they were filthy from years of sucking up dust.
|
|
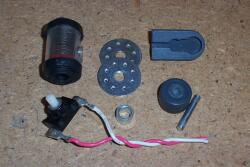
Useful parts from the vacuum's main body |
now depending on what kind of vacuum you have you are sure to find a bunch
of different bits and pieces on or in the main vacuum body itself. So lets begin
to take it apart best we can, you may need screwdrivers to do this or in some
cases use a bit of brute force. Allot of parts are easily removed as it may have been
designed this way for cleaning etc. Be careful of the dust inside if you have allergies,
there can be a terrible mess inside one of these units.
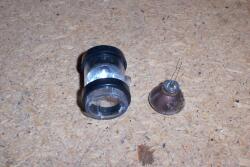
Above you can see a small tube center of the vacuum's lid, this is the full bag
indicator. It is easily removed without need to loosen screws or such. Place all
the parts that look good to one side, keep this piece handy for later..
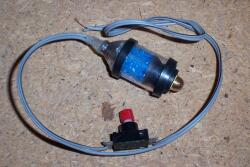
Here we have the vacuum's power switch and most of these will be a push
button similar to this one. It may be mounted with small screws or a collar
nut. Put this somewhere safe and be careful not to cut away to much wire
near to the terminals at this point incase you want to use them again.
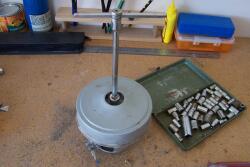
Ok the last part you will probably remove will be the electric motor itself,
this may have useful terminals or washes that you could also. Lets pull it
apart as see what we have, i had to use a socket set to remove the fan and
I later used a screw driver to pry open the aluminum housing. In there i found
a couple of large washes and a spacer. The electrics and core was discarded
although i kept back the brush fittings just in case.

I was now left with a small pile of bits and pieces to sort through and think
about. I kept parts of plastic and rubber incase i should use them later
for covering over end pieces. I discarded the screws as i will use more
shapely nuts and bolts later on in the construction.
|
|
Lets start building |
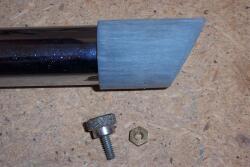
Ok, firstly i pushed the front end plastic fitting onto the chrome tube and
rummaged through a box of assorted nuts and bolts finding this little
beauty. Its a chrome button with a small threaded shaft, it can be used
not only to hold the plastic sleeve in place it will function as the sabers
focus control. I added a rubber tap washer to it also which will mold
itself around the tube very nicely. I clamped the plastic end into the drill
vice and drilled a clean hole through both the plastic and the metal pipe.
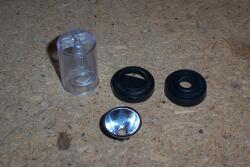
Now you can see the bolt and washer attached firmly, remember the full
bag indicator i removed from the vacuum cleaners body, now it has a new
use. This will eventually become the lightsabers emitter and will house the
light bulb for lighting things up.. The spring and the red plunger were removed
leaving only the empty casing and a rubber stopper on either end.
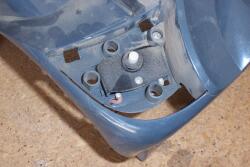
Lets do the other fitting, firstly the tube needed to be solid but not heavy
so i chose to fill both ends of the fitting by using some pine dowelling glued
securely via a glue gun. I pushed the dowel into the fitting as far as it would
go and marked it for trimming, then i did the same again to the opposite side.
It had to be in two pieces because the fitting has a curve to it.
I used the glue gun again to seal the edges of the dowel to the plastic fitting
which looks kinda raw but you wont be able to see this when its finished
anyway. I sealed off both ends in the same way and then sanded the bottom
end flush with the plastic, this was so i could next add the two large washes.

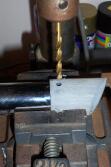
I clamped the plastic end piece into the work bench and drilled a hole into the
dowel, this would be to secure the two washes i found inside the vacuum's
electric motor. The washes were just right diameter to match the plastic fitting.
I fastened the washes down with a large wood screw, between the washes was
the spacer i found inside the electric motor, a small piece of rubber tubing was cut
and pushed inside the spacer to stop the pieces from moving about.
|
|
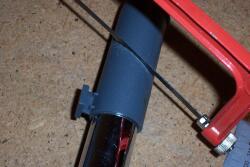
Now lets figure out the switch mounting |
Amongst the few parts i chose to use was a plastic slot i removed from the
bottom of the vacuum's body and this rather good little push button switch.
I decided the two might work out well together and marked out the first hole
to be drilled on the chrome tube.
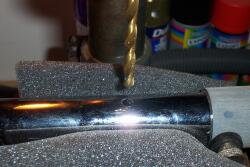
I used a bit of thin foam to protect the chrome tube while it was clamped
inside the drill vice and drilled a small hole that the plastic slot would
be attach to. A rather large hole needed to be drilled just above this
one for the collar of the switch to pass through, indent where you will
drill the hole first by tapping a small dent with a nail punch, this will
help center the drill bit and stop it from slipping about while drilling.
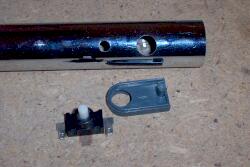
You can see how the plastic slot and switch might attach to the chrome
tube a little better in this picture, the large hole drilled into the plastic
slot will be used to fit over the buttons collar once it has been fitted.
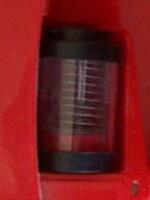
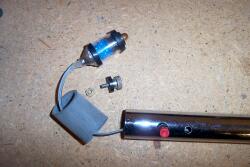
Ok this is much more like it, you can see all the parts are taking shape now,
a small red cap has been glued to the top of the push button to give it the
proper look. The next step is to work out the lighting and electrics..
|
|
The tricky part, adding the electrics |
The next part really depends on how good you are with wiring, i tried a
few different idea's all with their own set of pros and cons and in the
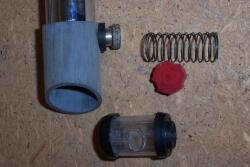
end i did it the simplest way possible. I took the full bag indicator and
broke it apart so i could look at placing a bulb inside.
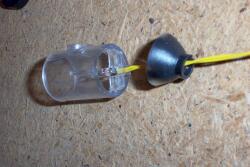
In this picture you can see i tried at first a small reed bulb, i could have
placed this center and held it in place using a electric glue gun. The
connections of any small bulbs can be delicate so try not to bend them
around to much or they can break off.
I glued the reed bulb into a small reflector that was from an old torch,
now i could have used a LED or "Light Emitting Diode" in place of the
bulb as you can get super bright LED's that are actually brighter, but for
now lets stick with the simple bulb.
The connection to the bulb was coated with the hot glue, this would
protect the delicate wires from breaking. The switch was also soldered
in place along the double strand wire that i happened to have laying
around. The thickness of the wire should be as thin as possible as
less energy would be consumed during operation, the wire i chose
was something similar to speaker wire which is a little bit thick. The
inside of the full bag indicator was filled with small blue beads, i didn't
want just a plain light so i tried the beads for added color.
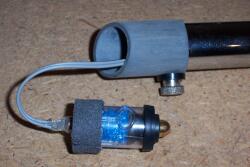
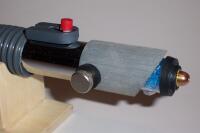
Ok now it was time to thread the wires through the chrome tube and
leaving enough free wire so that i could assemble the other end pieces.
Check how much wire you need before soldering it all together. This is
another good reason to use thin wire, larger wire will take up more room
and becomes bunched up within the chrome tubing.
A narrow band of filtering cloth was used to wrap around the base of the
emitter. The filter cloth was removed from the vacuum's air intake cover
and is quite strong, it was firmly attached to the emitters base using the hot
glue gun. This would ensure a tight fit but not a permanent attachment,
everything should be easy to take apart again.
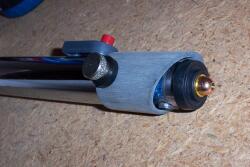
Now you can see the front of the lightsaber complete, the emitter sits snug
inside the plastic fitting and the brass nut you can see on the end was added
from a broken key ring laser pointer. The red cap on the switch was from a red
marker pen, these two parts weren't from the vacuum i admit but you are
allowed to make compromises when it comes to the decorations.
|
|
What about the power source |
Ok, how do we power it and store the cells inside the chrome tube, the bulb
that i chose has a max rating of about 3 volts so i don't want to exceed this
or risk blowing the bulb, two 1.5 volt batteries would do the trick and "C"
size battery's would fit the diameter of the chrome tube best. They would
also add some extra weight to the handle but would need to be securely
placed inside,we don't want anything rattling about and we should be able
to change them easily without using a soldering iron.
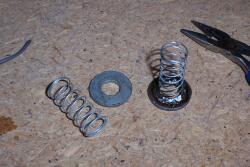
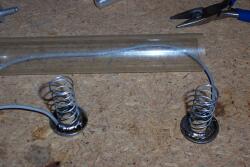
I had two soft springs that i removed from inside the vacuum's casing and
i soldered these to a couple of large washers, i did this so to give the springs
something to stand straight against and i could easily solder the wires along
side them. The washes should be cleaned with some sandpaper firstly to
achieve a good bond then some flux was applied to the metal to prepare it.
The washers became very hot after awhile which allowed the solder to
move more freely, be very careful not to touch the washers until cool.
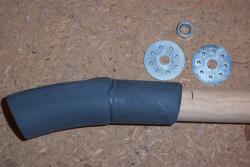
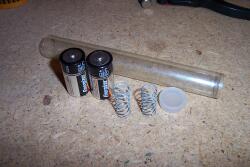
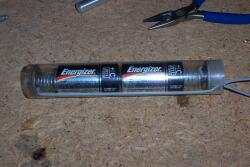
Now i had a plastic tube that was the perfect diameter to hold the "C" size
battery's, it was sealed at one end and had a plastic cap, the only thing i had
to do was shorten it as there is limited room inside the chrome tube.
You can see that the washes were chosen also for there size, this would
insure a good fit. One washer and spring was slipped into the tube with its
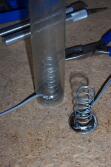
wire passing through a small hole at the end of the cylinder.
The springs were soft but had adequate pressure to make good connections
with the battery's terminals, you can see how the bottom wire trails on the
outside of the cylinder and then passes through another hole near the
top just before the cap.
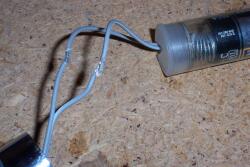
The battery wires were then soldered to the wires connecting to the switch
and light bulb, a blob of hot glue was used to insulate the welds preventing
any short circuits. Again i wished i had thinner wire at the time as i knew
i might have some trouble with wires bunching inside the chrome tube, if
electronic sound effects were used there would not be any room for such
a battery pack and a 9volt transistor battery would have been used instead.
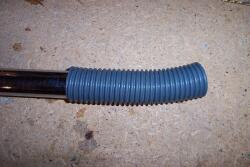
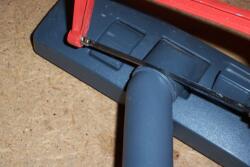
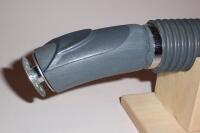
Ok with the battery pack in place we could finally fit the hand grip, this used
to be part of the vacuums flexible hose and was the perfect diameter for the
handle, it simply slides onto the chrome tube with only a bit of twisting.
Now for the bottom end fitting, i had to cut another inch or so from this to
make room for the battery pack. See how the fitting has that slight bend
to it, a bit like count dooku's lightsaber, this pushes onto the end firmly.
|
|
Now for the great unveiling!! |
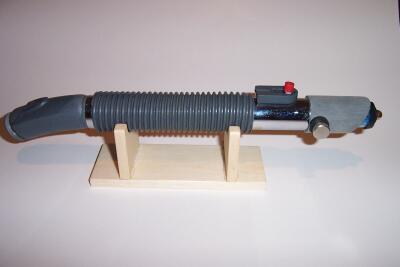
Ta dah!, a lightsaber from a vacuum cleaner.
The front end with its emitter and the count dooku style back end..
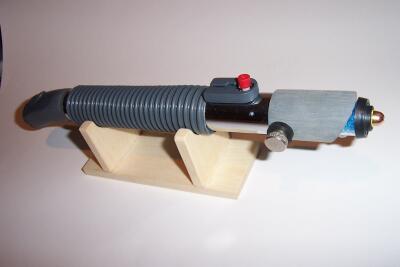
A nice little wooden rack is added and you have a real display piece, it cost
me almost nothing to build it and it sits proudly on the shelf for all to see.
|
|
Summary |
Well there you have it, the finished Lightsaber in all its glory, turned out
quite well if i do say so myself, now imagine how many hundreds of vacuum
cleaner brands there must be and how many derelict broken vacuums
are out there just waiting to be converted. With each different vacuum
a new and exciting look can be discovered, who knows perhaps someday
the world will come to understand and know the wonder that is,
"The VacuumSaber".
If you enjoyed my guide do drop me a line and let me know, if you intend
to make a Vacuumsaber i would love to see the finished item. Send it
in and i will post it here for inspiration.
It is said that in order for a Jedi to complete his or her training they must first
build their very own lightsaber, so now it has been said, so let it be done..
"How to build a lightsaber from a vacuum cleaner"
Star Wars Trader - NZ , www.geocities.com/starwarstrader_nz
|
Star Wars Trader - New Zealand , � 2005-2008 Copyright SWTNZ
Original photographs, graphics & text etc is the property of SWTNZ unless
otherwise stated, "Star Wars" related media including images, video and characters
etc are copyright to and owned by Lucasfilm Ltd. SWTNZ is neither sponsored or
endorsed by Lucasfilm nor does it affiliate with any other division thereof.
This website is best viewed at 1024x768 with Internet Explorer
|
|
Affiliates
VidBox
Buck Rogers
The Time Machine
|