Chevy Truck On-Board Air and A/C
Having on-board air was something I
would need on this truck. Airing down for 4x4 action means you have to air back
up at the end of the trip. Doing that at the mercy of the nearest gas station is
no fun at all. An ARB style electric compressor is useless for air tools and
takes forever to air up large tires. Since we also use this truck as a tow vehicle for our race cars
this
on-board air system can be used for tire changes and such at the track as well. A
major bonus! Looking around on the Internet I found lots of Jeep on-board air conversions,
but no Chevy truck stuff. So here we go . . .
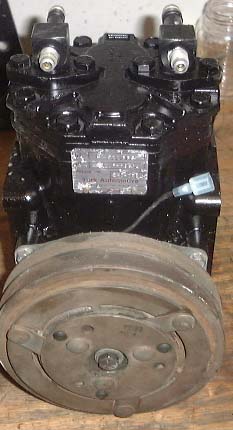
 I started with what I had learned from the Jeep pages and began looking for a
York air conditioning compressor on a Volvo. Turns out what I found was this
York 210 on a Chevy van with a small block. Can you say "Lucky
SOB"? These compressors are all over the junkyard on all different
kinds of cars. Do NOT grab the first one you find. Look until you find a
Model 210. It's marked on the plate right in the front of the compressor. Try to
find one like I have pictured here with the barbed hose connections, this is the
perfect York find.
I started with what I had learned from the Jeep pages and began looking for a
York air conditioning compressor on a Volvo. Turns out what I found was this
York 210 on a Chevy van with a small block. Can you say "Lucky
SOB"? These compressors are all over the junkyard on all different
kinds of cars. Do NOT grab the first one you find. Look until you find a
Model 210. It's marked on the plate right in the front of the compressor. Try to
find one like I have pictured here with the barbed hose connections, this is the
perfect York find.
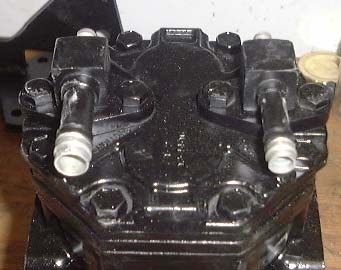
 The compressor I found had ½" barbed inlet and a 3/8" outlet on it so the air line hookup
could not be much easier. The only mildly difficult part was finding a ½" inlet filter. I found one that looked right at Pep Boys for a
$1.99. It turned out to be 5/8 instead of ½", no big deal. I used some
5/8" hose and clamped it down real good. The filter works just fine and
flows a little easier and cleaner than a sintered bronze filter will.
The compressor I found had ½" barbed inlet and a 3/8" outlet on it so the air line hookup
could not be much easier. The only mildly difficult part was finding a ½" inlet filter. I found one that looked right at Pep Boys for a
$1.99. It turned out to be 5/8 instead of ½", no big deal. I used some
5/8" hose and clamped it down real good. The filter works just fine and
flows a little easier and cleaner than a sintered bronze filter will.
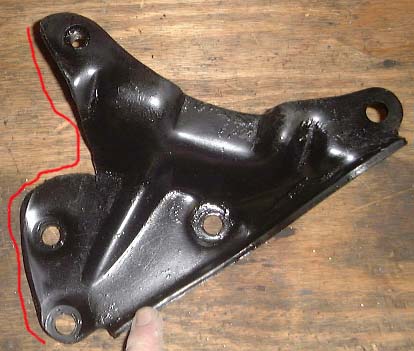
 This is the bracket that was holding the compressor on the van's small block. I
was really lucky to
find this part! This one part saved me hours of work and who knows how much
money. If you find one of these don't forget to snag the spacer that goes in
between the bracket and the water pump. The compressor sits at a poor angle
without it. The York basically bolted right
on my small block with this bracket. There are a few issues that needed to be dealt with though.
This is the bracket that was holding the compressor on the van's small block. I
was really lucky to
find this part! This one part saved me hours of work and who knows how much
money. If you find one of these don't forget to snag the spacer that goes in
between the bracket and the water pump. The compressor sits at a poor angle
without it. The York basically bolted right
on my small block with this bracket. There are a few issues that needed to be dealt with though.
 The section in red is what had to be cut off of the original A/C bracket to
clear the York bracket. Guess I should have done a before and after. Oh well,
you get the idea. If you don't, this project is not for you. :-)
The section in red is what had to be cut off of the original A/C bracket to
clear the York bracket. Guess I should have done a before and after. Oh well,
you get the idea. If you don't, this project is not for you. :-)

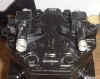
 The first picture shows the York bracket before I modified it. The red circle is
around a spacer welded to the back of the bracket. This has to be removed as the
second picture shows. You put the stock A/C bracket on first with one bolt in
the hole farthest to the right. Then the York bracket is installed on the front
of the water pump with one bolt in its hole furthest to the left. Install a
stud in the upper left hand cylinder head bolt hole. Then the two
brackets can be secured to the head at the same time with one nut. The
third bolt on the stock A/C bracket goes through the power steering pump and
then into the head. The third bolt on the York goes into the water pump. You'll
need to use a long bolt and a spacer to make it work properly. Problem #3
solved.
The first picture shows the York bracket before I modified it. The red circle is
around a spacer welded to the back of the bracket. This has to be removed as the
second picture shows. You put the stock A/C bracket on first with one bolt in
the hole farthest to the right. Then the York bracket is installed on the front
of the water pump with one bolt in its hole furthest to the left. Install a
stud in the upper left hand cylinder head bolt hole. Then the two
brackets can be secured to the head at the same time with one nut. The
third bolt on the stock A/C bracket goes through the power steering pump and
then into the head. The third bolt on the York goes into the water pump. You'll
need to use a long bolt and a spacer to make it work properly. Problem #3
solved.


 A friend suggested I use a radiator hose out of a van. A trip to the junkyard
confirmed the suggestion was a good one. I pulled a thermostat housing off of
a van and purchased a new 1977 "G" series radiator hose. With the new
thermostat housing in place, smog fitting and all, the new hose cleared the
compressor and the hood just fine. Problem #1 solved.
A friend suggested I use a radiator hose out of a van. A trip to the junkyard
confirmed the suggestion was a good one. I pulled a thermostat housing off of
a van and purchased a new 1977 "G" series radiator hose. With the new
thermostat housing in place, smog fitting and all, the new hose cleared the
compressor and the hood just fine. Problem #1 solved. 
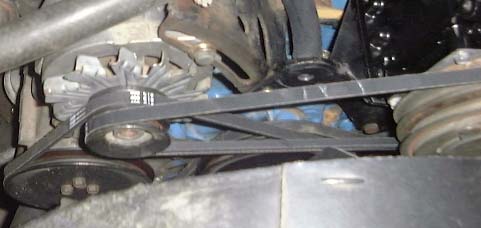
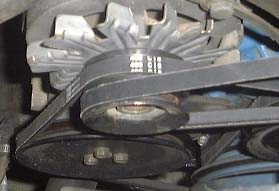
 The stock alternator has a single pulley. I looked
around on the Internet for double V-Groove pulleys and only found the expensive billet ones.
The stock alternator has a single pulley. I looked
around on the Internet for double V-Groove pulleys and only found the expensive billet ones.

 A couple hours poking around the junkyard and I found
this double V-Groove pulley on a mid eighties Ford Thunderbird Turbo Coupe.
I pulled the alternator from the Ford and dragged it over to a Chevy truck
to make sure it would fit. It fit perfectly. Problem #2 solved.
A couple hours poking around the junkyard and I found
this double V-Groove pulley on a mid eighties Ford Thunderbird Turbo Coupe.
I pulled the alternator from the Ford and dragged it over to a Chevy truck
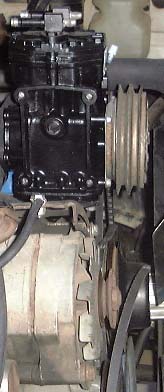
to make sure it would fit. It fit perfectly. Problem #2 solved. The
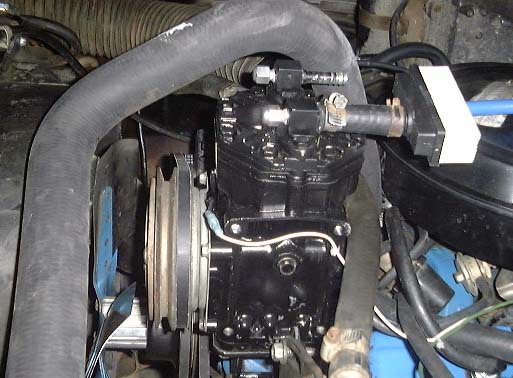
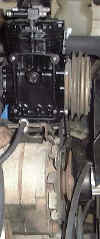
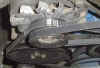
compressor is now firmly mounted to the truck. and you can start to build the air system around it.  Here you can see the installed compressor with the inlet filter and upper
radiator hose installed.
Here you can see the installed compressor with the inlet filter and upper
radiator hose installed.
 This
is the air manifold I made out of a block of aluminum on my drill press. All
the fittings are ¼NPT to 3/8 air hose. The four small holes are just counter
sunk screw holes to attach it to the truck. The white plastic line goes to the
VDO air pressure gauge in the cab of the truck. The pressure gauge on the
manifold was a freebee that came with the air tank we bought. This is not how
it ended up looking, see below.
This
is the air manifold I made out of a block of aluminum on my drill press. All
the fittings are ¼NPT to 3/8 air hose. The four small holes are just counter
sunk screw holes to attach it to the truck. The white plastic line goes to the
VDO air pressure gauge in the cab of the truck. The pressure gauge on the
manifold was a freebee that came with the air tank we bought. This is not how
it ended up looking, see below.
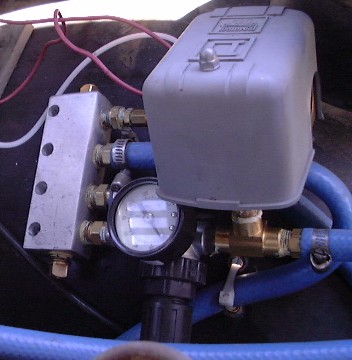
 Here is most of the air system fittings. The big gray box is the pressure switch
for the compressor. I used a 15 amp circuit breaker instead of a fuse because I
had an extra one laying around. The illuminated rocker switch sends power to the
pressure switch when lit. If the pressure in the tank is below 100PSI the
pressure switch activates the clutch on the compressor until the pressure is
125PSI and then cuts power again.
Here is most of the air system fittings. The big gray box is the pressure switch
for the compressor. I used a 15 amp circuit breaker instead of a fuse because I
had an extra one laying around. The illuminated rocker switch sends power to the
pressure switch when lit. If the pressure in the tank is below 100PSI the
pressure switch activates the clutch on the compressor until the pressure is
125PSI and then cuts power again.
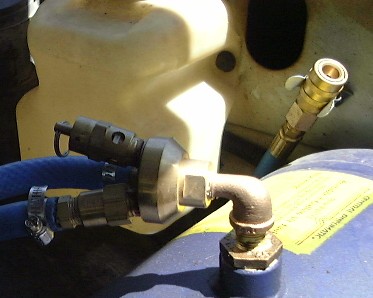
 Here is the final tank manifold. The one I made out of aluminum was too soft. I
just got an elbow and it then fit under the hood. Be vary careful installing the check valve. It
has an installation torque rating of only 120 in-lbs. If you over torque it,
like I did, you'll have to go get another one.
Here is the final tank manifold. The one I made out of aluminum was too soft. I
just got an elbow and it then fit under the hood. Be vary careful installing the check valve. It
has an installation torque rating of only 120 in-lbs. If you over torque it,
like I did, you'll have to go get another one.
 Here is the installed manifold. You can see I added a pressure regulator valve.
I set it at 80PSI and still have the compressor switch (large gray box) filling
the 5 gallon tank to 125PSI. This system works really well. It moves some
serious air! I added an oil separator in the pressure line coming out of the
compressor.
Here is the installed manifold. You can see I added a pressure regulator valve.
I set it at 80PSI and still have the compressor switch (large gray box) filling
the 5 gallon tank to 125PSI. This system works really well. It moves some
serious air! I added an oil separator in the pressure line coming out of the
compressor.
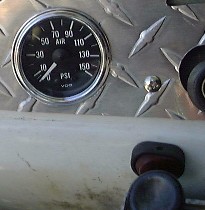
 This is the in cabin air pressure gauge and the on-off switch. The gauge comes
in handy when you need to monitor the pressure from inside the cabin.
This is the in cabin air pressure gauge and the on-off switch. The gauge comes
in handy when you need to monitor the pressure from inside the cabin.
|