|
Getting a Clean Beveled Border
by Irene Smith
This could as easily be titled "How to get Bordered Backgrounds without Stupid Lines Across Them" but that seemed a bit too long. The problem is that when you bevel a bordered background, you often get beveling on the top and bottom edges as well. The only other solutions I've seen involved adding borders on the top and bottom (which we'll do here too) and then carefully selecting the original area again. There is a slightly easier solution that works well in both PaintShop Pro 5.0 and PhotoShop versions 4.0 and up. We're going to step through the solution (and, since I couldn't stand the though of just having you create a simple border again, I added a carved in design to spice things up.) Here we go. I'm going to give you the instructions for
PaintShop Pro, but the PhotoShop instructions aren't all that different.
Set your background color to R: 131 G: 119 B:133 and create a new 100 by 100 pixel image, 16.7 million colors. Immediately select the entire image (Selections/Select All) and then save the selection to the Alpha channel (Selections/Save To Alpha Channel...) finally clear the selection (Selections/Select None).
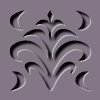
Now we're going to place the design on the border. I've used a border ornament I like, but you can use any dingbat character you have. Make it about 60 pts. and make sure that floating is not selected. Select Image/Effects/Cutout and use the following settings: Fill interior unchecked, Interior color: doesn't matter, Shadow color: Black, Opacity: 100, Blur: 3, Vertical Offset: 3, Horizontal Offset: 3.
To complete the design, select Images/Effects/Drop Shadow and use these settings: Color: White, Opacity: 50, Blur: 1, Vertical Offset: 1, Horizontal Offset: 1.
Save the selection to the Alpha Channel if you want to and then clear the selection. (Selections/Select None) Now we're going to get back to the main topic of this tutorial, the bevel! This is what we have so far:
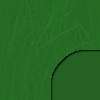
We're going to add a border to the top and bottom of the image before we apply the bevel. Select Image/Add Borders then clear (uncheck) Symmetric and add a top and bottom border of 20 pixels. Now we're going to add the bevel. In this case, to make things easier, we're just going to use the buttonize command. Select Image/Effects/Buttonize and use the following settings: Height: doesn't really matter, but mine was set to 1, Width: 10, Opacity: 100, Transparent Edges. Here is the bordered image before cropping:

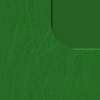
Almost done now! Load your full image selection from the Alpha Channel. That's Selections/Load From Alpha Channel. Your selection should be #0 if you followed this tutorial. Now, for the next to the last step, select Image/Crop to Selection and... there it is, your original border piece, neatly cropped!

The only thing that remains is to make the image wide enough to tile properly. Set the background color to: R:192, G:192, B:192. Select Image/Add Borders again, set top, bottom and left to 0 and set the right border to 1500. This should be wide enough to view in almost everyone's browser without tiling! Take a look at the final result!
Now that wasn't so hard, was it? You can, of course, employ all types of techniques to make the bevel, from a simple buttonize command to special beveling filters to BladePro. Whatever you do, you can be sure you won't have any lines across your lovely border.
|
|