|
Printing Preferences
Printing - New models with advanced options
With newer model laser printers you have the ability to change more options and take advantage of other features, as your printer can handle many more commands from the computer program.
SCREEN ANGLE FORMAT:
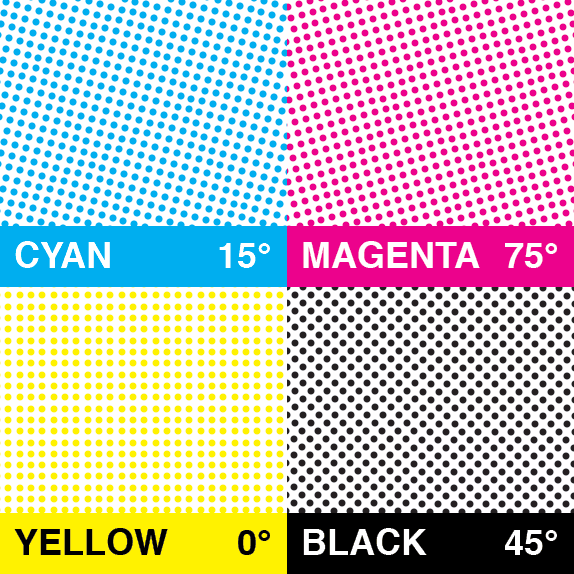 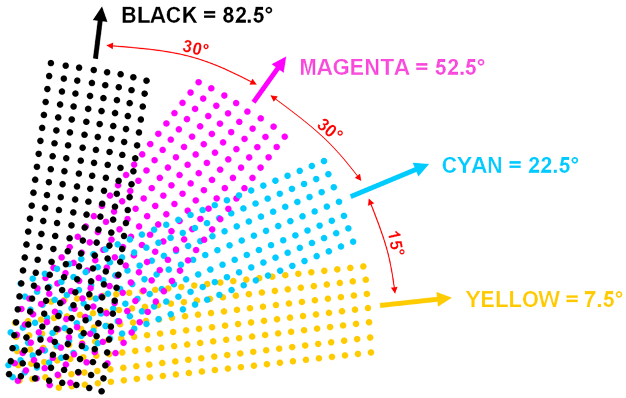
NOTICE THE SCREEN ANGLE VARIATION IS 30 DEGREES ANGLE APART FROM EACH OTHER AND YELLOW IS ZERO OR 15 DEGREES BECAUSE YELLOW DOES NOT AFFECT OTHER SCREEN AND WILL NOT RESULT INTO SCREEN CLASHING.
 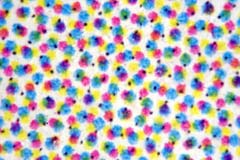
ROSETTE PATTERN: Expected screen angle output. Rosette pattern will achieve if the screen angle is 3O degrees apart from each other noticed the rose floral pattern that's why it's called rosette pattern.
Dot per inch or (dpi) amount divided into two the results is Line per inch (lpi) for example: 300 dpi will be 150 lpi
Screen Variations Guidelines:
- VERY FINE SCREEN FOR ARTBOOK & HI-QUALITY PHOTOS MAGAZINE: 200 LPI
- HIGH QUALITY AND FINE SCREEN FOR ANNUAL REPORT: 177 LPI
- STANDARD HIGH QUALITY SCREEN FOR FOUR COLOR MAGAZINES: 133 - 150 LPI
- AVERAGE SCREEN FOR NEWSPAPER : 85 - 110 LPI
- NEWSPRINT/GROCERY COUPONS: 65 - 71 LPI
PRINT OUTPUT REFERENCES:
BACKGROUND: Select a colour to be printed as a background outside the picture area.
BORDER: Lets you print a black border around the picture.
BLEED: Lets you print crop marks inside rather than outside the image. So when it's trimmed the unprinted part of the images will not be seen.
CALIBRATION BARS: Prints an 11-step grayscale, a transition in density from 0 to 100% in 10% increments. With a CMYK color separation, a gradient tint bar is printed on the left of each CMY plate, a progressive color bar on the right.
CROP MARKS: Where the page is to be trimmed. You can print crop marks at the corners, at the centre of each edge, or both
LABELS: Prints the file name and channel name on the image.
TRANSFER: Lets you adjust the transfer functions, traditionally used to compensate for dot gain or dot loss that may occur when an image is transferred to film. Generally, it’s best to adjust for dot gain using the settings in the CMYK Setup dialog box.
SCREENS [pictured left]: This is the option you will commonly use with CMYK printing, as this options enables you to change the frequency, angle and shape of the dots that the computer generates to make up the separations.
NB: The preferred Shape configuration for process printing is Round or Ellipse
With all your options selected/ changes made you can proceed to print by clicking OK. Congratulations you've made your first color separation!
Summary
If you are after a magic formula that gives a perfect result every time - I don’t think one exists! Problems arises anytime, anywhere but you'll learn to troubleshoot it and render solutions to most of the problems you will encounter. Remember, all pictures vary [colours/ density/ size/ etc.] so changing the settings, testing and playing with these features is quite fun and quickly gives you a few different results as long as you know the basics.
|