1.0 CREATE LAYERS


1.1

After you open your scanned lineart in PS, the first thing you do is change the image mode to RGB color.

At the top menu bar, choose Image > Mode > RGB Color.


1.2

Clean up the lineart. Press Ctrl + M and make the curve look something like the one in the pic will usually do the job. ->

Play around with this curve to make the cleanest lineart possible.

For the lineart pic you can download on the first page, this cleanup process has already been done.


1.3

On the right hand side of PS, you should see a window with the Layers, Channels and Paths tabs. Click on the Channels tab. (if you don't see this, choose Window at the top menu, then tick Channels from the drop down box)

Drag the Blue layer to the icon pointed by the red arrow. With the Blue Copy layer selected, press Ctrl + I.


1.4

Choose the Layers tab, select Layer 1 (or Background). Follow this input sequence:

D > X > Alt + backspace

Layer 1 should now be completely white.
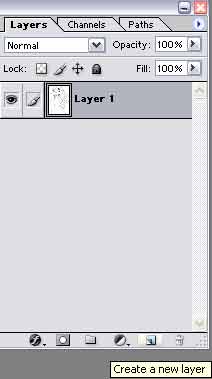
Press the Create a new layer button at the bottom. You should see a new layer appears on top of Layer 1 called Layer 2.

Select Layer 2, press Alt + S then L. From the Channel drop down menu, select Blue Copy then Ok. Press D, X then Alt + Backspace.

Now the lineart appears on Layer 2 and you can colour whatever you want below this layer without interrupting the lineart!

Rename Layer 2 to lineart.


All preparations finished. Now get on with the actualy colouring!

NEXT: Base colour

BACK: Introduction


  Diary | Gallery | About me | Links | Photoshop Tutorial | Home    
Hosted by www.Geocities.ws

1