CANADIAN & VINTAGE LIGHTWEIGHT BICYCLE
FINISHING OFF HANDLEBAR TAPE GUIDE
e-mail [email protected]

I suppose that there are a number of acceptable ways to finish off a handlebar tape job, but I have seen precious few that appeal to me. As a millwright, by trade, I have learned a number of interesting knots, one of which seems to lend itself well to this particular bicycle interest.
After completing the taping of your handlebars, go right ahead and use a narrow section of �electrician�s tape (or any sticky tape, for that matter) to secure the loose end(s) of the handlebar tape. Now, grab yourself a new set of �shoe laces�. Not the flat soft type used to tie up you going to church Oxfords. Rather, the type used for work boots or even sports shoes. These kinds of laces are round in profile, relatively solid and tend to retain their shape. I might add that shoe laces come in any number of different colors and, even if the color you need (Bianchi Green, for example) is not readily available, a couple of dollars spent for fabric dye can create whatever color you choose.
For this project, you will need:
1. One set of handlebars
2. A package of handlebar tape
3. A short piece of �electrician�s tape, or masking tape, whatever
4. One pair of shoe-laces, at least 45 inches long per side
5. One tube of clear Silicone Seal � optional
6. Fabric dye � optional
The Procedure:
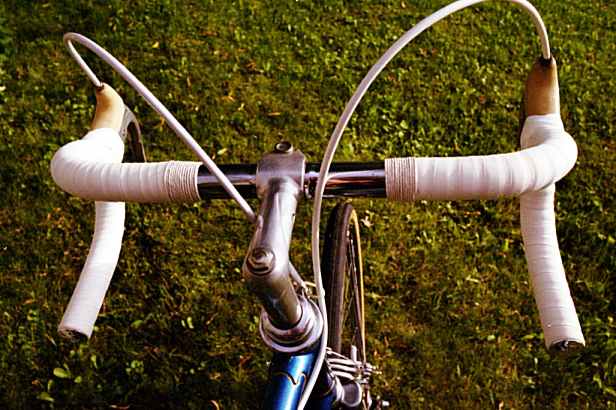
1.0 Tape your handlebars. If you don�t know how to do this, take a look at our Links Page and go to the Park Tool web site to see how it is done.
2.0 Using any sticky tape that you can find, secure the loose end(s) of the handlebar tape.
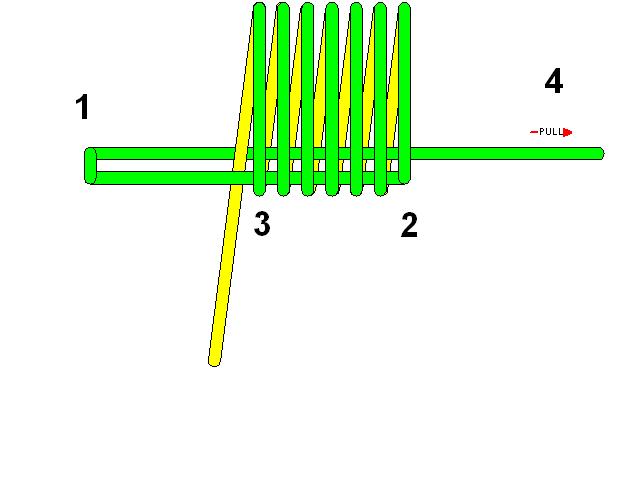
3.0 Refer to the illustration and get ready to cover up the sticky tape:
3.1 Fold the shoe-lace 180 degrees (1), about six inches from one end and, with the fold facing towards the stem, lay the folded lace against the underside of the handlebar.
3.2 Decide how wide you want the sized area to be (2 - 3) and then make your first wrap, with the shoe-lace, around the handlebar, trapping the folded lace. Note: ensure that the first wrap is at a 90 degree angle to the center-line of the handlebar. You will have to fiddle with this at first.
3.3 Make a couple of more similar wraps, ensuring that they are good and tight and that no spaces are visible between wraps, then go back and try to tighten the whole business up, as best you can. Don�t worry if it doesn�t go just right at first. It is easy to start over, as you learn what is working best for you.
3.4 Continue this wrapping until you come to the spot on your bars where you want the sizing to end (3). Note: Use a ruler to ensure that the sizing is equal distance from the stem and that the width of the sized area is equal on both sides. Again, if you don�t get it right the first time, just unwrap the shoe-lace and start again. Nothing is cast in stone at this point.
3.5 With each wrap, make an effort to tighten the lace as much as possible, all the time ensuring that the whole mess is still sitting at 90 degrees to the center-line of the handlebars and allowing no gaps between each wrap. Keep trying, you will get it.
3.6 Once satisfied that all the wraps are tight, and that there are no spaces between the them, pass the running or loose end of the lace through the loop formed by your initial fold (3).
3.7 Hold the sizing firmly with your thumb and index finger, ensuring that nothing slips, and pull on the other end (4) of the shoe-lace.
3.8 As you pull on the lace (4), you will see the initial fold (3) begin to slide under the shoe-lace wraps. You will have to pull hard to achieve this result but the minute you see what is happening you will understand how the whole deal works.
3.9 Continue pulling and adjusting the appearance until you think that the initial loop is about in the middle of the sized area. Stop pulling!
3.10 Now, using a sharp utility knife or something like it, cut off the ends of the shoe lace as close to the wraps as possible. Done properly, the ends will be hidden under the shoe lace wraps.
3.11 You can leave the whole business exactly as is or finish it off by rubbing a small amount of clear Silicone Seal into the shoe lace wraps.
You can practice this knot on just about anything with just about anything. Once you learn how to do it, go on and give it a try on your handlebars. Good luck.