What we are going to do, is sew the quilt on the diagonal since it is an "on point" quilt set.
Don't panic on me now... this is realllllyyyyyy easy....
Trust me... have I let you down yet?

Set down the outside blocks first. Honestly, this is the easiest way. Now, put your left ear to your left shoulder and look at the graphic... see it now?
Start in the upper left corner. I have the rows blocked off with the green lines. Put one of the twist blocks with two corner triangles in the upper left.
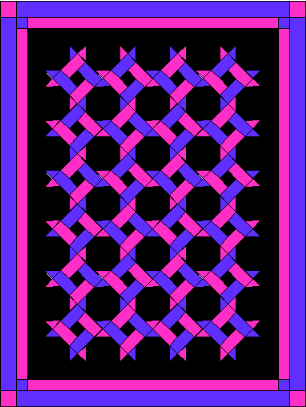
Now look and see that the next diagonal row has two outside blocks and they are the opposite fabric from the first row.
(Note also the placement of the three corner squares)
Notice that every other row across on the diagonal has different color setting triangles. You will have one row with your first twist fabric and the next row will be your next twist fabric.

Note the red circles around the corner triangle for each diagonal row... whatever the fabric is in that corner triangle for that row will be the same fabric rectangle that goes across from left to right in that same row! Yes, honest, it is that easy.
Look at the graphic at the left. The first full row has a pink triangle and in that row, the pink strip on the twist block goes along the top from left to right.
In the second diagonal row, the corner triangle is blue and that same color strip in the twist block goes across the top of the row from left to right.

You know what I mean by diagonal don't you? The way the red arrows are going in the graphic. Not straight across the top of the quilt, but if you put your left ear to your shoulder and look at the arrows!

Look in the red circle... whatever twist fabric is going across the top of the twist block in that row is the color of snowball block that you put in that row.
Honestly... I told it would be a lot easier than you thought it would be.
See, blue across the top from left to right, blue snowball block.
Pink across the top from left to right, pink snowball block.

It *should* look like the rings are intertwined...
If yours doesn't look like this, go back and see where you might have turned a block wrong.
If you look striaght on at the quilt in the rows across the quilt from left to right (not diagonal) you will see that the snowball blocks alternate from blue to pink to blue acorss each row on the straight, and the next row the snowball blocks are opposite in the row.... that is just another way to check.

They will go in all the empty spots to make the quilt straight on the outside edge.
Notice in the upper left corner:
That is one of the four triangles you only cut on one digaonal.
There will be one in each corner. The outside edges are on the striaght
of the grain so they don't stretch. (as all of your triangles should
be).
 Sew
the setting triangles all the way to the edge of your quilt. They will
be a little bigger and extend over the edge of the other blocks.
Sew
the setting triangles all the way to the edge of your quilt. They will
be a little bigger and extend over the edge of the other blocks.  You
can trim off the ragged edges later. You can either trim them 1/4"
away (for a seam allowance) from the blocks, or you can cut trim
the outside edge beyond the edge of the quilt blocks beyond your blocks
so the quilt "floats".
You
can trim off the ragged edges later. You can either trim them 1/4"
away (for a seam allowance) from the blocks, or you can cut trim
the outside edge beyond the edge of the quilt blocks beyond your blocks
so the quilt "floats". 
Congratulations... you have just completed your very own "Twisted" quilt!
Now add some borders of your choice and you are done! Guess I jumped ahead there...