 |
Four Fabric Version
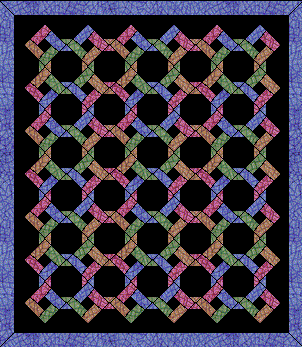
Remember, this is our end goal!
We will set and sew the quilt on the diagonal since it is an "on
point" quilt set.
Don't panic on me now... this is realllllyyyyyy easy....
Trust me... have I let you down yet? |
|
|
| You will assemble all the blocks the same
size, cut all of the setting triangles the same. You
will just use four different fabric instead of two fabrics. |
You will make the amount of each block as
shown under the picture of that block below... |

Make 21 of these for the quilt
shown.
|

Make 21 of these for the quilt
shown.
|
| First off, you need to make two different twist blocks. Both
blocks use the same fabric, but they are sewn in reverse order on
one set of blocks. Notice that starting with the block above, the
purple is first then going around clockwise, the rose, the brown and then
the green. |
On the other set of blocks above, the colors go in reverse. You
have the purple on the top but the same colors go in counterclockwise direction.
So you want to sew them on with the purple first, then the green,
brown, and then rose. |
| The easiest way to not get mixed up is to
make a paste up sheet of your colors and follow that. |
You don't want to sew them in two different
twist directions, you just want to sew the
order of the fabrics different on the two
sets of blocks. |
|
|

Make 15 of these for the quilt
shown.
|

Make 15 of these for the quilt
shown.
|
| Here you have two different
snowball blocks.
One set will have two of the colors in your twist blocks..... |
And one set will have two of the other colors.
You just don't sew any two colors on... you
have to use the right colors together. Whatever fabric you substitute
for mine in the twist block graphic, substitute the same ones for the snowball
blocks. Once again, a paste-up sheet will help a lot. |
 |
 Four
the first set of blocks set them in *every other row*, on the diagonal... Four
the first set of blocks set them in *every other row*, on the diagonal...
Notice the placement of say, the rose strip in each row. You have
one across the top and one across the bottom in this first set of rows.
|
 |
 Now
when you set in the other set of rows, the rose strips go up and down instead
of side to side like in the first rows you set in. Now
when you set in the other set of rows, the rose strips go up and down instead
of side to side like in the first rows you set in.
You may be able to look from left to right in the block instead of
on the diagonal in the graphic on the left and determine more easily, for
you, how the blocks are set in. Whatever makes it easiest for you to do.
It is not hard to do this, just takes some concentration!
|
 |
 This
graphic shows the first set of snowball blocks added to the rows. This
graphic shows the first set of snowball blocks added to the rows.
These are the brown/blue blocks for my graphic quilt.
Once again, like in the two fabric twist quilt, the strip that is
going across the top of the diagonal row is where you put that fabric in
the snowball block... also, that each row across on the diagonal has the
same color combination snowball block.
The empty places are where the second set of snowball blocks will
go. |
 |
 This
graphic shows the snowball blocks added to the rows. This
graphic shows the snowball blocks added to the rows.
Once again, like in the two fabric twist quilt, the strip that is
going across the top of the diagonal row is where you put that fabric in
the snowball block... also, that each row across on the diagonal has the
same color combination snowball block. |
|
|
| Setting triangle snowball blocks:
If you want to make this non floating version of the four color fabric
quilt, note the corner triangle on the setting triangles.
Each triangle takes a different color triangle on the setting triangle.
It will be the color of fabric that completes the ring around the outside
edge.
|
In the quilt illustrated, there are nine green triangles, two brown,
9 blue and two rose. You will have to adjust these triangles to your
fabrics. It is easiest to do these after you have the rows laid out.
Hope you enjoyed this lesson...
Mary Ann Beattie |