
Walkthrough, Level 11: Eagle's Nest I
I do not guarantee that this walkthrough is complete.
The route described below is the one I have found be the easiest. I
know and you probably know as well that there are plenty of different
ways to finish the level.
Objectives: |
- Locate and retrieve the sniper rifle
- Power up the cable car by switching the generator back on
- Activate the cable car controls
|
 The key to this level is patience. You can shoot almost every
enemy with your AK47 and binoculars, but it takes time. If you run in with
blazing guns you will enter severe resistance...
The key to this level is patience. You can shoot almost every
enemy with your AK47 and binoculars, but it takes time. If you run in with
blazing guns you will enter severe resistance...
If you want to play really
safetly you should actually intentionally set off an alarm. Since the guards
don't respawn in this level it's better to know where they are instead of being
surprised by guards coming from barracks when you're in a stressed situation.
Compound 1
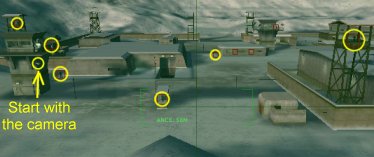
You start on a hill facing the first compound to enter. The
Dragunov is cleverly placed by Harrisson's men on the roof of the two storey
building in the middle of a military compound (not very brilliant one could
argue). Equip yourself with the mp5 and go down to the shelf marked in the
screenshot. From there you can take out most of the guards patrolling the ground
in the first compound since they will run outside the compound to a corner of
the wall when they are hit by one shot.
 The screenshot
to the right might look scary with a whole bunch of guards, but don't worry. As
I said, the guards will run out to the closest corner of the wall once you hit
them with one shot and make easy targets there. One thing: Don't stand at the
edge of the shelf, since you then will be closer than 50 meters from the corner
and the guards will start shooting back. If they do, back off 2-3 meters and
continue to "pick" them. After a while you can go down and pick up some AK47s
before you continue shooting.
The screenshot
to the right might look scary with a whole bunch of guards, but don't worry. As
I said, the guards will run out to the closest corner of the wall once you hit
them with one shot and make easy targets there. One thing: Don't stand at the
edge of the shelf, since you then will be closer than 50 meters from the corner
and the guards will start shooting back. If they do, back off 2-3 meters and
continue to "pick" them. After a while you can go down and pick up some AK47s
before you continue shooting.
 Eventually you will have a neat pile of dead
guards to disarm. Try to clear the whole yard (check your map) from guards,
including the one at the south-east corner of the two-storey building, who you
kill from the water tower if he hasn't come running towards you.
Eventually you will have a neat pile of dead
guards to disarm. Try to clear the whole yard (check your map) from guards,
including the one at the south-east corner of the two-storey building, who you
kill from the water tower if he hasn't come running towards you.
Approach the two-storey building carefully. If you want you can slide
down the wire from the watertower, which probably is the safest way to approach
the building. There are four guards at the second floor and one at the ground
floor. You can throw in a hand grenade to kill some of them. Don't forget to
pick up the Spas12 with ammo and some hand grenades at the crates at the ground
floor. Note that you can shoot one of the second-floor-guards through a crack in
the ceiling when you have entered the stairs (inside the house).
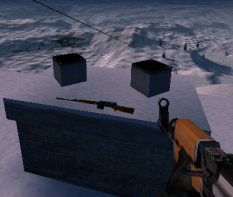
 When the coast is clear jump up on the crates at the second floor and
from them up on the roof. The dragunov is placed on the chimney(?) Grab it and
jump down on the crates and then climb down to the ground. It might be tempting
to slide down the wire towards teh next compound, but it will only cost you
ammo. Instead walk down. From about 80 meters distance you will have a good
chance to shoot the guard on the pylon with AK47 and binoculars. Then continue
down. Keep a bit to the left, since the guard at the pylon is facing towards
compound 2 (north). You can then sneak up in his back and get an easy head-shot.
Do the same with the next guard by the next pylon. (It is actually possible to
walk down to the first pylon and climb it, knife the guard in the back, climb
down and knife the other guard).
When the coast is clear jump up on the crates at the second floor and
from them up on the roof. The dragunov is placed on the chimney(?) Grab it and
jump down on the crates and then climb down to the ground. It might be tempting
to slide down the wire towards teh next compound, but it will only cost you
ammo. Instead walk down. From about 80 meters distance you will have a good
chance to shoot the guard on the pylon with AK47 and binoculars. Then continue
down. Keep a bit to the left, since the guard at the pylon is facing towards
compound 2 (north). You can then sneak up in his back and get an easy head-shot.
Do the same with the next guard by the next pylon. (It is actually possible to
walk down to the first pylon and climb it, knife the guard in the back, climb
down and knife the other guard).
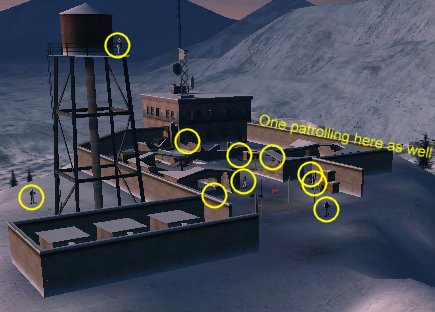
Compound 2
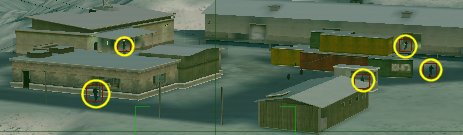
 Walk up to the ridge in front of the checkpoint
of compound 2. From there you will again have a good view and be able to take
out most of the guards you need to kill to complete mission 2. Start with
spending a Dragunov shot on the camera on the south-west-most watchtower. Then
you can take out all the encircled guards in the screenshot, preferably with
AK47 and binoculars (it's always good to save Dragunov ammo). If you hit the two
guards patrolling the yard they will run and stand close to the checkpoint and
make easy targets (and so are also the rest of the guards, since they just stand
and wait for your shots to hit them). When you're done, check your map. Click on
the cameras around the power building to see the areas they survey. Then snipe
the guard patrolling around the power building at a spot where the cameras don't
survey.
Walk up to the ridge in front of the checkpoint
of compound 2. From there you will again have a good view and be able to take
out most of the guards you need to kill to complete mission 2. Start with
spending a Dragunov shot on the camera on the south-west-most watchtower. Then
you can take out all the encircled guards in the screenshot, preferably with
AK47 and binoculars (it's always good to save Dragunov ammo). If you hit the two
guards patrolling the yard they will run and stand close to the checkpoint and
make easy targets (and so are also the rest of the guards, since they just stand
and wait for your shots to hit them). When you're done, check your map. Click on
the cameras around the power building to see the areas they survey. Then snipe
the guard patrolling around the power building at a spot where the cameras don't
survey.
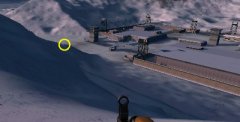
 To play it really safe you can now walk up to the ridge south-west of
the compound. From there you will be able to see and snipe two guards in the
barracks (see screenshot). You might have to jiggle around a bit to spot them,
but it is possible to see two. If you don't kill them now they will spot you
when you enter the power building.
To play it really safe you can now walk up to the ridge south-west of
the compound. From there you will be able to see and snipe two guards in the
barracks (see screenshot). You might have to jiggle around a bit to spot them,
but it is possible to see two. If you don't kill them now they will spot you
when you enter the power building.
When you're done, enter the compound (visit the checkpoint to pick up AK47
and ammo). Walk up to the "lock" of the ammo builing (by the ramp leading down)
and press action key to open the main door. Walk in and pick up hand grenades,
M16A2 and ammo. Walk back out the way you came and enter the other door of the
ammo building. Inside you'll find a computer with which you can turn off the
cameras for 2 minutes. Do that and enter the main door of the ammo building
again. This time continue through the door in the "loading ramp-room". Climb
ladder and then exit through the door (this is the same route through the ammo
building as in level 3).
 Walk over to power building. If you didn't shoot the guards in the
barracks from the hill side they will spot you and come running. Either shoot
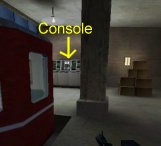
them now or do that when you exit the building. Enter power building. One stair
down you will find the control to turn on the electricity for the cablecar. Walk
up to the console and press action button when you get the icon at the bottom of
the screen.
Walk over to power building. If you didn't shoot the guards in the
barracks from the hill side they will spot you and come running. Either shoot
them now or do that when you exit the building. Enter power building. One stair
down you will find the control to turn on the electricity for the cablecar. Walk
up to the console and press action button when you get the icon at the bottom of
the screen.
Exit building (kill guards) and exit the compound the same way
you entered. Outside the gate, walk right and around compound 2. Stay clear
(>50 meters) of the guard in the watchtower. Continue up to compound 3.
Compound 3
 There are four
guards patrolling the area in compoud 3 and one in the checkpoint. Furthermore
there are three guards in the barracks. If you walk up to the back of the
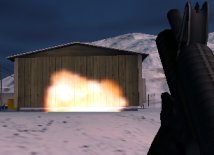
barracks you can kill the guards in the barracks with a M16A2 grenade (shoot at
the back of the barracks).
There are four
guards patrolling the area in compoud 3 and one in the checkpoint. Furthermore
there are three guards in the barracks. If you walk up to the back of the
barracks you can kill the guards in the barracks with a M16A2 grenade (shoot at
the back of the barracks).
Kill the rest of the guards and walk up to the cablecar building. Since there
are no more guards who can bug you you can ignore all cameras.
 Walk up to the door of the cablecar building and pick the lock. Walk in,
walk up to console. Press button to activate the cable car.
Walk up to the door of the cablecar building and pick the lock. Walk in,
walk up to console. Press button to activate the cable car.
Turn around and walk into cablecar. Car heads for Eagle's Nest.
Mission completed.
|
