|
This
tutorial is applicable to Adobe Photoshop
(AP) 6.0 and other versions of AP. For this tutorial, I've used PrintKey-Pro V1.03 to take
snapshots of the program while I work. For reference, I've
referred to Peace N Luv's tutorial. Thanks Khanh!
Step
1. Save it in BMP first, then save it as PSD in Adobe Photoshop
When
you first scan your image, save it in BMP format. Your image will be
clearer. And then open it in Adobe Photoshop and save it in PSD. This is because in PSD
form, you
can do your artwork using many layers and save it with your layers
intact. In other forms, the program will merge all your layers into one,
so when you go back to your artwork, you'll have only one layer.
|
|
Step
2. Adjust Levels
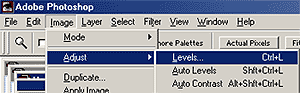
On
your tool bar, go to the
Image > Adjust > Levels.
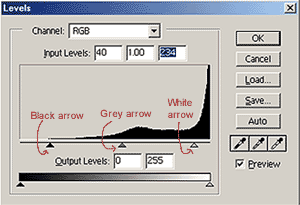
Adjust the black and white arrows so that your lines are dark but the background is
pristine white and clean.
To
make your lines darker, move the black arrow to your right.
To
make your image brighter, move the white arrow to your left.
The
grey arrow can be used to balance the brightness and darkness of
your image. |
|

|
Step
3. Work the Background copy layer
Go to the layers palette. Click on the layer
titled Background. Click and drag it down to the  create new
layer option. This will make a new copy of your artwork, called Background
copy. After that, you can
delete the layer titled Background. Rename Background copy to
Drawing, or anything you fancy.
create new
layer option. This will make a new copy of your artwork, called Background
copy. After that, you can
delete the layer titled Background. Rename Background copy to
Drawing, or anything you fancy.
The reason why you do this is because,
when it's titled Background, it won't allow for transparencies, and it
will be always have to be the last layer. You want your ink/pencil work
on top. And the reason why you rename your drawing is so that you know
which layer holds your drawing. DUH! |
|
Step
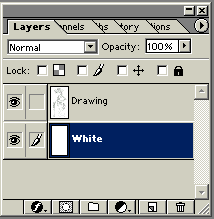
4. Create white background
After you have made a new copy of your
artwork, click on the create new layer option again, and you will
get a new layer.
Fill it with the purest white you can get from the
colour palette. On the layer window, click and drag the white
layer so that it's under the layer titled Drawing. This will be your
background for the time being. Your layers should look like this: |
|
|
Step
5. Go to Channels
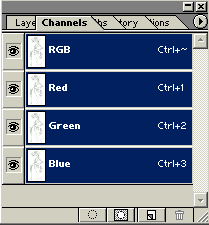
Make sure the layer Drawing is
highlighted on the layer window. Next, go to the Channels window and
make sure that it's in RGB mode. If it's not, go to the Image option at
the top, choose mode and then RGB Color. Your
Channels window will look like this on the right.
Now click on the button on
the most left, the one that looks like a dotted circle. Your drawing
will be selected.
Go back to the layers window. Press DELETE on your keyboard. Your
drawing will be look lighter.
|
|
|
Step
6. Paint it Black
Choose your biggest brush and pick black from the colour palette.
Go back to your layers window. Tick the little box for lock editing
layer transparencies at the top of your layers window (AP6.) or preserve
transparencies. It's the one on the most left, the one that looks like 4
squares.
MAKE sure you do this, if not, you'll be painting your
whole drawing black ;)
Paint your drawing so that the lines are dark again. The reason why you
do this is so that only your lines are selected and they can be
separated from the white which was your paper. This way, you can paint
under your lines. |
|
Step
7. Deselect your artwork. When
you do this right, your drawing will look like this:
|
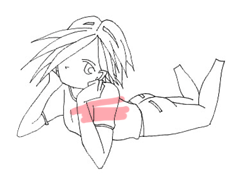
Like this! |
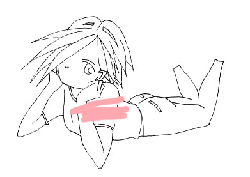
Not this! |
Your battle is half won :)
After doing this a few times, you'll be able to do this within seconds. Want to know how to
paint
your drawing?
-
Back to top -
Painting
-
Dodge
& Burn - Tips
-
|