Maintenance
If you dont know how to do this shit i will kill you!! -_-
*under construction*
If you dont know how to do this stuff then dont call yourself a car enthusiast =D but hey, everybody has to learn somewhere and sometime right? so this is the place where u will learn basic stuff...
Oil Change
How do you do an oil change...well ok. it's really simple but let's see what u need first:
Socket wrench with either a 10, 12, or 14mil socket(depends on application)
new oil filter
OIL!
oil pan
jack
ok so you got all that stuff now? good. what u need to do is first jack the car up in the air...high enough so that you can see the oil drain bolt at the bottom of the car. It's that big bolt head sticking out from the oil pan...which is usually on the passenger side of a front wheel drive car. You cant miss the oil pan because it's the only thing on the bottom of the engine that resembles a container...that's where the oil resides.
Now what you want to do is to take that entire bolt out...as u remove it with the socket, oil may start dripping/draining out and u will get it all over ur tool haha. so find a method of doing it so that u wont get so dirty...oh and make sure the car is cooled down or u'll burn ur hands off =)
Make sure that the draining oil is landing onto ur oil pan and draining all into the pan...oil is supposed to be properly disposed of so once ur oil pan is full of ur old oil, take that junk and bring it to a canadian tire or something so the can dispose of it
Now that the oil is all drained, put back the drain plug and lower the car...
From the top of the car(with the hood open of course) u should be able to see your oil filter...now for the 4age, it can be grabbed from the top and simply twisted out. so take it out. it's a colored little round thing sticking out of your block...it's made of plastic and is usually green, white, orange or black.
Once out, put a new one in but be sure to lubricate the sealing ring of the new filter with oil so that it will have a proper seal. once in, start to fill up your car wil oil. ppl say to put in the entire 4L jug into a 1600cc 4cyl. but be aware that 4L is way too much...and oil pressure will be high and you could possibly blow a gasket!
So while you're pouring it in, just stop at some point in time, let the oil settle and take out the dip stick to see how high it is. just a tiny bit above the max mark is okay....but not way above it and not way below it(obviously)
Air pressures and how to pump air
Dont laugh, i've encountered an endless amount of people who dont know how much air to have in their tires and also dont know how to tell how much pressure is actually in the tire!!
Well...a key rule of thumb is that for a street application, a very general guidline is to have 32psi in the front and 30psi in the back.
Now of course, this varies with the stiffness of the sidewall, the profile of the tire, the weight of the car, the size of the tire etc etc...But you never ever want to go to the max pressure limit of the tire because as you are driving, temperatures will rise!!! you want to keep it below max.
How to pump air...well at a gas station..u press the round button on the box that says "AIR" hahahaha. then oOoOo look, it's making noises!! must mean air is pumping right? no...no it's not pumping. u gotta take off the cap on ur valve stem....then stick the air pump peice into the valve stem and PRESS THE TRIGGER/BUTTON/LEVER whatever u want to call it. THEN it is pumping air. now to check for how much pressure there is, let go and there will be a guage that pops out the top of the tool! cool huh? uhhhhhh yea......
If using a tire pressure guage, just stick the tire pressure guage onto the valve stem and it will show how much pressure there is inside. to release the reading, press the button and it will go back to zero.
Jack Points
Know your jack points!! Just dont jack the car from anywhere u see fit!
There are jacking points on the side of the car....you see on the bottom, there is a peice of metal sticking out that goes all along the bottom? It's just a straight line that goes from one end to the other. notice that near the wheels the metal get's slightly thicker? good. that's where u jack up the car from!
Changing Spark Plugs
Alright...spark plug changing! well...you will need:
socket wrench with extention
spark plug socket peice(looks like a socket but has rubber on the inside to hold the plug)
hands
Yea, that's right, u need ur hands u dork! Alright...pop the hood and see where all the spark plug wires are leading to on the head? Where they lead to is where your plugs are. first take out the plug wires and REMEMBER THE ORDER THAT THEY ARE IN! i cannot stress how important this is! if u mess up the order u will have a messed up firing order and everything will be baaaaad
ok so after taking them out and remembering where they go(or u could do it one by one...and plug them back after the new plug is inserted!)....stick ur socket with a long extention down there and start unscrewing the spark plug...loosen it and take it out.....oo kool huh? now take the plug out of the socket peice and put ur new plug in there.
Start screwing it in but be sure not to over tighten!! make sure that it's only hand tight, dont kill it. it wouldnt be pretty if you stripped the threads on the head now would it?
Do this for all the other plugs and make sure that your new plugs are properly gapped to factory spec!! It usually says on the inside of the hood how much to gap it(it says on a sticker). if u dont know how to gap it...then get a gapping tool and jam the right size peice according to gapping spec in the plug and voila!! it has been gapped!
Changing brake pads
What you need...
New pads
Socket wrench either 10, 12 or 14mil depending on application
hands(so u cant do this if u dont have any...)
C clamp
jack
Ok now that you got all that..jack up your car, take off the wheel and observe your wonderful disc brakes!! OOoOoOoO...
Ok so you see the caliper right?(I'd sure hope so or um it's either u are blind or ur car has no brakes)...at the very bottom on the back side(The side facing the axles) there should be a bolt sticking out...that's the bolt u want to take it. it's merely a pin that keeps the caliper down facing the disc brake
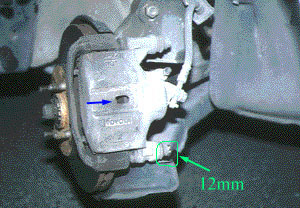
once the pin is slid out, simply rotate the caliper upwards...and BOOM! you have access to your old pads! now press the piston back with a c clamp and simply slide the pads out and slide the new ones in(be sure to retain that little metal shield thing...i dunno what it's for but it's there so dont chuck it!)
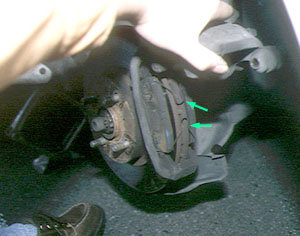
once the new pads are in, slide it back down and tighten the pin back on. repeat for all other sides. simple huh? yes...makes you wonder why places like speedy charge you at least 70 bucks
Brake Bleeding
i'm too lazy to make another stupid list of "what you need" so....bare with me hahaha
Alright so ur gonna have to do this with a friend because it is not a one man operation! pop the hood open and open the cap to ur master cylinder brake fluid resevoir. after thaat remove all wheels and have the car on either stands or have it sit on ur wheels as stands(Vivek's great boro idea)
now you want to start at the side furthest away from the master cylinder...which is always the back and is on the opposite side of where the master cylinder resides...ok so get there pronto!
once there, u will notice a bleeder valve on the caliper to bleed the brake fluid...take off the valve cap and get ready! u will now need ur friend to be in the car and good to go, a pail and a little straw that is able to stick onto the bleeder valve and leads into the pale. Ok so now u need like a 10 or 12mill wrench to loosen and tighten the bleeder valve. first, leave it as it is...and tell ur friend to pump the brake like a maniac! this builds pressure in the line...after 9 or so pumps, tell ur friend to step on the brake as hard as he/she can....and then what u do is loosen the bleeder valve and the fluid will squirt into the pale....as this happens, ur friend MUST be constantly pressing hard as the pedal will go to the floor once u open the valve....tell ur friend to keep the brake on the floor...what u now do is tighten back the valve and then ur friend can let go....repeat till u dont see any more bubbles and move to the other side at the back....remember, work on the furthest brake from the master cylinder first....always in that order: from far to near.
**EDIT*** Further info provided by Christopher Page from Toyota Nation after viewing my site:
You say to start on the brake farthest from the master cylinder and move towards it, i.e., RR, LR, RF, LF. This bleeding order is right for cars with NON_REDUNDANT brake systems. I'm not sure when the change-over started exactly (depends on the car) but I believe it was late 80s, early 90s. The thing is, newer cars have basically two brake systems, one on each diagonal pair of wheels, so that if one of your lines break or whatever then you still have one front and one back brake. This means that the bleeding order for a car with brakes like these (like mine) is actually RR, LF, LR, RF. I know because I have read this and the first time I changed my pads I used the order from my old car, like I had always done, but the brakes were still not super-tight. I found out about the redundant brake system on line, and when I tried the second order a few days later, I got out some air that was left from using the wrong order.
Timing Belt
Ok so ur timing belt is dead...that's great because u will now spend 3 hours of your day hacking away at the confined spaces of ur engine bay. be happy.
What u need: 12mil, 14mil, 17mil and 10mil.
What u want to do is jack up the car, put the front on jack stands and then jack up the motor slightly by the oil pan. Once that is completed, remove the passenger side engine mount. there are 2 bolts at the bottom and the one main big ass bolt(17mil). once that is out u can now access the wonderful 3 sets of timing covers!!!! -_-
using a 10mil socket, u will now have to remove every single timing cover from top to bottom. be careful with the 2nd cover because there is a bolt that you will probably miss: the middle one. there are 4 at the corners and one smack dab in the middle right underneath where the engine mount would just cover/block it out of sight.
After this you want to loosen up the timing belt tensioner(10mil), put it on it's loosest setting with a pry bar or something and then tighten the bolt back. you can now remove ur old timing belt. yay. pat urself on the back, you are half way done. Oh and by the way, i forgot when u need to loosen the alternator so u can slide it out of the way...so if by any chance it has already gotten in the way, then u obviously need to loosen it =P
now put a 17 on the crank pulley and turn the motor back to TDC. there will be a mark on the crank pulley that lines up with a mark on the block. line the two up. also do the same with the 2 cam gears up top. line the marks on the gears with the lines on the side of the head.
slip the new timing belt on, put the tensioner back on tightly, tighten it and proceed to do the reverse of what was described above....that my friend, is how you do a timing belt ;)
Navagation
Home|AE pages|EF Pages|Boro/DIY Mods|My dyno day