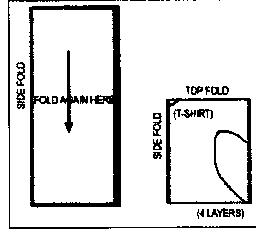
| Garb for everyone Tabards A tabard can be worn with a belt either over normal clothing or with a T-tunic. Over a tunic is much better, especially for women. The tabard and the tunic should be made of different colors (otherwise, why bother?). 1. Measure from the shoulder to the desired length and double the measurement. Measure the width of the shoulders. 2. Cut cloth into a rectangle using those dimensions. 3. Cut a hole for the neck, taking care not to cut the hole too large. 4. Hem the edges and add trims if desired. 5. Belt into place, letting the extra hang below your waist T-tunics (don�t wear a ruff with this � the Vikings will beat you up) All hail the mighty T-Tunic! Since the first days of clothing this has been the basic garment for both sexes and is still the most popular way to look medieval in a hurry. Even better, they are simple to make and are fairly simple to decorate. As far as what to wear on one�s nether-regions in addition to the tunic, women (who�s tunics should be at least calf length) can get away with shorts or whatnot, while men have the joy of choosing whether or not they�re manly enough to slip into a pair of leggings (modern tights work fine). If you�d rather not, modern pants disappear quite handily beneath even a mediocre tunic. Basic tunic construction (Image courtesy of Hand) 1. Measure from the neckline to the knee and double that length. 2. Buy that many inches of 60 inch wide fabric (45 does not work unless the tunic is to be for a child). 3. Make sure the fabric is folded in half vertically (it usually comes that way from the store). Fold the fabric in half horizontally. 4. Find a comfortable large t-shirt and fold it in half, sleeves together. 5. Place the shirt so the fold of the t-shirt is along the side fold edge of the fabric and the neck opening is at the top fold. 6. Cut an opening for the neck, not too big. 7. Cut out the sleeve/body part. Make the sleeves approximately the same width as the sleeves on the T-shirt. Widen the body by approximately 4-6 inches from the T-shirt. 8. Sew sides together wrong side out (it is really best to sew this twice). Hem bottom opening, neck and sleeves. Add trims if desired. 9. Throw a tabard (if you�re wearing one) on, then belt both at the waist, letting the loose ends hang free below (i.e. don�t tuck them into whatever you�re wearing below the waist; it�ll make you look like you�ve stored a parachute in your slacks!). If you want to buy a pattern (though I think they are actually harder than following these directions) some of the pattern companies have men�s medieval (T-tunic) patterns or those used for Christmas pageants also work. Belts Almost everyone, with the possible exception of upper-class women, will want a belt. They are worn over the top of most clothing. The best ones for early period garbs are those MUCH longer than you would normally wear, of brown or black leather (and ideally with a ring instead of a buckle at the end). Later eras, particularly the Renaissance, saw the rise of buckled belts similar to the modern style, though if you go for this option you�ll again want a plain leather belt and a very simple metal buckle, preferably non-shiny (remember, we�re talking iron, copper, and maybe bronze for these buckles). Thrift stores are a good source for belts. To put on a long belt, slip the free end through the buckle (remember to slip on any pouches, scabbards, or the like that are to hang from the belt before you start to tighten it). Feed the free end all the way under the buckle end, pulling it up towards your neck until the belt tightens around your waist. This should have formed a loop of leather just below your stomach. Pull the free end down through the loop and tighten until the belt once again fits your waist. This should form a single knot in the belt. Let the loose end dangle free. Pouches Everyone will want at least one pouch to dangle from your belt, especially since your garb will probably not have pockets. Pouches came in a wide variety of shapes, sizes and materials. The following are instructions for the easiest type. Please, make this an opportunity to have fun! Materials: Any material heavier than gauze, about 24 inches ribbon or cord, thread, a safety pin 1. Cut two pieces of material approximately 8 inches by 12 inches (if you need to carry something particular, size the pouch accordingly). 2. Add any decoration desired to the middle of the pouch. 3. Pin the pouch pieces together with the fancy sides to the inside. Sew around the sides and bottom about 1 inch from the edge. Use a sewing machine, you want this strong! Check for holes in the pouch. Sew around the pouch again (you want this strong so those keys don�t get lost). 4. Fold down the top edge by approximately 2 inches. 5. Sew near the raw edge (the non-folded one); start � inch from a side seam and stop � inch from the other side of that same seam. 6. Pin the safety pin to the ribbon and insert the ribbon around the top of the pouch using the channel you just made. Knot the ends of the ribbon together. 7. Turn the pouch fancy side out and add any additional trims desired. Capes Both men and women of all classes wore capes knee-length or longer. Hip length capes were very fashionable for men but not used by women. Probably the best idea is to follow a commercial pattern of the non-poncho variety, especially if you want a hood. Use frogs, hooks or ties instead of buttons. Ruffs for the neck and wrists Ruffs are what set the Elizabethan era off from earlier periods in history, hence they should not be worn with T-tunics, medieval gowns or kilts. They should also not be worn by peasants. Ruffs should only be made in white or off-white tones. 1. Cut a piece of material the size of your neck plus 3 inches long by 3 inches wide. 2. Cut a second strip 45 inches long by 5 inches wide. 3. Sew the long sides of a strip together, then turn the tube inside out so the seam is in the inside (a safety pin makes this much easier). Press the strip! Repeat with the second strip. Sew closed both short ends of the short strip and one end of the long one. 4. By hand, sew the end of the closed end of the long strip to the short one. Next sew (about � inch further along the short strip on the opposite edge) the long edge of the long strip. Repeat again, next on the original edge again (most people find it easier to use two needles and thread, one for each edge of the neck strip). The long strip should be forming a �candy ribbon� look. Continue until 1 inch from the second end of the neck strip. 5. Cut off excess from the second strip and sew the end closed. 6. Add Velcro to the ends of the neck strip. (The same process is used for sleeve ruffs though the pieces of cloth are smaller.) Hats See the appropriate pages for men and women. Shoes See the appropriate pages for men and women. WEBPAGE CONTENTS NEXT PAGE: ACCESSORIES |
 |