| Transformation: Part 2 |
| Home Stock Machine Planning Transformation I Transformation II Big Step Solo Seat Finished Product Gallery 1 Gallery 2 |
| I had my new pipes and the bike was now lowered a whole 2" in the front. This really gave the bike more of a 'bull-dog' stance. I liked it a lot. I was a bit wary about the pipes before I mounted them. I just wasn't sure a Virago should have fishtails. This is why it's important to have an overall picture of what you're trying to accomplish. I knew the fishtails fit into that picture. This customization was not about increased performance...so it wouldn't make sense to install some un-baffled drag pipes. It was about achieving a custom look. If I had to analyze that look, I would describe it as this: a little bit Retro a little bit lower a little bit meaner a whole lot sleeker more flowing in its presentation, with lines that actually connect and carry through from front to rear a pitbull stance with a shorter front end to help flatten the angle of the tank longer pipes to accentuate the wheelbase low bars to bring the height of the front end down even further |
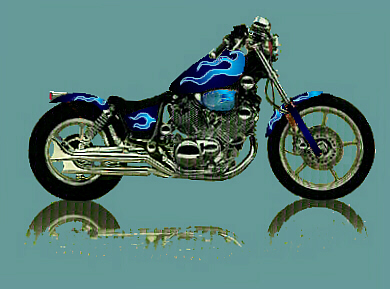 |
| This is the computer version which I finally settled on. Compare it to the finished product and you can see why I keep emphasizing the need for an overall picture. Pretty accurate. |
 |
| So now it was time for some rear end modifications. I had picked up a rear fender from a used parts shop for $10 long before I knew what I was going to do with it. All I knew was that it was wide enough to cover my tire and that it had two threaded mounting holes in it. I would need to make my own fender struts. There is a hole right above the hole in the frame where the shocks mount. I could use that. The actual hole for the shock mount runs completely through the frame although it is threaded only about half way. Now I knew that when it came time to cut the frame, I would need to take those two holes into account. The fender strut would basically be a triangle of three holes; two to match the frame and one to match the fender. But then that left the fender to pivot on its left and right mounting holes. So I bolted a strap of 1/4" aluminum across the seat area using the original forward fender mounting holes. The new fender would be bolted to that strap, preventing it from pivoting. It's all basically a matter of using what you have to come up with something that works. In real backyard custom bike-building, there usually is no blueprint. Drawings really helped though. Sketches and doodles... I made four different sets of fender struts, incorporating different angles, which would allow the fender to sit lower or higher, shorter or longer. I settled on a variation and set about tapping a thread inside the inboard (closest to the wheel) side of the shock mount hole. Of course I removed the shock mount bolt to allow the debris and cutting fluid to exit out the outboard side. I only ran the thread up to the existing thread (approx middle of the hole) so as not to interfere with the shock mount bolt when I installed a bolt from the backside. Of course this meant carefully choosing the proper length of bolt. I should note that I was unable to find a metric tap to match the size of the hole so I ended up using a standard tap. The top hole didn't need to be threaded. Just a nut and a bolt and the struts were mounted. The 'new' used fender was chromed so I got the chrome removed by a local plating company. My painter, Russell Willson, filled any existing holes in the fender before painting. I drilled a few new ones to accomodate the lights I would use on the rear end. They were just a matter of looking through a few catalogues and picking lights that matched. There are all kinds of lights in all kinds of price figures. My small 'cat-eye' tail-light was $45 Cdn and the small cat-eye signals were about $35 if I remember correctly. Feel free to blow a few hundred dollars if you like. Not me. |