Stock Machine
Planning
Transformation I
Transformation II
Big Step
Solo Seat
Finished Product
Gallery 1
Gallery 2
*I know there are Virago die-hards out there who would rather die than change a single facet of their stock Virago. That's fine. I still hope you can respect and appreciate what I've done.*
"but...but...where will you mount the fender?! where will you rest the seat?! what about the brake light?????!!!"
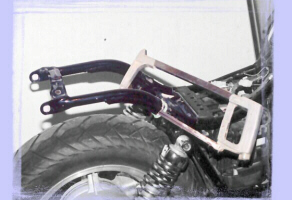
It took me months of soul-searching and pondering to get to this point. It was important for me to take a picture before the blade cut through the entire thickness of the tube.
This, I believe, is the step that too many would-be customizers are afraid to take. That goes for any kind of bike. I guess there's the fear of cutting resale value. The way I see it is this: The Virago is an excellent bike but it can usually be found for less than $5000.00. Mine is a '98 and it's an 1100cc so it cost me a little more ($6700.00 Cdn). I want to enjoy my bike to its maximum potential...and for me, that includes making a few changes to better suit my tastes in styling.
So, I carefully placed masking tape around the tube where I wanted to cut, at an angle that would let me keep the forward fender mounting holes for future use, and that would accomodate the curvature of the backside of a solo seat. The bag rail mounting holes just above the shock mount holes were also retained for future use.
After cutting, I filed all the edges. Then I ran a telescoping magnetic pen down the tube to pick up as much of the loose shavings as I could. The ends were painted with automotive touch-up paint. I have yet to cap those tube-ends. A plug weld should do the trick...and a little re-paint.