Previous Page |
 Next Page | |
 | ||
Previous Page |
Next Page | |
| ||
Lesson 16: Indenting, Spacing, and the Format Painter
Margins, as you know from previous lessons, are the spaces around the edges of a page. Paragraph indentation is how far a paragraph is from the left and right margins - either the whole paragraph or just the first line. Spacing is the amount of space between lines and between paragraphs. The Format Painter can be used to quickly change the formatting of one paragraph or document section to match another.
Indenting
You can indent paragraphs so that only the first line of each paragraph is indented, or the whole paragraph can be indented (such as a quotation). You can increase or decrease the amount of indentation of one or more paragraphs. You can also create a hanging indent, which is when the first line of the paragraph is not indented, but the rest of the paragraph is.
First Line Indent:
|
This is an example of a first line indent. The first line is indented, but the remaining lines start on the left margin. |
You can set a first line indent by using the Ruler. If the Ruler is not showing in the document window, open the View menu and select Ruler (it will have a checkmark next to it if it is showing in the window). Select the paragraph(s) that you want to have a first line indent. Next, drag the First Line Indent marker on the Ruler to the position where you want the first line of text to start. The First Line Indent marker is shown next to the arrow in the picture below.

To quickly change subsequent paragraphs to have this same first line indentation, see the Format Painter instructions below.
Left Indent of Entire Paragraph:
To increase or decrease the left indentation of an entire paragraph, first select the paragraph. Next, click either the Increase Indent or Decrease Indent toolbar button (see the lesson called "Display/Hide Toolbars and Add/Remove Toolbar Buttons" for more information).
 Increase Indent |  Decrease Indent | |
The paragraph indentation will be increased or decreased by one tab stop (using Word's default tab stops if no tab stops are shown on the ruler). To manually set the indentation amount, set a tab stop on the ruler (see Lesson 2, "Creating a Letter to Learn about Microsoft Word: Step 4 - Set the Tabs").
Right Indent of Entire Paragraph:
To change the right indentation of an entire paragraph, the Ruler must be showing in the window. If the Ruler is not showing in the document window, open the View menu and select Ruler (it will have a checkmark next to it if it is showing in the window). Select the paragraph you want to change. Drag the Right Indent marker on the Ruler to the position where you want the paragraph text to end.

To quickly change subsequent paragraphs to have this same right indentation, see the Format Painter instructions below.
Hanging Indent:
| This is an example of a hanging indentation. The first line of this paragraph is not indented, but every other line of this paragraph is indented. |
To create a hanging indent, the Ruler must be showing in the document window. If the Ruler is not showing in the document window, open the View menu and select Ruler (it will have a checkmark next to it if it is showing in the window). Select the paragraph you want to change. Drag the Hanging Indent marker on the Ruler to the position where you want every line of the paragraph except the first line to start.

To quickly change subsequent paragraphs to have this same hanging indentation, see the Format Painter instructions below.
Negative Indent:
A negative indent pulls the paragraph toward the left margin. To create a negative indent, the Ruler must be showing in the document window. If the Ruler is not showing in the document window, open the View menu and select Ruler (it will have a checkmark next to it if it is showing in the window). Select the paragraph you want to change. Drag the Negative Indent marker on the Ruler to the position where you want every line of the paragraph except the first line to start.

To quickly change subsequent paragraphs to have this same negative indentation, see the Format Painter instructions below.
NOTE: You can also make more specific changes to indentation by using the Paragraph dialog box, Indents and Spacing tab section. Open the Format menu and select Paragraph, then click on the Indents and Spacing tab. You can also get more information about indentations by using Word Help.
Spacing
The default for line spacing is single-spaced, which allows enough room on the line for the largest sized font plus a little extra space. You can also have 1.5 spacing (one-and-a-half times the size of single line spacing), double spacing, or you can determine the exact size of space between lines and paragraphs.
To change the spacing between lines or between paragraphs, open the Format menu and select Paragraph. The Paragraph dialog box will appear. Click on the Indents and Spacing tab.
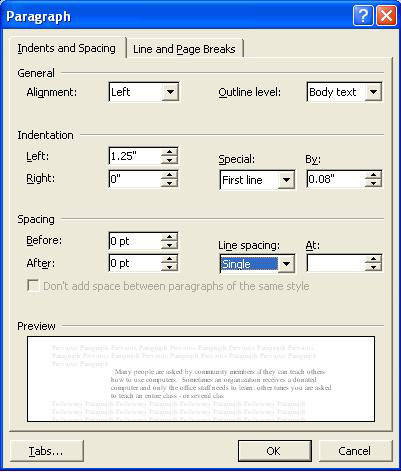
With this dialog box you can change from single spacing to 1.5 or double spacing, or make the line spacing at least a certain size or exactly a certain size. Click OK when you have made your changes.
You can also use the Line Spacing toolbar button on the Formatting toolbar, which looks like the picture below. If you cannot find that toolbar button, see the lesson called "Display/Hide Toolbars and Add/Remove Toolbar Buttons" for more information.

First select the text to which you want to apply the new line spacing. If you want to use the most recently used setting, click the Line Spacing toolbar button. If you want to use a new setting (change from single to double spacing, for instance), click the arrow to the right of the button and select the spacing number you want. If you want to set precise spacing measurements, click the arrow to the right of the toolbar button, select More, then change the settings under Line Spacing.
To quickly change subsequent text to have this same line spacing, see the Format Painter instructions below.
Format Painter
You can quickly apply the text style, size, color, indentation and line spacing from one paragraph (or line of text) to another by using the Format Painter. The Format Painter button is located on the Standard toolbar (see the lesson called "Display/Hide Toolbars and Add/Remove Toolbar Buttons" for more information). The Format Painter toolbar button looks like this:

First, place the cursor inside the paragraph or line of text that you want to copy from. Next, click the Format Painter toolbar button. Finally, select the text you want to change to that format. If you are selecting more than one word, make sure not to release the left mouse button until you have selected the entire amount of text. The text you have selected will change to copy the font style, size, color, indentation and line spacing of the text where you first clicked on the Format Painter button. If you want to undo the changes, open the Edit menu and select Undo.
NOTE: You can also get more information about the Format Painter by using Word Help.
Practice: To practice what was learned in this lesson, open Word (create a new document). Type a few lines of text, then use the above instructions to change the indentation and line spacing. Copy some of the text and paste it at the end of the document, then change the font style, size, color, indentation and/or spacing of the new section of text. (See previous lessons about changing font features, if necessary.) Follow the Format Painter instructions to change the second set of text back to match the first group of text. When you are finished, close the document and Word, with or without saving the changes.
 Previous Page |
Next Page |