Previous Page |
 Next Page | |
 | ||
Previous Page |
Next Page | |
| ||
Tasks that you repeat often while working with documents in Word can be automated by using a macro. A macro is a series of instructions in Word that are grouped together as a single task or command to accomplish these instructions automatically instead of manually. The basic steps to using a macro are to create (record) a macro and then run it.
Create/Record a Macro
Creating a macro is like recording it on a tape recorder. Every keystroke and mouse button click used while recording your macro is saved. The only task not saved is the selection of text by using the mouse.
These are some tips that Microsoft Word offers for recording macros:
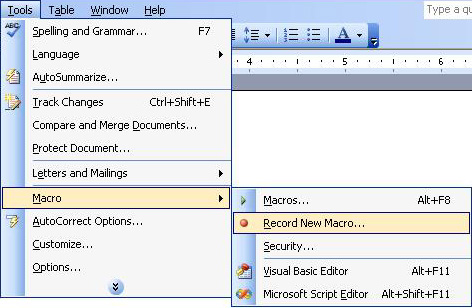
To record a macro, first plan your steps ahead of time. Then, open the Tools menu, go to the Macro submenu, and select Record New Macro.
The Record Macro dialog box will appear.
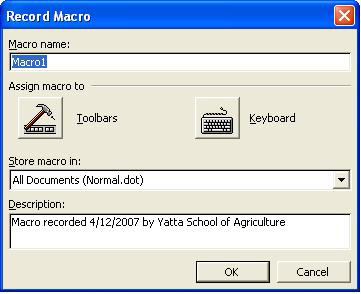
First, type the name of the macro. You should give the macro a descriptive name so that you can find it easily when you need to run it again in the future. The macro name should be one word, however. After typing in the name, you can decide whether to add the macro to the toolbar as a button, or assign a keyboard shortcut key so that to run the macro in the future you can use one of these two methods to start it instead of re-opening the macros menus. Assigning shortcuts to macros will not be covered in this lesson; use Word Help for more information.
Leave the information displayed in the "Store macro in" drop-down box. Type a detailed description of what the macro is used for in the text box under "Description." When you are ready to start recording the macro, click the OK button. The Stop Recording dialog box will appear and the mouse pointer will turn into a picture of a tape cassette.

Perform the steps you want to use your macro for and when you finish, click the button on the Stop Recording toolbar that looks like a square. Don't worry about making mistakes while you are recording the macro - you can either edit them out later or record the macro again.
Run a Macro
To run a macro, you can either use the shortcut you assigned to the macro when you recorded it, or use the menus. For this lesson, we will use the menus. Open the Tools menu, go to the Macro submenu, and select Macros. The Macros dialog box will open.
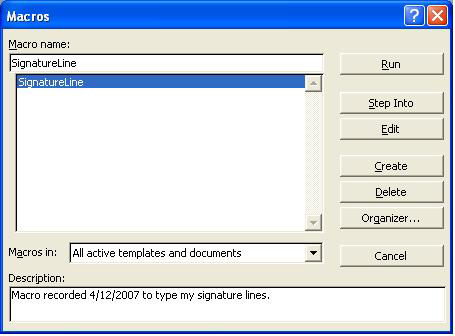
A list of the macros you have recorded will appear in the list and as you click on each one, the description of that macro will appear in the "Description" box. Click the Run button to run the selected macro. For this lesson, a SignatureLine macro was created that automatically types the following:
| Sincerely yours, Jane Doe |
When we select this macro from the list and click the Run button, that information is automatically typed into our document from the position of the cursor.
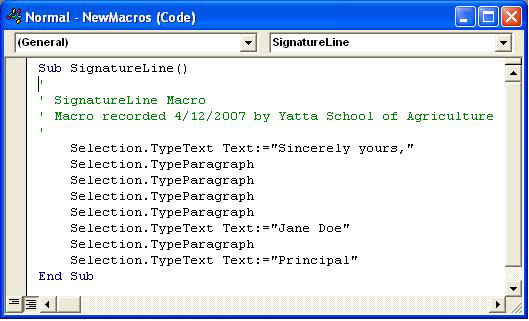
Edit a Macro
When you make a mistake (and correct it immediately) while recording a macro, you can either edit the macro later or re-record it (or leave it as it is, with the extra steps in it). Editing a macro uses the Visual Basic Editor or the Microscript Editor, both of which can be very complicated. Editing macros is not recommended for inexperienced users.
To edit a macro, open the Tools menu, go to the Macro submenu and select Macros. From the list of macros, click on the one you want to edit and then click the Edit menu. The Visual Basic Editor will probably open, with the code that describes your macro. If you can find the steps in the code related to your mistake, delete the entire lines relating to that mistake. However, editing the code can be very difficult.
NOTE: Editing macros is not recommended for inexperienced users. If you make a mistake in recording a macro, it is best to re-record it.
Practice: To practice what was learned in this lesson, open Word (create a new document). Follow the instructions in the lesson above to create a macro that will type your name and then move the cursor down one line. After creating the macro, run it once or twice. For more practice, create another macro to perform some other tasks and then run it. When you are finished, close Word and the document, with or without saving the changes.
 Previous Page |
Next Page |