Previous Page |
 Next Page | |
 | ||
Previous Page |
Next Page | |
| ||
Lesson 12: Using AutoCorrect, AutoComplete and AutoFormat
AutoCorrect, AutoComplete and AutoFormat are three Word features that help make your work easier. You can have spelling and grammar mistakes automatically corrected, dates and common words automatically completed (inserted) for you, and text automatically formatted.
AutoCorrect
Most versions of Microsoft Word have the ability to automatically correct spelling and grammatical errors, right as you are typing them! This feature is called AutoCorrect and it can be customized to fit your needs.
You can use the AutoCorrect feature to automatically detect and correct typos, misspelled words, grammatical errors, and incorrect capitalization. For example, if you type teh plus a space, AutoCorrect replaces what you have typed with the. You can also use AutoCorrect to quickly insert text, graphics, or symbols. For example, type (c) to insert �, or customize AutoCorrect so that you can type ac to insert Acme Corporation, for example.
To turn AutoCorrect on or off, to add an entry or to delete an entry, open the Tools menu and select AutoCorrect (AutoCorrect Options in Word 2003).

The AutoCorrect dialog box will appear, with the AutoCorrect tab section open.
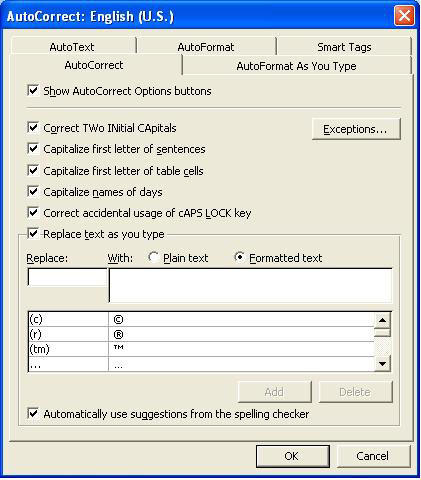
Let's go over each option available in the AutoCorrect dialog box. (NOTE: Older versions of Word may not have all of the same options.)
Show AutoCorrect Options buttons
When a word is changed with AutoCorrect, a button (initially a blue bar, then a picture of a lightning bolt) may appear when you move the mouse over the corrected word.
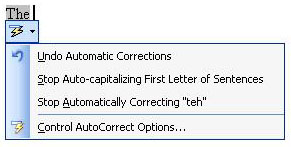
This is the AutoCorrect Options button - click on it to open the menu. You can use this to return the word to its original spelling, or to change some of the AutoCorrect options.
In the AutoCorrect dialog box, place a checkmark in the box (left-click in the box) next to the "Show AutoCorrect Options buttons" if you want this button to appear with your corrected words. Remove the checkmark (left-click over the checkmark in the box) if you don't want the button to show when words are automatically corrected.
Correct TWo INitial CApitals
Select this option if you want to automatically correct words typed with two capital letters (instead of one). For instance, if this sentence had started with the word "For" spelled "FOr" and the "Correct TWo INitial CApitals" option was checked, "FOr" would automatically be changed to "For" after the spacebar was pressed after typing the word.
Capitalize first letter of sentences
If you start a new sentence and forget to capitalize the first letter of the first word, it will automatically be capitalized after you press the spacebar once after typing the word, if this option is checked.
Capitalize first letter of table cells
Turn this option on if you are working with tables and want words in each cell to be capitalized.
Capitalize names of days
If you are typing the names of days and forget to capitalize the first letter, it will be automatically corrected if this option is checked.
Correct accidental usage of cAPS LOCK key
Words that are accidentally capitalized when the Caps Lock key is unintentionally turned on will be fixed if this AutoCorrect option is selected.
Replace text as you type
In the scroll box below this option are the replacement options that AutoCorrect will recognize. To add a new one, type your shorthand text in the first text box and the word, symbol or phrase you want it to be replaced with in the second text box and it will be added to the list. For example, you could type your initials in lowercase to have AutoCorrect automatically replace it with your name after you type the initials and press the spacebar in a document (e.g., js could be replaced with John Smith).
Automatically use suggestions from the spelling checker
If this option is checked, AutoCorrect will use Word's main spelling dictionary to automatically correct words.
Exceptions... button
Click the Exceptions... button in this dialog box to add information about any words you do not want to be automatically corrected, even if the option has been turned on. The AutoCorrection Exceptions dialog box will appear.
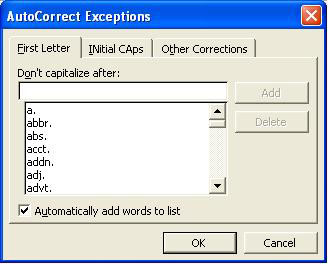
The three tab sections in this dialog box are First Letter, INitial CAps and Other Corrections. Type your exception in the text box in the correct tab section and click Add. If you want to delete any list entries that are already there, click on the one you want to delete and then click the Delete button. Click the OK button when you are finished with the AutoCorrect Exceptions dialog box.
When you are finished with the main AutoCorrect dialog box, click the OK button.
The corrections related to the options you have marked will be made automatically after the mistake is typed and the spacebar is pressed once.
AutoComplete
AutoComplete can insert the current date and common words after you type just the first few letters of the word. After the first few letters are typed, a suggestion for that word will appear. Press the Enter or Tab key to accept that suggestion and the word will automatically be placed in your document.

AutoComplete can be turned on and off from the AutoText tab section of the AutoCorrect dialog box. To open the AutoCorrect dialog box, open the Tools menu and select AutoCorrect (AutoCorrect Options in Word 2003), then click on the tab labeled "AutoText."
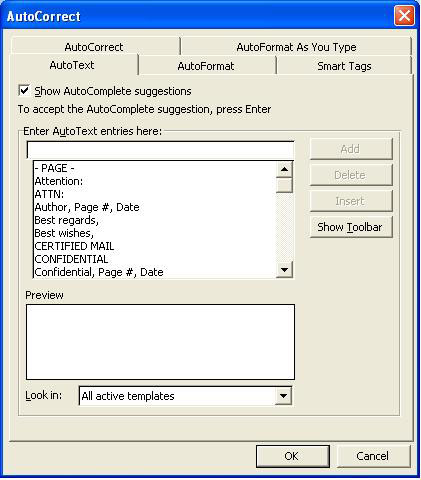
To turn AutoComplete on or off, click the Show AutoComplete Suggestions option box.
To add a new word or phrase to be automatically completed, type the entire word or phrase - as you want it to appear in a document when it is automatically inserted using AutoComplete - in the text box under "Enter AutoText entries here," then click the Add button. To delete an AutoText entry, click on it in the list and then click the Delete button. When you are finished, click the OK button to close the AutoCorrect dialog box.
AutoFormat
AutoFormat lets you automatically apply formatting to your text - formatting like headings, borders, numbers, symbols, fractions, bulleted and numbered lists, and email address hyperlinks. The formatting can be applied as you type the text or after you have already typed it.
AutoFormat can be turned on and off (and customized) in the AutoCorrect dialog box. Again, to open the AutoCorrect dialog box, open the Tools menu and select AutoCorrect (AutoCorrect Options in Word 2003). There are two tab sections in the AutoCorrect dialog box that apply to this feature: AutoFormat and AutoFormat As You Type. We'll work with the AutoFormat tab section first.
AutoFormat Tab Section:
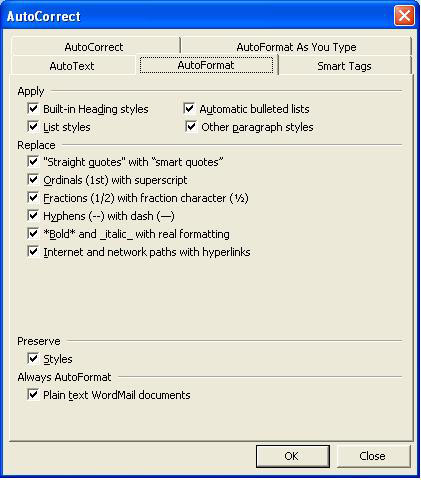
Choose the options in the AutoFormat tab section that you want to apply to your document. For example, select which - if any - of Word's style types you want to use (heading, bulleted lists, etc.). In the second section of the AutoFormat tab section, select which options you want Word to replace. For example, there are different types of quotes and dashes that are used; AutoFormat can automatically change the type of dash you type with the type of dash you prefer in your document. Read each option to see how it will be replaced. The bottom two sections of AutoFormat will not be covered in this lesson. When you have made your choices, click the OK button to close the dialog box.
When you have finished typing text and want it to be automatically formatted according to the choices you made in the dialog box, open the Format menu and select AutoFormat.

The AutoFormat dialog box will appear.
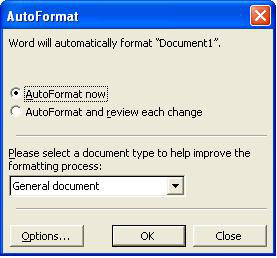
Select whether to automatically format the entire document (first option) or to automatically format the entire document and then review the changes (second option). (When you review the changes, you have the chance to look at each change and accept or reject each change.) In the second section of this dialog box, choose from the drop-down list whether the document is a general document, a letter, or an email. Clicking on the Options button will open the AutoFormat tab section of the AutoCorrect dialog box so that you can make AutoFormat changes (see above). Click OK when you are ready to automatically format the document, or Cancel if you decide not to.
Of note, below is a picture of a document where the second option (AutoFormat and review each change) was selected and the OK button clicked:
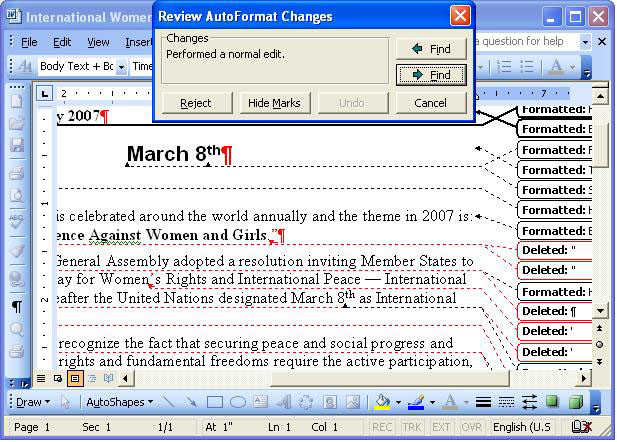
If we were working on the document in the picture above, we could go through each change and accept or reject it, one by one.
AutoFormat As You Type Tab Section:
The other tab section of the AutoCorrect Dialog Box is AutoFormat As You Type.
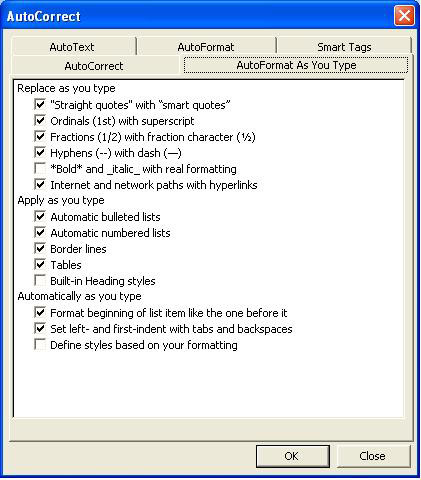
AutoFormat As You Type does just that - formats as you type. Formatting changes are made when you press the spacebar after typing a word. Choose the options in the dialog box that you want to use while you are typing and those changes will be made when you press the spacebar after typing something on the list of options. For example, if you select the Ordinals (1st) with superscript option, whenever you type 1st, 2nd, etc., Word will change it (after you press the spacebar after typing it) to 1st and 2nd.
Click the OK button on the dialog box to close it.
Practice: To practice what was learned in this lesson, open Word and an existing document. Follow along with the lesson to open the various dialog boxes and view the options. For more practice with AutoFormat, open the Format menu, select AutoFormat, select the second option ("AutoFormat and review each change") and click OK. When the AutoFormat dialog box appears again after the changes are made, click the Review Changes button. Scroll through the document and view the changes. When you have finished, click Cancel in the first dialog box and Reject All in the second dialog box. Close the document and Word, but do not save the changes.
 Previous Page |
Next Page |