Previous Page |
 Next Page | |
 | ||
Previous Page |
Next Page | |
| ||
Lesson 11: Using Drawing Tools
You can draw lines, shapes and arrows in your documents, using your mouse. First, however, you need the Drawing toolbar visible in your document window.

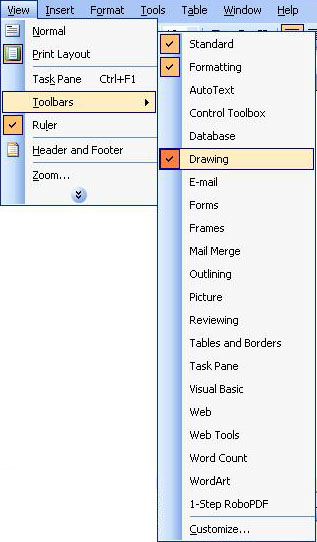
To make sure the Drawing toolbar is visible in your document window, open the View menu, go to the Toolbars submenu and see if Drawing has a checkmark next to it. If it does have a checkmark, the toolbar is already in the window. If there is no checkmark, select Drawing (left-click on it) and that toolbar will be placed in the window.
The information listed below covers the buttons available on the Drawing toolbar.
AutoShapes
There are many AutoShapes available for you to use: various lines, connectors, basic shapes (like rectangles and ovals), arrows, etc. Some of the buttons will be available on the toolbar, but you can also open the AutoShapes menu by clicking on it on the toolbar and select the shape you want to draw from any of the submenus.
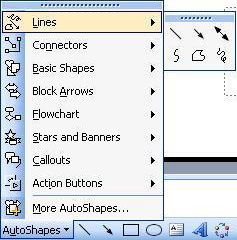
To draw an AutoShape, select the type of shape from the toolbar or AutoShape toolbar menu. Once you have done so, the mouse pointer shape will change. Move the mouse pointer to the place in the document where you want to draw the shape, hold down the left mouse button and move the mouse (left, right, up, down). Release the left mouse button when you have finished drawing the shape. To change the color, move or resize the AutoShape, see those instructions toward the end of the lesson below.
Text Box

Sometimes when you type text you need to be able to move it around easily in a document. You can do that by placing the text in a text box (text boxes can be moved to different places in a document). You can add a text box to your document by opening the Insert menu and selecting Text Box, but there is also a Text Box button located on the Drawing toolbar. When you click the Text Box toolbar button (or select Text Box from the Insert menu), the shape of the mouse pointer changes. Move the mouse pointer to the position in the document where you want to add the text box, hold down the left mouse button and move the mouse (up, down, right, left) until the text box is the shape you want it, then release the left mouse button.
NOTE: Newly created text boxes may disappear unexpectedly if no text is placed inside the box. Therefore, it is recommended that at least one letter (any letter) is typed in the text box immediately after the text box is created. You can go back and change the text later.
To move the text box on the document, see the Moving/Resizing instructions below.
For more information about changing the text font, see Lesson 3.
Insert WordArt

WordArt is a Microsoft feature that allows you to create fancy text with various colors, sizes and shapes. To insert WordArt text, click on the WordArt toolbar button. The WordArt Gallery dialog box will open.

Select a WordArt style by clicking on it and then clicking on the OK button. (Click on the Cancel button if you decide not to use WordArt.) The Edit WordArt Text dialog box will open.

Type in your text, change the font type and size, and add bold and italic if you wish. Click on the OK button when you are finished.
Below is a picture of a sample WordArt:

To move or resize the WordArt, see the Moving/Resizing instructions below, toward the bottom of the lesson.
Insert Diagram or Organizational Chart

The Insert Diagram or Organizational Chart feature (and toolbar button) are not available in older versions of Word. For more information about this feature, see the Microsoft PowerPoint lesson called "Creating Organizational Charts."
Insert Clip Art

See Lesson 3, "Creating a Newsletter to Learn More about Microsoft Word: Step 13 - Insert a Picture or Clip Art."
Insert Picture

Although the Insert Picture feature is available in all versions of Word, the Insert Picture toolbar button is not. For more information about this feature, see Lesson 3, "Creating a Newsletter to Learn More about Microsoft Word: Step 13 - Insert a Picture or Clip Art."
Fill Color

The Fill Color toolbar button allows you to "fill" the inside of the shape you have drawn with the color of your choice. First, click on the drawn object (shape) in the document. Next, click on the arrow to the right of the Fill Color toolbar button (not on the toolbar button itself). A menu will open.
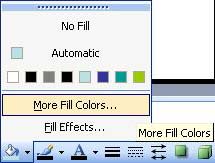
This menu is where you can change the color. Select a color or click on More Fill Colors or Fill Effects and make your changes (click on the Preview, OK, or Cancel buttons as needed).
If the line of color shown under the paint can on the Fill Color toolbar button is already the color you want to use, you can just click on the shape you want to fill with color and then on the Fill Color toolbar button (click on the paint can, not on the arrow to the right of it).
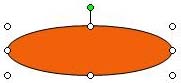
Below is a sample oval AutoShape with a fill color of red:
If you previously used a Fill Color and want to remove it, click on the object, then on the arrow next to the paint can and select No Fill.
Line Color

You can also change the color of a line (or plain arrow) you have drawn in a document. First, select the line on the document. Next, click on the arrow to the right of the Line Color toolbar button. Select a color or click on More Line Colors or Patterned Lines and make your changes (click on the Preview, OK, or Cancel buttons as needed).
If the line of color shown under the paintbrush on the Line Color toolbar button is already the color you want to use, you can just click on the line or arrow you want to change the color of and then on the Line Color toolbar button (click on the paintbrush, not on the arrow to the right of it).
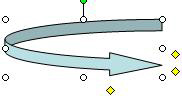
Below is a sample plain arrow with a line color of blue and a special pattern:

If you previously added a Line Color and want to remove it, click on the line or arrow object, then on the arrow next to the paintbrush (not the paintbrush itself) and select No Line.
Font Color

The Font Color toolbar button changes the color of the font in a text box or elsewhere in a document. First, select the text you want to change colors or, if you have not begun typing the text in a text box yet, left-click once inside the text box. Next, click on the arrow to the right of the Font Color toolbar button. Select a color or click on More Colors and choose a color from there (click on the Preview, OK, or Cancel buttons as needed).
If the line of color shown under the letter "A" on the Font Color toolbar button is already the color you want to use, you can just select the text you want to change the color of and then click on the Font Color toolbar button (click on the letter "A" of the Font Color toolbar button, not on the arrow to the right of it).
Line, Dash & Arrow Style

The Line, Dash and Arrow Style toolbar buttons allow you to quickly and easily change the style of a line or arrow (and either one can become a dash). Draw the line or arrow, then click on the Line, Dash or Arrow toolbar button and make your selection. (You can also click on any line or arrow already drawn in the document and change it in this manner.)
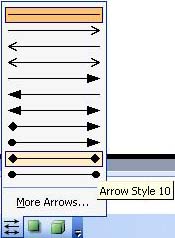
If you also want to change the style and weight of the line or arrow at the same time, click on More Lines (Line Style toolbar button) or More Arrows (Arrow Style toolbar button). This will bring up the Format AutoShape dialog box:
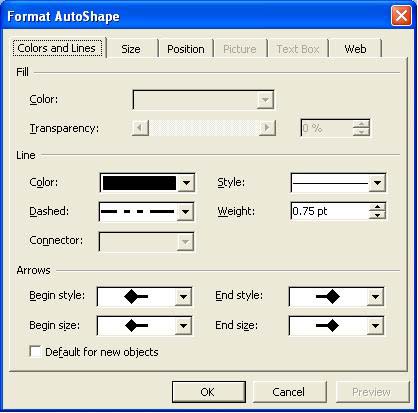
Within this dialog box, you can change the color of the line or arrow, the type of dash (if any), and the style and weight of the line or arrow. You can also change the beginning and ending styles and sizes of the line or arrow. After you start making changes, the Preview button will become available and you can click on it to see what the line or arrow will look like once you change it. When you have finished making changes, click the OK button to permanently apply the changes, or the Cancel button to make no changes.
Shadow Style

Any drawn object can have a shadow applied to it. Click on the object, then click on the Shadow Style toolbar button and select a style. If you have previously placed a shadow on a drawn object and want to remove it, click on No Shadow.
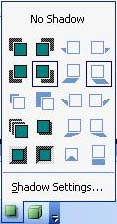
(NOTE: Shadow Settings will not be covered in this lesson.)
Here is an example of an oval AutoShape with a shadow style applied to it:
3-D Style

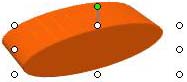
Any drawn object can also have a three-dimensional (3-D) effect added to it. Click on the object, then click on the 3-D Style toolbar button and select a style. If an object already has a 3-D style applied to it and you want to remove it, click No 3-D.

(NOTE: 3-D Settings will not be covered in this lesson.)
Here is an example of an oval AutoShape with a 3-D style applied to it:
Changing the Color of a Drawn Object
To change the color of any drawn object (with the exception of WordArt), double-click on it to bring up the Format AutoShape dialog box. Click on the Colors and Lines tab if it is not already showing. Make your color changes and click on OK.
Moving/Resizing
To move or resize any drawn object, first left-click on it once, to display the sizing handles (the white circles or squares appearing on the sides of the drawn object). To move a drawn object, move the mouse pointer over the object until a thin black four-way arrow appears, hold down the left mouse button and move the mouse until the object is in the new location, then release the left mouse button.
To resize a drawn object, move the mouse pointer over one of the white circle or square sizing handles until a thin black two-way arrow appears. The arrow directions will show which way the object can be resized (left-right, up-down, or diagonally left-right). Note that you can move an object in any direction, even if the arrows point in different directions. Hold down the left mouse button and move the mouse until the drawn object is the desired size, then release the left mouse button. Repeat as necessary until the object is the size and shape you want it to be.
If there is a yellow diamond along with the white sizing handles, you can change the shape and size of the inside of the drawn object. To do this, move the mouse pointer over the yellow diamond, hold down the left mouse button and move the mouse (up and down and/or left and right, depending on the type of drawn object) until the object has changed, then release the left mouse button. If you do not like the changes, open the Edit menu and select Undo.

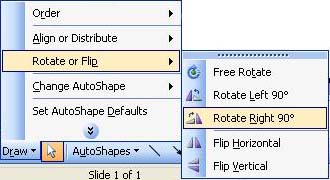
Flip/Rotate
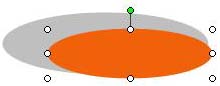
If the drawn object has a green circle included along with the white sizing handles, you can flip or rotate the object. Move the mouse pointer over the green circle, hold down the left mouse button, move the mouse left or right and down, then release the left mouse button when the object is in the desired position. If you do not like the changes, open the Edit menu and select Undo.
Another way to flip or rotate any drawn object is to select the object (left-click on it once until the white sizing handles appear), click on the Draw button on the toolbar, go to the Rotate or Flip submenu and select one of the directional choices.
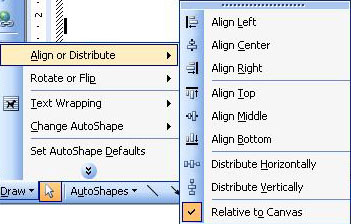
Aligning a Drawn Object on the Page
To align a drawn object on a document page (left, right or center, for example), first click on the object you wish to align. Next, click on the Draw button on the toolbar. Go to the Align or Distribute submenu and select one of the choices. If the only choice available on the submenu is Relative to Canvas, click on this option, then go back to the submenu and make your alignment selection.
Practice: To practice what was learned in this lesson, open Word (create a new document). Follow along with the lesson and add AutoShapes, text boxes, and WordArt. Change the Fill Color, Line Color and Font Color (after adding text to the text boxes). Add lines and arrows and change their styles. Add shadows and 3-D styles to your drawn objects. Change the colors of your AutoShapes. Move, resize and flip/rotate your drawn objects. Align one or more of your drawn objects relative to the canvas.
When you have finished, close the application. Save the changes if you wish, or else click the No button when the dialog box appears asking if you want to save your changes.
 Previous Page |
Next Page |