Previous Page |
 Next Page | |
 | ||
Previous Page |
Next Page | |
| ||
Sometimes you might want to create one letter and send it to several different people. Each person has a different name and address, but the main part of the letter will be the same for all of them. Instead of typing a separate letter for each person, you can use mail merge. Mail merge is the process of combining one document (usually a letter) and a list of names and addresses. Each part of the mailing that will be different (each name and each address, for example) is called a variable.
In older versions of Word, there are three main steps in the mail merge process:
In Word 2003 there are six steps to the mail merge process:
This lesson will cover each step of the mail merge process, but since older versions of Microsoft Word use different dialog boxes than Word 2003 uses, this lesson will be divided. The steps for older versions of Word will be first and then the steps for Word 2003 will follow. Click here to jump to Word 2003 instructions.
Instructions for Older Versions of Word:
Step 1: Create the main document (or open it if it already exists).
To start the mail merge process, first open Word. You need to be in a new, blank document. If a new, blank document opened with Word, the main part of the window will be white. If no document opened with Word, the main part of the window will be gray. If the main part of the window is gray (or there is a document showing that is not blank), open the File menu and select New, then select Blank Document from either the dialog box (older versions of Word) or the task pane on the right side of the window (Word 2003).
Next, open the Tools menu and select Mail Merge. The Mail Merge Helper dialog box will appear.
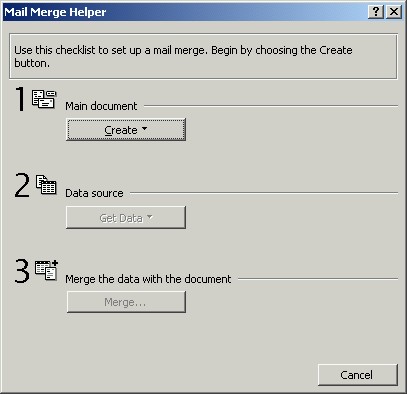
Under where it says 1. Main document, click the Create button. Select from the list the type of document you want to create: form letters, mailing labels, envelopes or catalogs (a membership directory, for example). The Restore to Normal Word Document option appears when you have already selected a different option. If, instead of creating a form letter (for example), you wish to go back to a normal, plain document, select this last option.
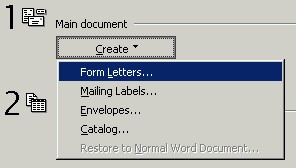
In this lesson we are going to create form letters, so we will select that option. But no matter which option you select, a new dialog box will appear:
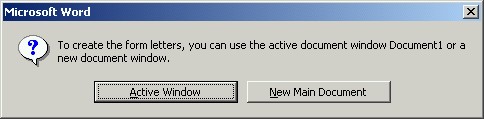
We can choose whether to use the current document window or open a new one. Since we are starting with a new blank document, we will click on Active Window.
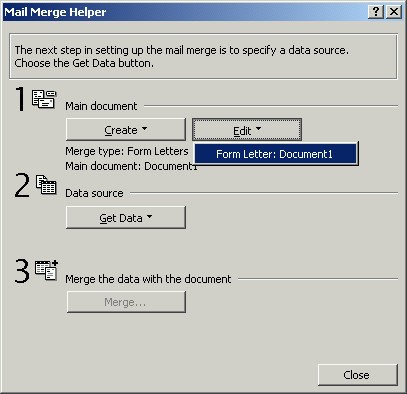
Now a new button appears in the Mail Merge Helper dialog box: Edit. When you click on it, it lists the default name of your document (Document1, for example) or, if you have saved that document already, the name you gave it.
We are going to come back to edit the form letter later. For now, we are going on to Step 2.
Step 2: Create the data source (or open it if it already exists).
Now we will click on the Get Data button under 2. Data source. When we click on the button, a list appears with these options: Create Data Source, Open Data Source, Use Address book, and Header Options.

We will use the first option, Create Data Source, but if we already had a data source (a file containing the names and addresses we wanted to use with our form letter), we would choose the Open Data Source option. If we were using the Microsoft Outlook or a similar application that contains an address book (a list of names and addresses), we would choose Use Address Book. Header Options is used to open or create a document containing field names (see below).
Again, we are creating new information, so we will select the Create Data Source option. The Create Data Source dialog box appears.
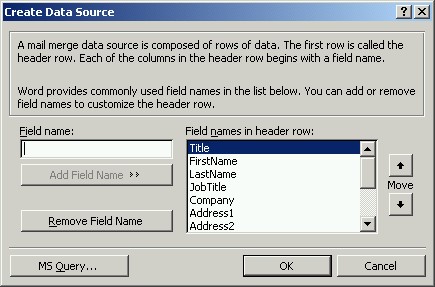
Each bit of information stored in a data source is called a field. In your main document, you will be inserting fields so that Word knows where to put the inserted information (names, for example). In the Create Data Source dialog box, you choose which fields to use. Some are given already. If you want to use the fields listed, leave them on the list. If you don't want to use a field listed, click on it and then click on the Remove Field Name button. You can add your own field names by typing them one at a time in the text box under where it says Field name and then clicking on the Add Field Name button. You can change the order of the fields in the list by clicking on a field name and then on either the up or down arrow key on the right side of the dialog box (where it says Move).
For our example, we will keep these fields and delete the rest:
|
Title First Name Last Name Company Address1 Address2 City Postal Code Country |
When finished, click the OK button.
Next, we are prompted to save the data source document (using the Save As dialog box). Navigate to the location on the computer where you want to save the document, name the document, then click Save. We are going to call our file Addresses.
Another dialog box appears:
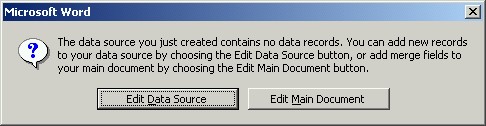
Since we want to input our data information now, we will click on the Edit Data Source button. Next, the Data Form dialog box will appear so we can enter our information.
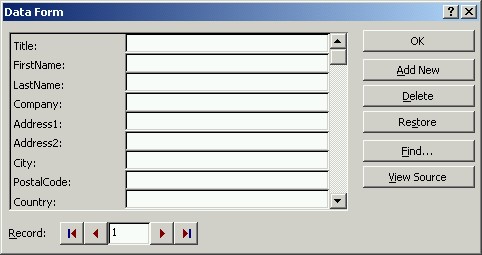
The Data Form dialog box will include each field name from the list on the previous Create Data Source dialog box, with text boxes for us to type in the information. After typing in the information for the first person, we will click Add New because we still have other people to add. When we have finished typing the information for the last person, we will click the OK button, which will close the dialog box. If at any time we want to delete a person's information, we will go to that person's record entry and then click on the Delete button. To find a particular person's record, we can either click on the arrow buttons at the bottom of the dialog box, or click on the Find button and follow the instructions to find that person.
NOTE: After clicking the OK button in the Data Form dialog box, you will need to return to the Mail Merge Helper dialog box by opening the Tools menu and selecting Mail Merge.
Return to Step 1:
Now that we have entered the data source information and know which field names we are using, we can go back and edit our main document. If we need to, we will re-open the Mail Merge Helper dialog box, then click on the Edit button under the first step and select the name of our document listed there.
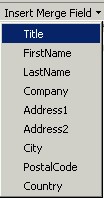
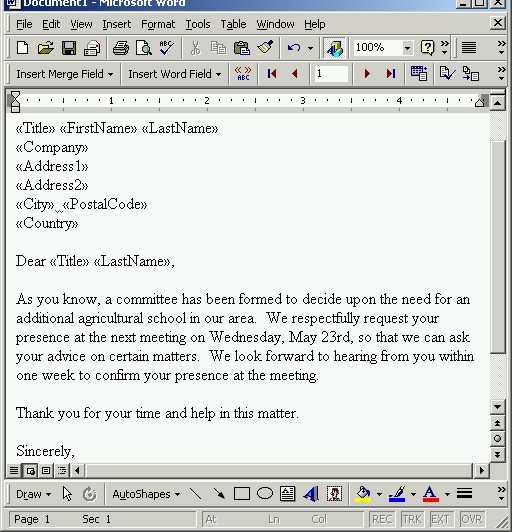
As we type our letter, we will need to insert the field names so that Word knows where to insert a person's unique information. Type the letter as if you were using the information for one particular person, but instead of typing that person's individual information, insert a field name. To insert a field name, click on the Insert Merge Field button on the toolbar and select a field name from the list. Remember to included spaces between fields when needed (for example, you would normally put a space between a person's first name and their last name, so put a space between those two field names).
While you are typing, the Word Office Assistant may appear, asking if you would like help writing the letter. Use the Office Assistant help if you want to. (See the lesson called "Using Word Help" for more information about Office Assistants.)
Here's an example of what a form letter might look like after all of the fields have been inserted:
Remember to save your letter frequently while you are creating it. (Use Save from the File menu or the Save toolbar button.) We are saving our example document as Form Letter.
Step 3: Merge the data with the document.
Now that the data information and the main document have been created and saved, we can merge the two together. We will return to the Mail Merge Helper dialog box (selecting Mail Merge from the Tools menu) and click on the Merge button under Step 3 on the dialog box. When we click on that button, the Merge dialog box opens.
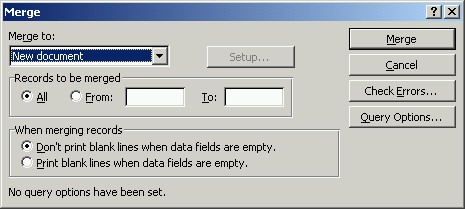
In the first drop-down box, under "Merge to," we can select whether to merge to a new document, to the printer, or to email. It is recommended that you merge to a new document so that you can check the final output and edit it if necessary. If you merge directly to the printer, you will have no chance to fix any mistakes. Merging to email will not be covered in this lesson.
If you have a large number of records in your data source, you might only want to merge a certain number of them at a time. Enter the range of record numbers in the "Records to be merged" part of the dialog box. If you want all of the records to be merged at once, select that option.
Some of the records may have empty fields. For example, some people may have two lines for the address (Address1 and Address2), while others may only have one. If you want, you can have a blank line where the unused field appears in the main document (the form letter, for example), but generally you don't want a blank line there.
When you are ready, click the Merge button. (If you decide not to merge at that time, click the Cancel button. The other buttons on the dialog box will not be covered in this lesson.)
Once you click the Merge button, all of the people in your data source (or the number range of records you have entered) will be merged with the main document. The final output will be in a new document if you have selected that option, which we have, and that document will open in a new window. Although it may not appear so in your new document window, each letter is on a separate page in the document and will be printed separately. Make sure to save the document before and after you begin working on it. You should scroll through the output document and double-check that the information inserted into the letter is correct and that you like the layout of the letter. If the merged letters are okay, you can print them. If you want to start over again, close this output document, go back to the main document and make your changes, open the Mail Merge Helper dialog box again, and re-start the merge. Save the new output document either as a new file or using the same name as the first output file (which will overwrite the first output file).
Practice: Open Word and start a new document. If you have an older version of Word, follow along with the steps in the section called Instructions for Older Versions of Word. If you have Word 2003, follow along with the steps in the section called Instructions for Word 2003. Enter information for at least two people when creating the data source (fictional information is fine). When you have finished, close the document(s) and Word, either with or without saving the merged letters (final output) document.
Step 1: Select the type of document to use.
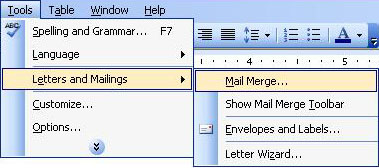
Start with a new document. Then, open the Tools menu, go to the Letters and Mailings submenu and select Mail Merge.
The Mail Merge task pane will appear on the right side of the document window.
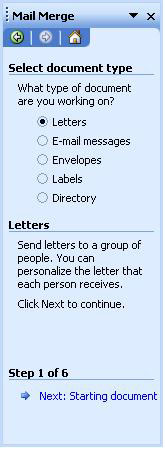
Select which type of document you want to use. As you select a document option, information about that type of document will appear below the list of options. You can use mail merge to create letters, e-mail messages, envelopes, labels, and directories (printed lists of addresses). When you have made your selection, click on the line at the bottom of the task pane (next to the arrow) that says Next: Starting document.
Step 2: Select a document to start with.
When you click on the link after Step 1, the task pane for the next step appears.
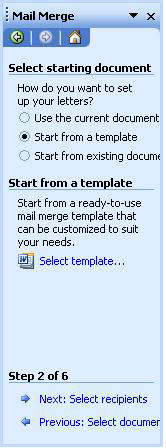
On this task pane, you have the choice of using the document you have open, using a template (see the lesson on "Templates and Wizards" for more information about templates), or using a document that already exists. For this lesson, we are going to use a template. After choosing Start from a template in the first section, we will click on the line in the second section that says Select template.... The Select Template dialog box will appear, already open to the Mail Merge tab section.
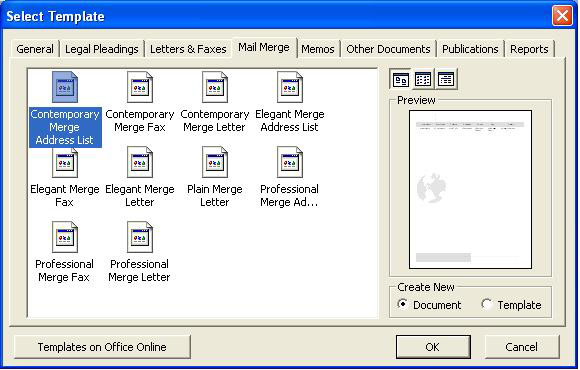
Click on each available file to see what it looks like in the Preview section. After you have chosen one template, click on the OK button. That template will be placed in your document.
To go on to Step 3, click on the line at the bottom of the task pane that says Next: Select recipients. (NOTE: In order to go on to Step 3 after choosing a template, the Step 2 task pane must have the Use the current document option selected.)
Step 3: Create a data file with the variables.
In the Step 3 task pane, your options are to use an existing list, use contacts from the Outlook application, or type a new list.
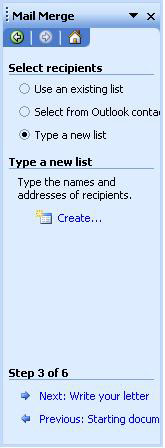
We are going to select Type a new list. Once we select that option, the line Create... appears in the second section of the task pane and we will click there. This will open the New Address List dialog box.
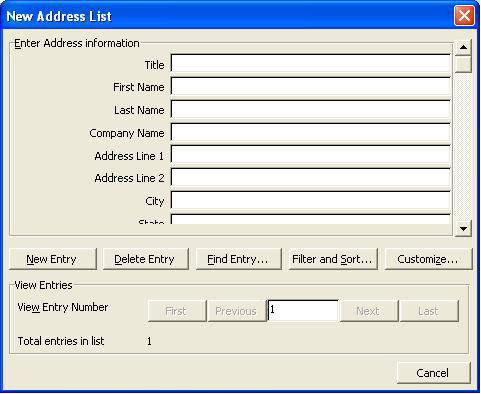
This is actually a type of database, a place to store information (see the Microsoft Access lessons for more information about databases). Each separate text box and label is a field. Each group of fields (information related to one person, for example) is called a record. To use this database, just enter the information. If you do not have all of the information asked for, leave those lines blank. When you have finished entering information for one person, click the New Entry button and enter the information for the next person. After you have entered information for two or more people, the First, Previous, Next and Last buttons will become available and will take you to those entries (records).
When you have finished entering information, click the Close button. If this is a new list (which it is, for our example), the Save Address List dialog box will open. Type a file name and click Save. Next, the Mail Merge Recipients dialog box will appear.

This is where you can sort your list by the different fields. Above each field column is the name of that field (Last Name, for example) - just click on that label to sort by that information in that column. (In our example, clicking on the Last Name field label sorted the list by last name, from A-Z.) Only the entries with a checkmark in the box will be sorted. Click on the OK button when you are finished sorting. (Note: The other buttons in this dialog box will not be covered in this lesson.)
When the Mail Merge Recipients dialog box closes, you are brought back to your document. This time the Use an existing list option on the Mail Merge task pane is selected - which is what we need, since the new list we created has been saved and is now "existing." To go on to Step 4, click on the line at the bottom of the task pane that says Next: Write your letter.
Step 4: Create the main document with the information that will not be changed.
In Step 4, you write your letter (or other document) and insert into it the field names so that the records you created can be merged into your document.

In the task pane, click on each line separately (Address block..., for example) and follow the directions in the dialog boxes to insert the fields. For example, clicking on Address block... will bring up the Insert Address Block dialog box.
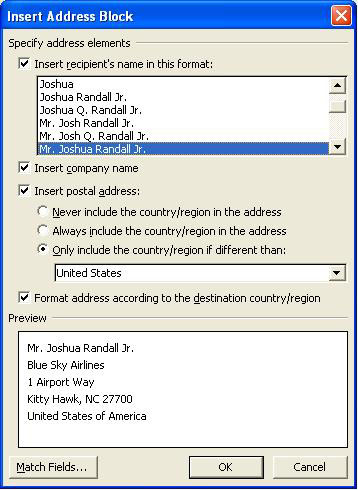
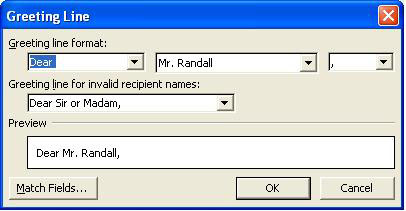
In this dialog box, we make the changes we want and then click the OKbutton. Next, click on Greeting line in the task pane and make changes in that dialog box, clicking OK when finished.
(Note: The other options listed in the task pane may or may not be needed for your mail merge and will not be covered in this lesson.)
After changing the address block and greeting line, type your letter. The templates tell you where you can insert your return address, the main body of the letter, your name and your title - simply click in those places and type the information.
When you have finished with Step 4, click on the line at the bottom of the task pane that says Next: Preview your letters.
Step 5: Merge the data file and the main document and check the results.
The Step 5 task pane looks like this:
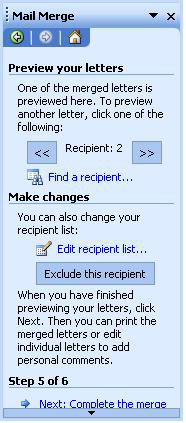
This is where the names and addresses on your recipient list are merged with the letter (or other document you have created). You can click on the arrows on the task pane to move from one letter to another to see the letters to each recipient. You can also make changes here, such as adding names and addresses to your recipient list or excluding one or more letters/recipients.
When you have finished with this step, click on the line at the bottom of the task pane that says Next: Complete the merge.
Step 6: Print the final document(s).
Step 6 is the final step. The task pane looks like this:
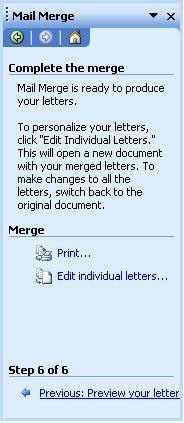
Here you can edit individual letters (for example, you can add a personal note to one or more people that will not appear on the other letters to other people) and print the letters.
At any time in this mail merge process, you can go back to a previous step by clicking the line at the bottom of the task pane that starts with Previous. If you want to save the file that contains all of the merged letters, you can do so (open the File menu and select Save As).
Practice: Open Word and start a new document. If you have an older version of Word, follow along with the steps in the section called Instructions for Older Versions of Word. If you have Word 2003, follow along with the steps in the section called Instructions for Word 2003. Enter information for at least two people when creating the data source (fictional information is fine). When you have finished, close the document(s) and Word, either with or without saving the merged letters (final output) document.
 Previous Page |
Next Page |