Previous Page |
 Next Page | |
 | ||
Previous Page |
Next Page | |
| ||
Lesson 9: Working with Tables
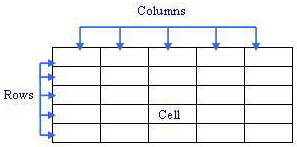
A table is a box that holds information in rows and columns. A cell is one place on a row in a column. Tables are used mainly when you want to organize information, especially numerical information. Here is an example of a blank table:
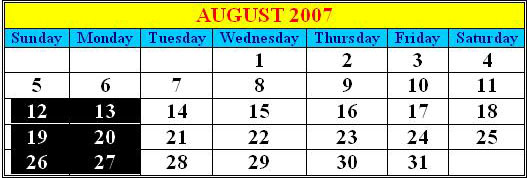
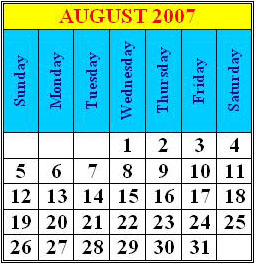
And here is an example of a table used for a calendar:
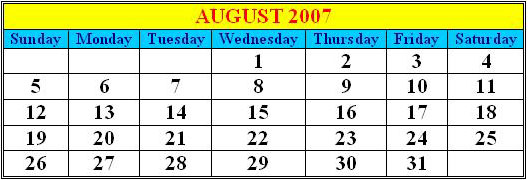
In the calendar example above, note that there are seven rows (horizontal) and seven columns (vertical). The first row has only one column that goes across (spans) the entire table. This is called cell merging and will be discussed later in this lesson.
To enter information in a table, simply left-click in a cell and start typing. You can change the font style, size and color, add bold or underline, and make any other changes to the text just as you can with any other text in a Word document.
While working with tables, these keyboard keys are used the most often:
| Enter | Add another line or start a new paragraph within a cell. | |
| Tab | Move to the next cell to the right or, if at the last cell on the right, down to the beginning cell of the next row. If at the last cell on the last row, Tab will add another blank row to the table. | |
| Arrow Keys | The left, right, up and down arrow keys will move left, right, up or down in the table. |
Insert a Table
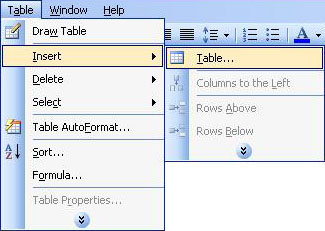
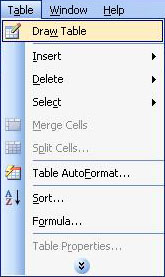
There is a special menu in Word for working with tables. To insert a table into your document, first place your cursor in the document where you want to insert the table (left-click once at that location). Next, open the Table menu, go to the Insert submenu and select Table.
The Insert Table dialog box will appear.
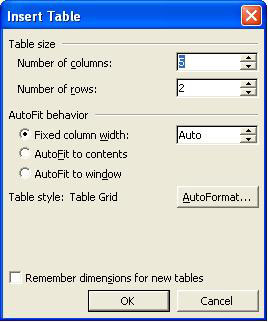
In the Table Size section, type the number of columns (vertical) and rows (horizontal) you want for your table. If you want the table to fit automatically, select one of the three options in the AutoFit Behavior section. The Fixed Column Width option will make all of the columns an equal width and the table will fill the width of the page. The AutoFit to Contents option will size the table according to the size of its contents. Finally, the AutoFit to Window option will size the table to fit in the document window.
AutoFormats are predesigned formats that you can use with your table. To see these AutoFormats, click on the AutoFormat button. The Table AutoFormat dialog box will appear.

Scroll through the list of available table styles to see the different options. After making your selection, click on the OK button. If you decide not to use one of the AutoFormats (you can create your own style instead), click on the Cancel button.
Selecting Rows, Columns, and Cells
While working with a table, at some point you may need to select one or more cells, an entire row, or an entire column. There are a couple ways to select rows, columns and cells in a table.
The first method is to use the Table menu. Place the cursor in the row, column or cell you want to select, then open the Table menu. Go to the Select submenu and select Row, Column, or Cell. (Select Table if you want to highlight the entire table.)

When using the Table menu to select rows, columns or cells, you can only select one row, column or cell at a time. When you need to select more than one row, column or cell, use the second method explained below.
The second way of selecting rows, columns and cells - and the only way to select more than one at a time - uses the mouse pointer. When you place the mouse pointer directly outside the table to the left of a row or above a column, the pointer turns into the shape of an arrow. It also changes into the shape of an arrow when it is placed just inside the left border of a cell. To select one row, column or cell, move the mouse pointer until it turns into an arrow to the left of the row, above the column, or just inside the cell you want to select, then left-click once. To select more than one row, column or cell do the same, but instead of left-clicking once, hold down the left mouse button and move the mouse until the rows, columns or cells you want to select are all highlighted, then release the left mouse button.
Insert Additional Rows and Columns
To insert additional rows and columns into your table, first place your cursor in the table. Next, open the Table menu, go to the Insert submenu and select Columns to the Left, Columns to the Right, Rows Above, Rows Below, or Cells.
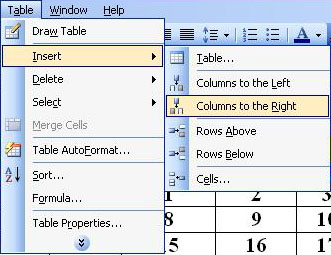
When you insert a row or column, it will be inserted in relation to where your cursor is. For instance, if you select Rows Above, one row will be inserted above where your cursor is. If you select Cells from the Insert submenu, the Insert Cells dialog box will appear.
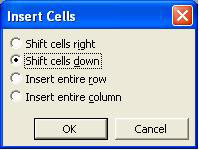
Select one of the options and click the OK button.
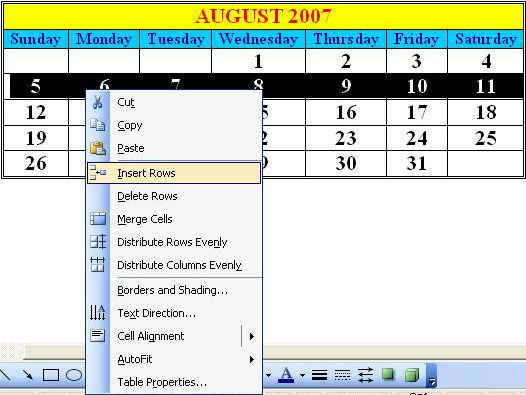
You can also use the right-click shortcut menu to insert rows and columns, but you cannot choose whether to place the inserted row or column above, below, left or right of the cursor - inserted rows will be placed above the current row and inserted columns will be placed to the left of the current column.
To insert a column or row using the right-click shortcut menu, first select the entire row or column. Next, right-click over the selected row or column and select either Insert Rows or Insert Columns, depending on whether you have selected a row or a column.
Delete Rows, Columns, or Cells
Deleting rows, columns or cells can mean one of two things: Deleting the contents only and leaving an empty row, column or cell in the table, or deleting the entire row, column or cell completely from the table.
To delete the entire contents of a row, column or cell only and leave the empty row, column or cell in the table, first select the contents of the row, column or cell. Next, press the Delete key on the keyboard. All of the information in the row, column or cell will be removed, but the row, column or cell will still remain in the table.
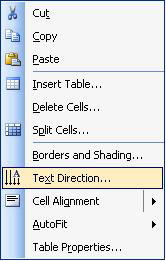
There are several ways to delete an entire row, column or cell completely from the table. First, select the row, column or cell. The first way to delete the entire row, column or cell is to press the Backspace key on the keyboard. Another way is to open the Tables menu, go to the Delete submenu, and select Columns, Rows, or Cells. A third way is to right-click over the selected row, column or cell and select Delete Rows, Delete Columns, or Delete Cells. A fourth way is to open the Edit menu and select Cut.
When you use any of the above methods to delete a row or column, the entire row or column will be removed from the table and the other rows and columns will fill up that empty space.
When you use any of the above methods to delete one or more cells, the Delete Cells dialog box will appear.
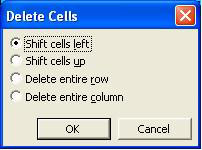
Choose one of the options and click the OK button.
Copying & Pasting Cells, Rows and Columns
You can use Copy & Paste to copy information from one cell to another, or to insert a new row or column with the same information. To copy information from one cell to another, select the cell contents you want to copy, open the Edit menu and select Copy, then left-click in the cell where you want the information to go, open the Edit menu and select Paste.
To insert a new row or column with the same information as another row or column, first select the entire row or column that you want to copy. Open the Edit menu and select Copy. Left-click in the row or column near where you want to insert the new row or column, open the Edit menu and select Paste. The row or column will be added (inserted) to the table.
Remember that you can always Undo your last task and revert the table (or document) to the way it was before your last action: Open the Edit menu and select Undo.
Adjust Row Heights and Column Widths
The height of the rows and the width of the columns can be changed. First, left-click in the row or column you want to change, then either open the Table menu and select Table Properties, or right-click and select Table Properties from the shortcut menu. The Table Properties dialog box will open.
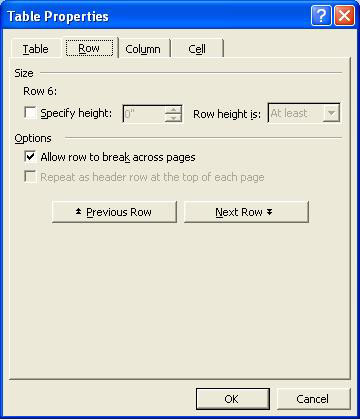
To change the height of one or more rows, click on the Row tab at the top of the dialog box. To change the width of one or more columns, click on the Column tab. Click on the "Specify Height" option and change the height in the box (Row tab section) or click on the "Preferred Width" option and change the width (Column tab section). When working with rows, you can make them At least or Exactly the height you specify. When working with columns, you can choose to use either Inches or Percent. You can easily move to the row or column properties of the other rows or columns by clicking on the Previous Row, Next Row, Previous Column or Next Column buttons to make height or width changes to those rows or columns. Click the OK button when you have finished making your changes.
Split and Merge Table Cells
To split a cell means to divide it into additional cells. To merge a cell means to combine cells. (For instance, in the calendar table example at the top of this page, the first row - "January 2007" - has all seven cells in that row merged into one.)
When either splitting or merging cells, first select the cell or cells you want to split or merge. Split cells by opening the Table menu and selecting Split Cells or right-clicking over the highlighted cell(s) and selecting Split Cells from the shortcut menu.

The Split Cells dialog box will appear.
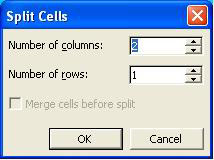
Enter the number of columns and rows you want the cell(s) split into. If you have selected more than one cell to split, you will have the option of merging the cells together first. If you do not choose this option, each individual cell will be split into the number of columns and rows you have entered. If you choose to merge the cells first, it will be treated as one cell and divided accordingly.
To merge cells together, first select the cells. Open the Table menu and select Merge Cells, or right-click over the highlighted cells and select Merge Cells from the shortcut menu. The selected cells will then become one cell spanning two or more columns.
Align Text Within Cells
You can align text within the cells by using the left-, right- and center-justified buttons on the toolbar, either before or after you type the text. (To align more than one cell at a time, select all of the cells at once and then click the toolbar button.) However, you can also align the text vertically within a cell if you want to.
To align text within a cell, first select one or more cells to be aligned, or select the whole table. Next, right-click over the selected cell(s) and open the Cell Alignment submenu on the shortcut menu.

Pictures of various alignment options will appear, showing text aligned left, center and right at the top of the cell (first row of options), in the middle of the cell (second row of options), and at the bottom of the cell (third row of options). Select one.
Note that if the cell height or width is small, the change may not be very noticeable. Vertical alignment becomes more noticeable in larger cells.
Change Text Direction Within Cells
Normally text is shown left-to-right (horizontally) in a cell. However, there is an option to change the text direction to up-and-down (vertically). First, select the text you want to change, or select one or more complete cells if you wish. Next, right-click over the highlighted text or cell(s) and select Text Direction from the shortcut menu.
The Text Direction - Table Cell dialog box will appear.
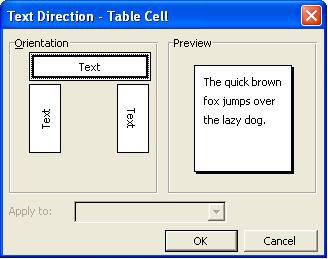
Click on one of the boxes in the Orientation section of the dialog box and see how the text will look in the Preview section. Click OK when you have made your choice. Below is an example of changed text direction.
Drawing a Table
You can draw your own table in a document instead of inserting one. This is used mostly when you want a table with odd rows, columns, and/or cell shapes and/or sizes. To draw a table yourself, open the Table menu and select Draw Table.
The Tables and Borders toolbar will appear.
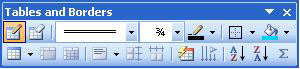
Move the mouse pointer over each toolbar button to see the name of the button. With this toolbar you can draw a table (even insert one, if you decide you would rather insert a table than draw one yourself), change the border line sizes and colors, add shading, change text direction, and many other tasks. Drawing a table is similar to using drawing tools to create lines in documents (see the lesson called "Using Drawing Objects") - just connect the lines to create your table.
Splitting a Table Across Pages
Sometimes a table needs to continue from one page to another. When that happens, you can split the table into two (or more) sections that have complete table borders. Simply select the row where you want to split the table, open the Table menu and select Split Table.
Sorting Columns and Rows
You can sort columns and rows by text, number or date, ascending (A-Z, 1-10, etc.) or descending (Z-A, 10-1, etc.). You can sort by three different criteria at once. For instance, if you had a table listing the names of children in a class (with the surnames and first names in separate columns) and their details, you could sort by surname (A-Z) first and first name second, both at one time. To sort, first select the rows and columns you want to sort. Next, open the Table menu and select Sort. The Sort dialog box will appear.
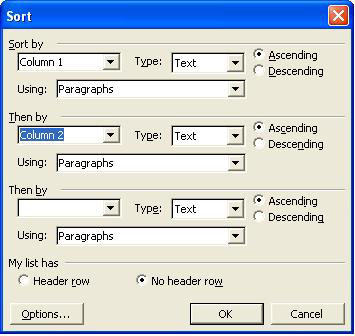
The columns and rows you have selected will be listed in the drop-down boxes under "Sort by" and "Then by." Choose which one you want to sort by first under "Sort by," second under the first "Then by," and third under the second "Then by." (For example, if you had a table of school children's names with the surnames in the first column and first names in the second column, you would select Column 1 under "Sort by" and Column 2 under the first "Then by.") Next to "Type," choose what type of content you are sorting by: text, numbers or dates. Choose either the Ascending (A-Z, 1-10) or Descending (Z-A, 10-1) option. ("Using" can remain Paragraphs.) If the cells you have highlighted contain a header row - a row of column titles, for example - or you have highlighted the whole table, choose either "Header row" or "No header row" under "My list has." For example, if your list of students says "Surname" above the first column of surnames and "First Name" over the second column of first names and you have highlighted the whole table, you would choose the "Header row" option. This is so that the titles will not be sorted along with the names. Click OK when you are ready to sort. If you decide after the sort that you want the table back the way it was before the sort, open the Edit menu and select Undo.
Table Borders & Shading (Background Colors)
Tables can have different borders and different backgrounds. In fact, individual cells can have different borders and backgrounds also. To change the borders and shading (background colors) of an entire table or individual cell(s), you can use either the Table menu or the right-click shortcut menu, but first select the entire table or just the cells you want to change. To use the Table menu, open it and select Table Properties, click on the Tables tab, and then click on the Borders and Shading button. To use the right-click shortcut menu, right-click over the table and select Borders and Shading (you can also select Table Properties and follow the instructions for using the Table menu). No matter which method you use, the Borders and Shading dialog box will appear.
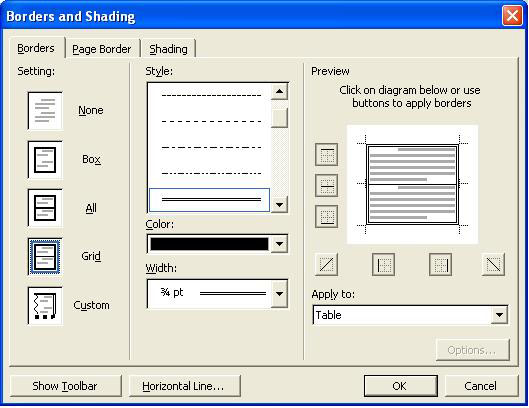
Click on the Borders tab to see the information about the table borders. On the left, in the "Setting" section, click on one of the images for the type of border you want. You can change the style, color and width of the table border line and choose whether to apply the changes to the entire table or just the cells you have selected. The Preview section will show you how the table will look when you click the OK button.
(NOTE: The Page Border tab section of the Borders and Shading dialog box is for placing borders around pages of documents, not around tables.)
To change the background color, first select the entire table or highlight the cells you want to change. Next, use one of the methods above to open the Borders and Shading dialog box. Click on the Shading tab.

In the Fill section, choose a background color by clicking on it. (To remove a color and return to the default background color, click on No Fill.) Click on the More Colors... button if you do not see the color you want listed and choose a new color. Choose a Pattern Style from the drop-down box in that section. Finally, select either Table or Cell from the "Apply to" drop-down box and click OK. If you decide immediately afterward that you want the table to revert back to the way it was before you made your changes, open the Edit menu and select Undo.
Converting Table to Text and Text to Table
You can convert a table into plain text and you can create tables from text if that text is separated by paragraphs, tabs, commas or other symbols.
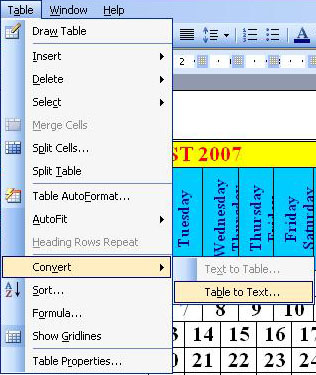
To convert a table to text, first select that table. Next, open the Table menu, go to the Convert submenu and select Table to Text.
The Convert Table to Text dialog box will appear.
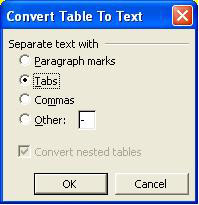
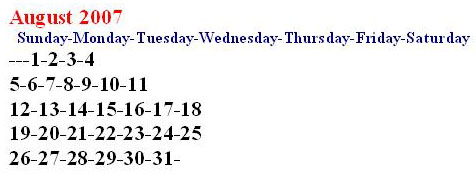
Choose how you want to separate the text (so that each cell is separated from another) and click the OK button. After converting our calendar table to text separated by hyphens (-), it looks like this:
To convert text into a table, it must be separated by paragraphs, tabs, commas or other symbol. First select the text you want to convert, then open the Table menu, go to the Convert submenu, and select Text to Table. The Convert Text to Table dialog box will appear.
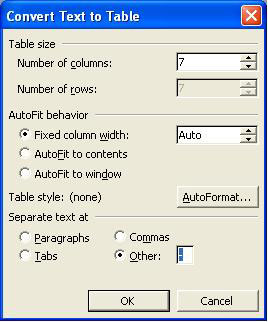
Change the number of rows and/or columns, if you need to, and the AutoFit if you wish. The most important part of this dialog box is the "Separate text at" section toward the bottom - you need to tell the computer how your text is separated so it knows what information to put into each cell. In our example, we used hyphens (-) to separate our cells, so we will choose the option called Other and enter a hyphen as the symbol. When you are ready to convert the text into a table, click OK.
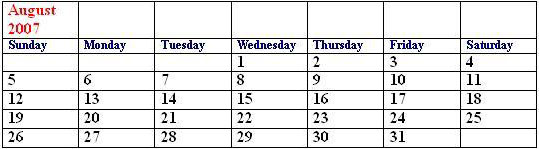
When you convert text into a table, you will need to merge cells and change the font and alignment to make the table look the way you want, but this method of converting text into a table is a lot easier than re-typing all of the information into a new table! Below is our calendar, converted back into a table after it was converted previously to text. Note that the cells of the first row (heading row) will need to be merged again and the heading ("August 2007") will need to be centered again.
Practice: Open Word and start a new document. Follow along with the information in each section of this lesson to become familiar with the different aspects of tables. Close the document and Word when you are finished, either with or without saving the document.
 Previous Page |
Next Page |