Previous Page |
 Next Page | |
 | ||
Previous Page |
Next Page | |
| ||
Lesson 4: Special Features
In this lesson, we will learn how to insert special characters and symbols, how to use superscript and subscript, how to hide and show non-printing characters, and how to apply case changes to text.
NOTE: You will need to have Microsoft Word open and either a blank document or a pre-existing document open. When you have finished with this page of lessons, you can close the document, with or without saving the changes.
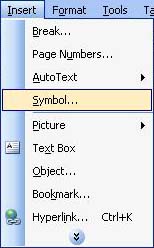
The standard keyboard contains many symbols such as punctuation marks and others, but there are hundreds, if not thousands, of different symbols that cannot fit on a keyboard. In Microsoft Word, you select Symbol from the Insert menu when you want to include a symbol in your document that is not on the keyboard.
The Symbol dialog box has two tabs: Symbols and Special Characters. The Symbols tab section is used to insert any type of symbol and the Special Characters tab section is used to insert certain characters such as the "em dash" and the ellipsis. You can add a symbol or character to AutoCorrect so that it will automatically be inserted into a document when you type certain keys (see lesson on AutoCorrect). You can even create shortcuts (by using the Ctrl or Alt keys, for example) for certain symbols and characters, but that is beyond the scope of this lesson (see Microsoft Word Help for more information).
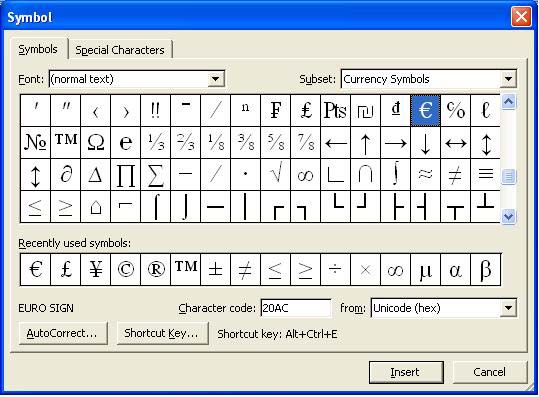
To insert a symbol, click on the Symbols tab. Each font type has its own set of symbols, although some fonts don't have any symbols. If you do not see the symbol you want in (normal text) in the "Font" drop-down box, you can scroll through the list to see the symbols of the other fonts. You can also change the "Subset" of the symbols by making a selection from that drop-down box. Subset types include Currency Symbols, General Punctuation, Arrows, Mathematical Operators, Geometric Shapes and many others. To insert a symbol, click on it in the dialog box and then click on the Insert button. Click the Close button when you have finished with the Symbol dialog box.
Certain characters such as the "em dash" (a long dash instead of the normal hyphen dash) and ellipsis (...) can be inserted from the Special Characters tab section.
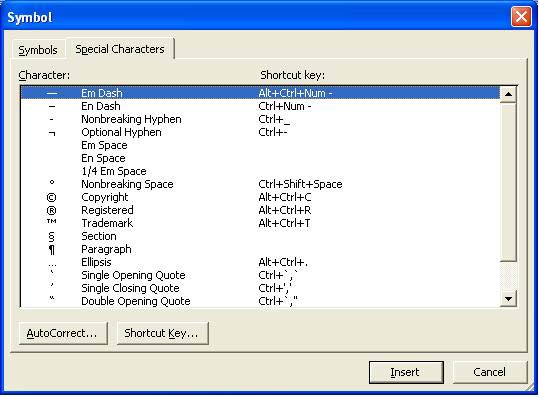
Again, click on the character symbol you wish to insert, then click on the Insert button. Click the Close button when you have finished with the Symbol dialog box.
Practice: Within a Word document, open the Insert menu and select Symbol. In the Symbols tab section of the Symbols dialog box, scroll through the different fonts and subsets and look at the different symbols available. Select one or two of the symbols and insert them into your document. Click on the Special Characters tab and select one or two characters to insert into your document. Click the Close button when you have finished.
Superscript is used to raise text to the top level of the line and subscript is used to lower text to the bottom level of the line. Here are some examples:
|
This is a line of text with superscript and subscript in it. 3rd of March 1st place ribbon 410 (4 to the 10th power) H2O Footnote1 |
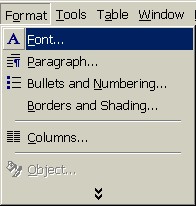
To make a word or character either superscript or subscript, type it first and then select it. Open the Format menu and select Font.
In the Font dialog box, select either the Superscript or the Subscript option and click the OK button.
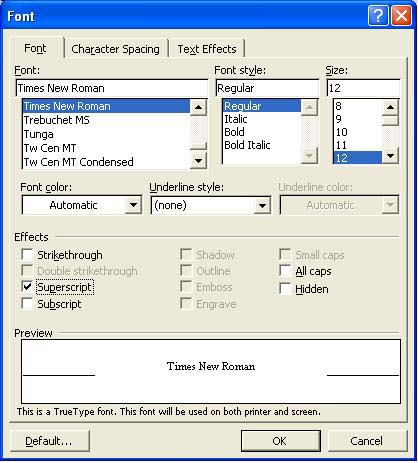
Practice: Within a Word document, type a sentence and then go back and select one word from that sentence. Open the Format menu and select Font. In the Font dialog box, place a checkmark in the Superscript option box and then click OK. Look at the word in your sentence. Repeat these steps with a different word, this time selecting the Subscript option.
Every time you press the Enter or Tab key on the keyboard, it is recorded in your document. Whether or not you can see these enter and tab characters depends on if your non-printing characters are showing. Non-printing characters are characters that are in your document, but will not print when you print your document.
The symbol for non-printing characters is the Paragraph symbol: 
When you click on this toolbar button, all of the non-printing characters in your document will appear. When you click on it again, these non-printing characters will be hidden. This is what a document looks like when the non-printing characters are showing:
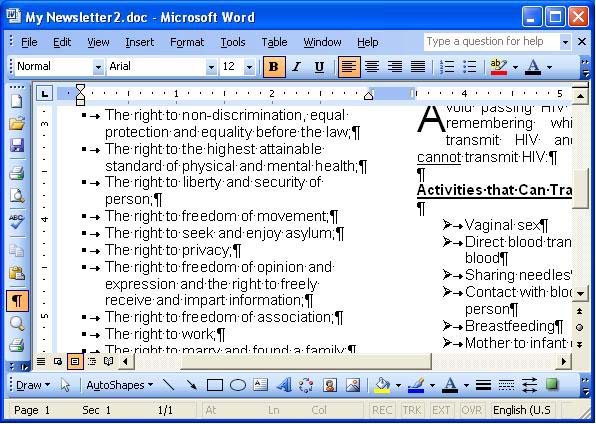
Some people like to have non-printing characters showing in their document to make it easier to make changes later. It can be very helpful, especially when deleting page and section breaks (see Lesson 3, Step 12: "Insert a Column, Section or Page Break"), to see those hidden non-printing characters. Once you can see the break character, you can easily delete it.
Practice: Within a Word document, click on the Non-Printing Characters toolbar button. (The more text and other objects the Word document has in it, the more interesting it will be when the non-printing characters can be seen.) When you have finished looking at the non-printing characters in the document, click on the toolbar button again to hide the non-printing characters.
NOTE: If you cannot find the Non-Printing Characters toolbar button on the Standard toolbar, see Lesson 5, "Display/Hide Toolbars and Add/Remove Toolbar Buttons".
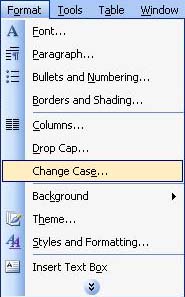
The case of a letter is whether it is capitalized (UPPERCASE) or not (lowercase). If you want to change the case of a letter or word but don't want to delete and retype it, you can use the Change Case feature.
First, select the word you want to change. Next, open the Format menu and select Change Case.
This will open the Change Case dialog box.
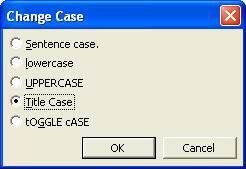
Within this dialog box, you can choose the case change option you want. Sentence Case will capitalize only the first letter. The Lowercase and Uppercase options will make the letter or word all lowercase or all UPPERCASE. Title Case will capitalize the first letter of each word. Toggle Case will reverse however the word is now. For example, if the word is "ToGgLe," the Toggle Case option will reverse it to "tOgGlE." After you make your selection in the Change Case dialog box, click the OK button.
Remember that you can use the Undo feature if you decide you don't like the changes you just made. (See previous lessons.)
Practice: Within a Word document, type your name, then go back and select it. Open the Format menu and select Change Case. Click on the first option and then the OK button, then notice how the capitalization of the letters in your name has or has not changed. Repeat these steps for the other options in the Change Case dialog box.
 Previous Page |
Next Page |