Previous Page |
 Next Page | |
 | ||
Previous Page |
Next Page | |
| ||
Step 3: Change the Page Setup.
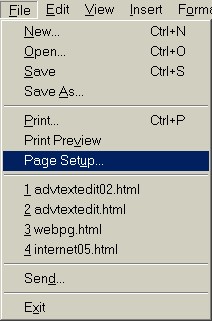
Page Setup is where you set the margins for your document, and where you decide which direction the document will print on the paper. To open the Page Setup dialog box, open the File menu and select Page Setup.
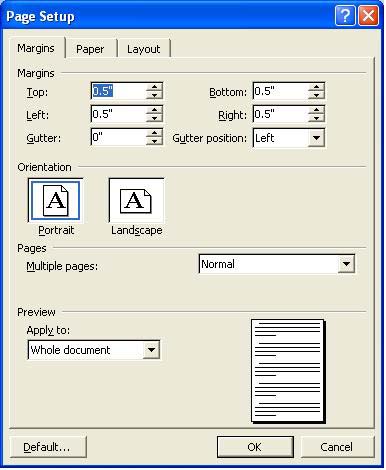
This will bring up a Page Setup dialog box similar to one of these:
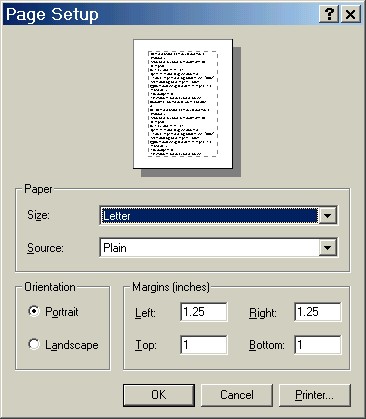
Page orientation is the way the document is printed on the paper. If you look at the picture directly above, you can see two small graphics under the word Orientation. One graphic shows the letter "A" on a piece of paper that is up and down, which is called Portrait. The second graphic shows the letter "A" on a piece of paper that is sideways, which is called Landscape. To choose a page orientation, click on the graphic.
To change the margins, just highlight the numbers that are in the top, bottom, left and right margin boxes and type your new margins numbers. (NOTE: Your margins may or may not be in inches, depending on your computer's settings.)
To change the paper size in older versions of Word, click the arrow for the drop-down box next to the word "Size" in the Paper section and choose the correct paper size. In Word 2003, click the tab at the top that says Paper and do the same with the drop-down box for paper there.
NOTE: There are other Page Setup features that will not be covered in this lesson.
For our newsletter, we are going to make the margins one inch in all four directions, and print in the Portrait page orientation.
Practice:
Open the File menu and select Page Setup. (In Word 2003, make sure you are in the Margins tab section by clicking on the word Margins at the top of the dialog box.) Check to see if the margins are in inches (if they are, there will be a " after each number). If the margins are in inches, change the top, bottom, left and right margins to 1. If the margins are not in inches, leave them as they are. In the Orientation section of the dialog box, make sure the Portrait graphic is selected. Click on the OK button to save the Page Setup changes. Click on the Save toolbar button (or open the File menu and select Save) to save all of the changes to your newsletter.
Step 4: Add a text box and change the background color.
Add a Text Box:
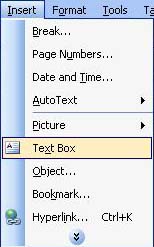
Now let's create a title for our newsletter. To do that, we are going to add a text box at the top of our page. To add a text box, open the Insert menu and select Text Box.
The mouse pointer will change shape. (In Word 2003, a box might appear saying "Create your drawing here." If so, just ignore it.) To create a text box, move the mouse pointer to where you want to start the text box, hold down the left mouse button, move the mouse down and toward the right until the box is the size you want, then release the left mouse button. In this case, we created the text box so that it goes from the left margin to the right margin.

Now let's add our title. Move the mouse pointer so that it is inside the text box and left-click once. The cursor will appear. Type your title.

Change the Background Color:
To change the background color of the text box, we need the Format Text Box dialog box. Move the mouse pointer over one of the border lines of the text box until the pointer turns into a four-way arrow. Right-click to display the shortcut menu and select Format Text Box.
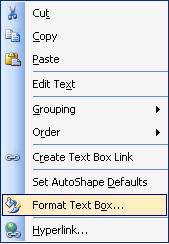
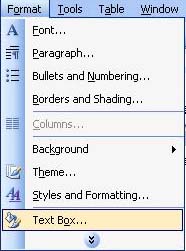
Alternatively, you can open the Format menu and select Text Box (but make sure you click somewhere inside the text box first).
Either method will open the Format Text Box dialog box, which looks similar to this:
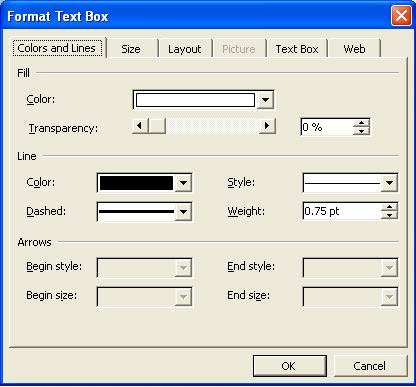
In the Colors and Lines tab section (the first one; click on the tab to view it if it is not showing already), you can change the background (fill) color of the text box and change the color of the border line surrounding the text box. You can also make that border line invisible (select No Line from the Color drop-down box in the Line section of the dialog box). We are going to change the background color of our newsletter title text box to yellow. To do this, select the color from the Color drop-down box in the Fill section of the dialog box.
Our newsletter now looks like this:

Practice: Follow the above instructions. Type Living with HIV inside the text box. Change the background color to yellow (or any other color). Save your document.
Move a Text Box:
To move a text box, move the mouse pointer over the text box until the pointer turns into a four-way arrow. (You may need to click once inside the text box first.) Next, hold down the left mouse button and move the mouse until the text box is in the new position, then release the left mouse button.
Resize a Text Box:
To resize a text box, first click somewhere along one of the borders of the text box. You will see sizing handles, which are little circles along the border. When you place the mouse pointer over one of these circles, the pointer will turn into an arrow showing in which direction the text box can be resized from that point (left-right, up-down, or a combination such as left-down or right-down). So, to resize a text box, place the mouse button over one of the sizing handles until the mouse pointer turns into the arrow showing the direction in which you want to resize the text box. Next, hold down the left mouse button and move the mouse until the text box is the correct size, then release the left mouse button.
Delete a Text Box:
There are a few ways to delete text boxes. One way is to click somewhere along the border of the text box until the sizing handles (circles along the border) are displayed and then pressing the Delete key on the keyboard. Another way is to click on one of the borders along the text box, open the Edit menu and select Cut. You can also right-click over a border of the text box and select Cut from the shortcut menu. If you delete a text box and immediately decide you made a mistake and want it back, open the Edit menu and select Undo to "undo" your last action of deleting the text box.
 Previous Page |
Next Page |